
4. Provisioning Template Management#
4.1. Templates Operations#
4.1.1. How to get all provisioning templates?#
Tested with FMG 7.2.2-INTERIM build 1247.
The following example shows how to get provisioning templates in the demo
ADOM:
{
  "id": 3,
  "method": "get",
  "params": [
    {
      "url": "/pm/template/adom/demo"
    }
  ],
  "session": "{{demo}}",
  "verbose": 1
}
{
  "id": 3,
  "result": [
    {
      "data": [
        {
          "name": "IPsec_Fortinet_Recommended",
          "oid": 4119,
          "template setting": {
            "option": "readonly",
            "stype": "_ipsec",
            "widgets": [
              "_ipsec"
            ]
          },
          "type": "template"
        },
        {
          "name": "BRANCH_IPsec_Recommended",
          "oid": 4123,
          "template setting": {
            "option": "readonly",
            "stype": "_ipsec",
            "widgets": [
              "_ipsec"
            ]
          },
          "type": "template"
        },
        {
          "name": "HUB_IPsec_Recommended",
          "oid": 4129,
          "template setting": {
            "option": "readonly",
            "stype": "_ipsec",
            "widgets": [
              "_ipsec"
            ]
          },
          "type": "template"
        },
        {
          "name": "BRANCH_BGP_Recommended",
          "oid": 4135,
          "template setting": {
            "option": "readonly",
            "stype": "router_bgp",
            "widgets": [
              "router_bgp"
            ]
          },
          "type": "template"
        },
        {
          "name": "HUB_BGP_Recommended",
          "oid": 4140,
          "template setting": {
            "option": "readonly",
            "stype": "router_bgp",
            "widgets": [
              "router_bgp"
            ]
          },
          "type": "template"
        },
        {
          "name": "SITES_BRANCH_IPsec",
          "oid": 4154,
          "scope member": [
            {
              "name": "dev_001",
              "vdom": "root"
            }
          ],
          "template setting": {
            "stype": "_ipsec",
            "widgets": [
              "_ipsec"
            ]
          },
          "type": "template"
        }
      ],
      "status": {
        "code": 0,
        "message": "OK"
      },
      "url": "/pm/template/adom/demo"
    }
  ]
}
4.1.2. How to get the list of used and modified provisioning templates?#
That’s how FortiManager GUI can show you that a Template Group has been modified
and explain why. For example, in the picture below, the sites Template Group
is marked with the Modified status. If you hover your mouse over the red
triangle icon, a tooltip appears with further details. You can see that two new
templates were added (an IPsec Tunnel Template named sites_BRANCH_IPsec and
an SD-WAN Template named sites_BRANCH_SDWAN), and the existing System
Template named sites_BRANCH_ST was also modified:

To gather this information, FortiManager GUI used the following API call:
{
  "id": 3,
  "method": "get",
  "params": [
    {
      "url": "/pm/config/adom/demo/_package/dirty_info"
    }
  ],
  "session": "{{session}}",
  "verbose": 1
}
{
  "id": 3,
  "result": [
    {
      "data": [
        {
          "oid": 42646,
          "templates": [
            {
              "objects": [
                {
                  "action": "edit",
                  "url": "fwmprof setting enforced version/FortiGate-40F"
                }
              ],
              "template": "fwmprof/PSIRT_Thu_Jul_17_2025"
            },
            {
              "objects": [
                {
                  "action": "edit",
                  "url": "fwmprof setting/42647"
                }
              ],
              "template": "fwmprof/PSIRT_Thu_Jul_17_2025"
            }
          ]
        },
        {
          "members": [
            {
              "action": "add",
              "url": "template/_ipsec/sites_BRANCH_IPsec"
            },
            {
              "action": "add",
              "url": "wanprof/sites_BRANCH_SDWAN"
            }
          ],
          "oid": 42650,
          "templates": [
            {
              "objects": [
                {
                  "action": "edit",
                  "url": "device profile settings/42654"
                }
           ],
              "template": "devprof/sites_BRANCH_ST"
            },
            {
              "objects": [
                {
                  "action": "edit",
                  "url": "device template widget action-list var-list/system dns/cache-notfound-responses"
                }
              ],
              "template": "devprof/sites_BRANCH_ST"
            },
            {
              "objects": [
                {
                  "action": "edit",
                  "url": "device template widget action-list var-list/system dns/dns-cache-limit"
                }
              ],
              "template": "devprof/sites_BRANCH_ST"
            },
            {
              "objects": [
                {
                  "action": "edit",
                  "url": "device template widget action-list var-list/system dns/dns-cache-ttl"
                }
              ],
              "template": "devprof/sites_BRANCH_ST"
            },
            {
              "objects": [
               {
                  "action": "edit",
                  "url": "device template widget action-list var-list/system dns/dns-over-tls"
                }
              ],
              "template": "devprof/sites_BRANCH_ST"
            },
            {
              "objects": [
                {
                  "action": "edit",
                  "url": "device template widget action-list var-list/system dns/domain"
                }
              ],
              "template": "devprof/sites_BRANCH_ST"
            },
            {
              "objects": [
                {
                  "action": "edit",
                  "url": "device template widget action-list var-list/system dns/primary"
                }
              ],
              "template": "devprof/sites_BRANCH_ST"
            },
            {
              "objects": [
                {
                  "action": "edit",
                  "url": "device template widget action-list var-list/system dns/retry"
                }
              ],
              "template": "devprof/sites_BRANCH_ST"
            },
            {
              "objects": [
                {
                  "action": "edit",
                  "url": "device template widget action-list var-list/system dns/secondary"
                }
              ],
              "template": "devprof/sites_BRANCH_ST"
            },
            {
              "objects": [
                {
                  "action": "edit",
                  "url": "device template widget action-list var-list/system dns/server-hostname"
                }
              ],
              "template": "devprof/sites_BRANCH_ST"
            },
            {
              "objects": [
                {
                  "action": "edit",
                  "url": "device template widget action-list var-list/system dns/ssl-certificate"
                }
              ],
              "template": "devprof/sites_BRANCH_ST"
            },
            {
              "objects": [
                {
                  "action": "edit",
                  "url": "device template widget action-list var-list/system dns/timeout"
                }
              ],
              "template": "devprof/sites_BRANCH_ST"
            },
            {
              "objects": [
                {
                  "action": "edit",
                  "url": "device template widget/dns/conf-sys-dns"
              }
              ],
              "template": "devprof/sites_BRANCH_ST"
            },
            {
              "objects": [
                {
                  "action": "edit",
                  "url": "system ntp/42659"
                }
              ],
              "template": "devprof/sites_BRANCH_ST"
            }
          ]
        },
       {
          "oid": 42681,
          "templates": [
            {
              "objects": [
                {
                  "action": "edit",
         "url": "system ntp/42659"
                }
              ],
     "template": "devprof/sites_BRANCH_ST"
            }
          ]
        }
      ],
      "status": {
        "code": 0,
        "message": "OK"
      },
      "url": "/pm/config/adom/demo/_package/dirty_info"
   }
  ]
}
4.1.3. How to CLI Preview a template?#
TBD.
Notes from #1222894:
7.6.4 and 7.6.5 are having different GUI features.
7.6.4/7.6.5:
The action is called Preview CLI Configuration. It is using this API
/securityconsole/template/cli/previewand looks like the assigned devices (scope) is optional.
7.6.5+/8.0.0:
The action is called Preview on Device. It is using this API
"/securityconsole/template/validateand assigned devices (scope) is required. It will provide a more accurate preview with meta variable replaced with mapping value; it will also process objects referenced in the template and add to the preview. Its like a dry-run of installation and provide a per device preview if there is no error.
4.1.4. How to validate a template?#
This is to make sure that all used metadata variables are resolved for the managed devices assigned to the template.
The following example shows how to trigger a template validation for the
template_group_001 Template Group assigned to the dev_001 managed device
in the demo:
{
  "id": 3,
  "method": "exec",
  "params": [
    {
      "data": {
        "adom": "demo",
        "flag": "json",
        "pkg": "adom/demo/tmplgrp/template_group_001",
        "scope": [
          {
            "name": "dev_001",
            "vdom": "root"
          }
        ]
      },
      "url": "securityconsole/template/validate"
    }
  ],
  "session": "{{session}}"
}
{
  "id": 3,
  "result": [
    {
      "data": {
        "task": 28
      },
      "status": {
        "code": 0,
        "message": "OK"
      },
      "url": "securityconsole/template/validate"
    }
  ]
}
4.2. How to get the controller status?#
Caught in:
#454555
#469731
#604197
It seems to be a non public API.
REQUEST:
{
  "method": "exec",
  "params": [
    {
      "url": "/deployment/get/controller/status",
      "data": {
        "adom": "...",
        "ctypes": ["fsw"],
        "device": "...",
        "options": ["savedb", "resync" ]
      }
    }
  ],
  "session": "...",
  "id": 1
}
We can also add wtp or fext as other ctypes.
4.3. Firmware Template#
4.3.1. Introduction#
Caught in #711918.
Main FMG JSON RPC API url for firmware template seems to be:
/um/image/template/upgrade
4.3.2. How to assign a device?#
Caught in #964977.
{
  "id": 3,
  "method": "add",
  "params": [
    {
      "data": [
        {
          "name": "dc_emea_001",
          "vdom": "root"
        }
      ],
      "url": "/pm/fwmprof/adom/dc_emea/fmw_001/scope member"
    }
  ],
  "session": "{{session}}"
}
{
  "id": 3,
  "result": [
    {
      "status": {
        "code": 0,
        "message": "OK"
      },
      "url": "/pm/fwmprof/adom/dc_emea/fmw_001/scope member"
    }
  ]
}
4.3.3. How to get an Upgrade Preview for Firmware Template?#
Caught in #1076332.
This is useful for reviewing which devices will require an upgrade.
The following example demonstrates how to retrieve an upgrade preview for the
firmware_template_001 Firmware Template within the demo ADOM:
{
  "id": 3,
  "method": "exec",
  "params": [
    {
      "data": {
        "adom": "demo",
        "name": "firmware_template_001"
      },
      "url": "/um/image/template/preview"
    }
  ]
}
{
  "id": 3,
  "result": [
    {
      "data": {
        "report": {
          "adom-name": "demo",
          "adom_oid": 38741,
          "device-number": 1,
          "devices": [
            {
              "end-time": 1732884824,
              "name": "fgt-001",
              "oid": 39590,
              "package-status": 1,
              "skip-path": 0,
              "start-time": 0,
              "taskid": 0,
              "tasks": [
                {
                  "current_version": "7.6.0-b3401",
                  "package-status": 1,
                  "platform": "FortiGate-VM64",
                  "product": 1,
                  "profile_name": "firmware_template_001",
                  "result": 0,
                  "serial": "FGVMMLREDACTED39",
                  "target_version": "7.4.4-b2662",
                  "upgrade_path": [
                    "7.4.4-b2662"
                  ]
                }
              ]
            }
          ],
          "end-time": 1732884824,
          "name": "firmware_template_001",
          "report-time": 1732884824,
          "start-time": 0,
          "success-number": 0,
          "taskid": 0
        },
        "status": "success",
        "taskid": 0
      },
      "status": {
        "code": 0,
        "message": "OK"
      },
      "url": "/um/image/template/preview"
    }
  ]
}
Note
In this example, the fgt-001 device will require an upgrade.
However, considering the current_version and target_version
attributes, this would actually result in a downgrade.
Regardless of the scenario, the upgrade_path attribute will
outline the steps required to reach the target version.
4.3.4. How to get an Upgrade Report for Firmware Template?#
Caught in #0919211.
To get the Upgrade Report generated by the to_fgt_740 Firmware Template in the dc_emea ADOM:
{
  "id": 3,
  "method": "exec",
  "params": [
    {
      "data": {
        "adom": "dc_emea",
        "name": "fgt_to_740"
      },
      "url": "um/image/template/report"
    }
  ],
  "session": "{{session}}"
}
{
  "id": 3,
  "result": [
    {
      "data": {
        "report": [
          {
            "adom-name": "dc_emea",
            "adom-oid": 165,
            "device-number": 1,
            "devices": [
              {
                "end-time": 1700776054,
                "name": "fgt-741-001",
                "oid": 175,
                "package-status": 0,
                "skip-path": 1,
                "start-time": 1700775638,
                "taskid": 9,
                "tasks": [
                  {
                    "current_version": "7.4.1-b2463",
                    "package-status": 0,
                    "platform": "FortiGate-VM64",
                    "product": 1,
                    "profile_name": "fgt_to_740",
                    "result": 0,
                    "serial": "FGVMMLTM22002647",
                    "target_version": "7.4.0-b2360",
                    "upgrade_path": [
                      "7.4.0-b2360"
                    ]
                  }
                ]
              }
            ],
            "end-time": 1700776054,
            "name": "fgt_to_740",
            "report-time": 1700776054,
            "start-time": 1700775638,
            "success-number": 1,
            "taskid": 9
          }
        ]
      },
      "status": {
        "code": 0,
        "message": "OK"
      },
      "url": "um/image/template/report"
    }
  ]
}
Note
In this output, there’s a single Upgrade Report.
Note
To get the upgrade reports for your managed devices, see section How to get the Upgrade Report for managed devices?.
4.3.5. How to list Firmware Templates?#
The following example shows how to retrieve the list of firmware templates for
the demo ADOM:
{
  "id": 3,
  "method": "get",
  "params": [
    {
      "url": "/pm/fwmprof/adom/demo"
    }
  ],
  "session": "{{session}}"
}
{
  "result": [
    {
      "data": [
        {
          "fwmprof setting": {
            "checksum": "1719401524-418766485",
            "description": null,
            "enforced version": [
              {
                "flags": 0,
                "platform": "FAP-Default",
                "product": 2,
                "upgrade-path": 1,
                "version": "7.0.3-b0060"
              },
              {
                "flags": 0,
                "platform": "FSW-Default",
                "product": 3,
                "upgrade-path": 1,
                "version": "7.0.5-b0086"
              },
              {
                "flags": 0,
                "platform": "FXT-Default",
                "product": 4,
                "upgrade-path": 1,
                "version": "7.2.5-b0164"
              },
              {
                "flags": 0,
                "platform": "FGT-Default",
                "product": 1,
                "upgrade-path": 1,
                "version": "7.0.15-b0632"
              }
            ],
            "image-source": 0,
            "schedule-day": 0,
            "schedule-end-time": null,
            "schedule-start-time": null,
            "schedule-type": 0
          },
          "name": "firmware_template_001",
          "oid": 4458,
          "type": "fwmprof"
        }
      ],
      "status": {
        "code": 0,
        "message": "OK"
      },
      "url": "/pm/fwmprof/adom/demo"
    }
  ],
  "id": 3
}
Note
In this output, the firmware template includes samples of all supported products using the default platform config values.
4.3.6. How to create a new Firmware Template?#
The following example shows how to create the firmware_template_001 Firmware
Template in the demo ADOM. In this example, dev_001 is being assigned
to the template at the time of creation.
{
  "id": 3,
  "method": "add",
  "params": [
    {
      "data": {
        "fwmprof setting": {
          "description": "This is the description field data.",
          "enforced version": [
            {
              "flags": 104,
              "platform": "FGT-Default",
              "product": 1,
              "upgrade-path": 1,
              "version": "7.2.11-b1740"
            }
          ],
          "image-source": null,
          "schedule-day": null,
          "schedule-end-time": null,
          "schedule-start-time": null,
          "schedule-type": 0
        },
        "name": "firmware_template_001",
        "type": "fwmprof",
        "scope member": [
          {
            "name": "dev_001",
            "vdom": "root"
          }
        ]
      },
      "url": "pm/fwmprof/adom/demo"
    }
  ],
  "session": "{{session}}"
}
Note
fwmprof setting: defines the firmware template settings. The possible attributes are:schedule-day: specifies the day(s) of the week when the upgrade task is scheduled to run and is only valid when theweeklyschedule type is selected.The value is submitted as an array of strings that specify the day of the week. For example, to schedule the upgrade task to run every Monday, Wednesday, and Friday, the value would be:
"schedule-day": [
  "monday",
  "wednesday",
  "friday"
]
schedule-end-time: specifies the end time for the upgrade task schedule. It is required when the schedule type is set toonce,daily, orweekly. The value must be submitted as a 24-hour date/time formatted string for theonceschedule type (e.g.,2024-12-31 23:59:00) or as a 24-hour time formatted string for thedailyandweeklyschedule types (e.g.,23:59:00).schedule-start-time: specifies the start time for the upgrade task schedule. It is required when the schedule type is set toonce,daily, orweekly. The value must be submitted as a 24-hour date/time formatted string for theonceschedule type (e.g.,2024-12-31 23:59:00) or as a 24-hour time formatted string for thedailyandweeklyschedule types (e.g.,23:59:00).schedule-type: defines the schedule for the upgrade task. The supported schedule types include:none: the upgrade task will not be scheduled to run automatically. Start and end times are not required for this schedule type.once: the upgrade task will run only once at the specified start time. Start and end times are required and must be submitted as a 24-hour date/time formatted string.For example:
2024-12-31 23:59:00.daily: the upgrade task will run every day at the specified start time. Start and end times are required and must be submitted as a 24-hour time formatted string.For example:
23:59:00.weekly: the upgrade task will run on the specified days of the week at the specified start time. Start and end times are required and must be submitted as a 24-hour time formatted string as with thedailyschedule type. Theschedule-dayattribute is also required for this schedule type to specify the day(s) of the week when the upgrade task should run.
image-source: specifies the source of the firmware image. The supported values include:0: image sourced from FortiGuard1: image sourced from FortiManagernull: defaults to0
namespecifies the name of the firmware template.enforced_version: specifies the firmware version enforced for devices assigned to the firmware template. This attribute is an array of objects that specifies the firmware version enforced for each of the devices assigned to the template.platform: specifies the platform for which the firmware version is enforced. Values must include a valid hardware platform supported by FortiManager that is in the range defined by theproductattribute. For example, if theproductattribute is set to1(FortiGate), valid values for theplatformattribute include:FortiGate-40FFortiGate-60FFortiGate-VM64FGT-Default(this is a special value that can be used to apply the enforced firmware version to any FortiGate platform)
A list of supported platforms can be retrieved using the following FortiManager CLI command:
diagnose dvm supported-platforms list`
product: specifies the product for which the firmware version is enforced:1: FortiGate2: FortiSwitch3: FortiAP4: FortiExtender5: FortiExtender-Modem
flags: specifies additional options for the enforced firmware version. Most flags apply only to the FortiGate platform. The value is calculated by summing the numeric values of the enabled flags:Firmware Template Enforced Version Flags# Flag
Description
Numeric Value
Boot from Alternate Partition After upgrade
Boot to secondary partition after upgrade
1Only upgrade FortiGate Clusters with all members up
Upgrade HA clusters only when all members up
8Skip Fortigate Disk Check
Skip the auto disk check during upgrade
32Skip FortiGate Auto Scan Disk
Skip disk auto scan during upgrade
64The default value is
104and is calculated by combining the numeric values of the following flags: -Only Upgrade FortiGate Clusters with all members up(8) -Skip Fortigate Disk Check(32) -Skip FortiGate Auto Scan Disk(64)Total is giving
104(8 + 32 + 64).
4.4. Certificate Template#
4.4.1. How to create a Certificate Template?#
When a Certificate Template is created, FortiManager also generates a Dynamic Local Certificate with the same name. The Certificate Template is used for enrolling certificates for managed devices, while the corresponding Dynamic Local Certificate enables referencing the device certificate within ADOM DB objects. Each time a Certificate Template is used to enroll a certificate for a managed device, FortiManager creates a new device-specific mapping (aka per-device mapping) in the Dynamic Local Certificate with the same name.
4.4.1.1. How to create an external Certificate Template?#
The following example shows how to create the certificate_template_001
Certificate Template in the demo ADOM:
{
  "id": 3,
  "method": "add",
  "params": [
    {
      "data": {
        "name": "certificate_template_001",
        "id-type": 0,
        "organization-unit": [
          "CSE"
        ],
        "organization": "Fortinet",
        "city": "Nice",
        "state": "PACA",
        "country": "FR",
        "email": "",
        "key-type": 0,
        "key-size": 3,
        "curve-name": 0,
        "scep-server": "https://10.0.0.1/app/cert/scep",
        "scep-password": "fortinet",
        "scep-ca-identifier": "ca_crt",
        "type": 0,
        "digest-type": 0
      },
      "url": "/pm/config/adom/demo/obj/certificate/template"
    }
  ],
  "session": "{{session}}"
}
4.4.1.2. How to create a local Certificate Template?#
The following example shows how to create the certificate_template_002
Certificate Template in the demo ADOM:
{
  "id": 3,
  "method": "add",
  "params": [
    {
      "data": {
        "city": "Nice",
        "country": "FR",
        "name": "certificate_template_001",
        "organization": "FTNT",
        "organization-unit": "CSE",
        "state": "PACA",
        "type": "local"
      },
      "url": "/pm/config/adom/demo/obj/certificate/template"
    }
  ],
  "session": "{{session}}"
}
{
  "id": 3,
  "result": [
    {
      "data": {
        "name": "certificate_template_002"
      },
      "status": {
        "code": 0,
        "message": "OK"
      },
      "url": "/pm/config/adom/ademo/obj/certificate/template"
    }
  ]
}
4.4.2. How to enroll a certificate using a Certificate Template?#
The following example demonstrates how to enroll a certificate for the
dev_001 managed device in the demo ADOM using
certificate_template_001 Certificate Template.
{
  "id": 3,
  "method": "exec",
  "params": [
    {
      "data": {
        "adom": "demo",
        "scope": [
          {
            "name": "dev_001",
            "vdom": "root"
          }
        ],
        "template": "certificate_template_001"
      },
      "url": "/securityconsole/sign/certificate/template"
    }
  ],
  "session": "{{session}}"
}
Note
When you debug FortiManager using the following CLI:
diagnose debug service main 255
diagnose debug enable
you can see that the template value is a full path to the
Certificate Template [1]:
Request [gui webforward:2911:fbce18d1-bda7-4ff9-9353-01a85adf7eeb]:
{ "client": "gui webforward:2911", "id":
"fbce18d1-bda7-4ff9-9353-01a85adf7eeb", "keep_session_idle": 1,
"method": "exec", "params": [{ "data": { "adom": "demo",
"scope": [{ "name": "dev_001", "vdom": "root"}], "template": "adom\/
demo\/obj\/certificate\/template\/certificate_template_001"},
"url": "\/securityconsole\/sign\/certificate\/template"}],
"session": 59590}
{
  "id": 3,
  "result": [
    {
      "data": {
        "task": 4935
      },
      "status": {
        "code": 0,
        "message": "OK"
      },
      "url": "/securityconsole/sign/certificate/template"
    }
  ]
}
After the task is completed, FortiManager saves the generated certificate in the managed device’s Device DB, using the Certificate Template name as the certificate object’s name. It also creates a per-device mapping entry in the Dynamic Local Certificate that is automatically generated with the Certificate Template.
The enrolled certificate stored in the dev_001 Device DB can be retrieved
using the following request:
{
  "id": 3,
  "method": "get",
  "params": [
    {
      "url": "/pm/config/device/demo/vdom/root/vpn/certificate/local/certificate_template_001"
    }
  ],
  "session": "{{session}}",
  "verbose": 1
}
Note
You can see that FortiManager created the certificate object using the
Certificate Template name (certificate_template_001).
{
  "id": 3,
  "result": [
    {
      "data": {
        "_certinfo": {
          "is_ca": 0,
          "issuer": "O = Fortinet Ltd., CN = Fortinet",
          "negsn": 0,
          "serial": "11:f1:48:3a:06:9d:67:d4",
          "subject": "C = FR, ST = PACA, L = Nice, O = FTNT, OU = CSE, CN = adom_72_001_dev_001.root",
          "subject_parsed": {
            "C": "FR",
            "CN": "adom_72_001_dev_001.root",
            "L": "Nice",
            "O": "FTNT",
            "OU": "CSE",
            "ST": "PACA"
          },
          "validfrom": "2022-08-22 17:37:44  GMT",
          "validto": "2032-08-26 17:37:44  GMT",
          "version": 1
        },
        "acme-ca-url": "https://acme-v02.api.letsencrypt.org/directory",
        "acme-domain": null,
        "acme-email": null,
        "acme-renew-window": 30,
        "acme-rsa-key-size": 2048,
        "auto-regenerate-days": 0,
        "auto-regenerate-days-warning": 0,
        "ca-identifier": null,
        "certificate": "-----BEGIN CERTIFICATE-----\nMIIDIDCCAggCCBHxSDoGnWfUMA0GCSqGSIb3DQEBBQUAMCsxFjAUBgNVBAoTDUZv\ncnRpbmV0IEx0ZC4xETAPBgNVBAMTCEZvcnRpbmV0MB4XDTIyMDgyMjE3Mzc0NFoX\nDTMyMDgyNjE3Mzc0NFowazELMAkGA1UEBhMCRlIxDTALBgNVBAgTBFBBQ0ExDTAL\nBgNVBAcTBE5pY2UxDTALBgNVBAoTBEZUTlQxDDAKBgNVBAsTA0NTRTEhMB8GA1UE\nAxQYYWRvbV83Ml8wMDFfZGV2XzAwMS5yb290MIIBIjANBgkqhkiG9w0BAQEFAAOC\nAQ8AMIIBCgKCAQEAp87wNOEOqm/+uc6vCQNL6cH5U9bMOxfZ0kmXHOui5pXeex+4\nr9Q2JoIkU+osWXwJXOuxDYCcK3ol6+5gX6Y60iPqfRS7VOXgNGd+z36r8hxIZjTe\neaNzHvml1nfxMwqALzf4wRn4zTB2GLJouV4RF8fxv4u0ockseDOnW07HVEPwv+ET\n1B7pxXMKh3RcnN630zETlLVFJ35kEf879iqC+Ony6pA0CtVdQTAdBCxxNaFVUjGK\nKaqWVx2yAjYp2eHl5e7mU0JEMCgOTS5A5mYqmevj04hw9s+LrvE4bshjq/eUdMSe\nQltZ2T9TP3dEWr8QSdu6wwq4EpP0Af/hK8k48QIDAQABow0wCzAJBgNVHRMEAjAA\nMA0GCSqGSIb3DQEBBQUAA4IBAQBN6qsjHJTFx0KGS/+VKuHkShC3vDgfUzn/qWcP\nnpkgUtU48JWIQSv4QVLtiLa+qfHnFv6TbQfVD/qcaDncdV2HE7F85po9QwyAf7ec\nqGcQw000qiojjMVsmt7abqiebJBJp8OtBdJutYv3OH1AtvIOV+Enj0YXPCtWzV9y\n2BMySPvYVA8VBJNbOfJE6QoTP/ZhR+xjHen6fPqOchjJXIAidIIOeVpH5msuSLuk\nk2F6K2Pow5gyvpgv/gwMMn+XZ2AzWKGfr2j1QXRVO9fHyNNB5e6RtQ+fJZgpLHh/\n8+zE6lSSUjvdPBM6t+4gvrun08trkdHzT3FSs5rWoqR2tMdS\n-----END CERTIFICATE-----",
        "cmp-path": null,
        "cmp-regeneration-method": "keyupate",
        "cmp-server": null,
        "cmp-server-cert": [],
        "comments": null,
        "csr": null,
        "enroll-protocol": "none",
        "extension": [
          {
            "content": "CA:FALSE",
            "critical": 0,
            "name": "X509v3 Basic Constraints"
          }
        ],
        "ike-localid": null,
        "ike-localid-type": "asn1dn",
        "last-updated": 0,
        "name": "certificate_template_001",
        "name-encoding": "printable",
        "oid": 3172,
        "password": [
          "ENC",
          "7ENU9ioxcoKvKJDeKgih/bzn7Wa+n3Oq64tpOtwsTXbdAzmaGtJx7AlTJNYcUdBk2/T3RX9tgiWPqSHWGAPKuIe4IuKOIeDWdtrcFvuY/SHTUk+rZ5ACIP2g9DgZ2Dk+AreXnXtzUEkTBws65+gCn3GuNae9vR1NN53E/HI9vI7VVF8+"
        ],
        "private-key-retain": "disable",
        "range": "global",
        "scep-url": null,
        "source": "user",
        "source-ip": "0.0.0.0",
        "state": null,
        "tmp-cert-file": null
      },
      "status": {
        "code": 0,
        "message": "OK"
      },
      "url": "/pm/config/device/dev_001/vdom/root/vpn/certificate/local/certificate_template_001"
    }
  ]
}
Note
The private-key cannot be exposed using the FortiManager API.
4.4.3. How to assign a Certificate Template to a managed device?#
When the managed device is already with a certificate not enrolled by the Certificate Template (for instance by uploading a certificate in the device Device DB - see How to upload a certificate?), and you still want to be able to refer to that certificate in some applicable ADOM DB objects, you can still decide to add a per-device mapping entry in the Dynamic Local Certificate which was automatically generated with the Certificate Template.
In fact, you have to assign the corresponding Dynamic Local Certificate which is
having the same name as the Certiticate Template. The following example shows
how to assign the certificate_template_001 Dynamic Local Certificate to
the dev_001 managed device in the demo ADOM:
{
  "id": 3,
  "method": "add",
  "params": [
    {
      "data": [
        {
          "_scope": {
            "name": "dev_001",
            "vdom": "root"
          },
          "local-cert": "cert_001"
        }
      ],
      "url": "/pm/config/adom/demo/obj/dynamic/certificate/local/certificate_template_001/dynamic_mapping"
    }
  ],
  "session": "{{session}}"
}
Note
The local-cert attribute should refer to an existing certificate in
the dev_001 Device DB.
certificate_template_001 is the name of the Dynamic Local
Certificate object. It shares the same name as the Certificate
Template because FortiManager automatically creates the Dynamic Local
Certificate when the Certificate Template is created.
{
  "id": 3,
  "result": [
    {
      "data": {
        "_scope": [
          {
            "name": "dev_001",
            "vdom": "root"
          }
        ]
      },
      "status": {
        "code": 0,
        "message": "OK"
      },
      "url": "/pm/config/adom/demo/obj/dynamic/certificate/local/certificate_template_001/dynamic_mapping"
    }
  ]
}
Note
The list of existing assigned managed devices is preserved.
4.4.4. How to unassign a Certificate Template to a managed device?#
In fact, you have to unassign the corresponding Dynamic Local Certificate which
is having the same name as the Certiticate Template. The following example
shows how to unassign the certificate_template_001 Dynamic Local Certificate
from the dev_001 managed device in the demo ADOM:
{
  "id": 3,
  "method": "delete",
  "params": [
    {
      "url": "/pm/config/adom/demo/obj/dynamic/certificate/local/certificate_template_001/dynamic_mapping/dev_001/root"
    }
  ],
  "session": "{{session}}"
}
{
  "id": 3,
  "result": [
    {
      "status": {
        "code": 0,
        "message": "OK"
      },
      "url": "/pm/config/adom/demo/obj/dynamic/certificate/local/certificate_template_001/dynamic_mapping/dev_001/root"
    }
  ]
}
Note
The list of existing assigned managed devices is preserved.
4.5. System Template#
4.5.1. How to get list of system templates?#
We want the list of system templates in ADOM DEMO_009.
REQUEST:
{
  "id": 1,
  "jsonrpc": "1.0",
  "method": "get",
  "params": [
    {
      "url": "pm/devprof/adom/DEMO_009"
    }
  ],
  "session": "PvxNZ0qnX2vWunu8n7wg7PfygD7e5aNKODztfQ+9Du80tr7OZMelMPAx+ad2I7Xh/u8bucNnhdwGMMUYjfT03A==",
  "verbose": 1
}
RESPONSE:
{
  "id": 1,
  "result": [
    {
      "data": [
        {
          "description": "",
          "enabled options": [
            "dns",
            "ntp",
            "email",
            "admin",
            "snmp",
            "repmsg",
            "ftgd",
            "log",
            "interface",
            "router",
            "combined"
          ],
          "name": "default",
          "oid": 4794,
          "type": "devprof"
        },
        {
          "description": "",
          "enabled options": [
            "admin",
            "interface"
          ],
          "name": "sys_template",
          "oid": 4802,
          "scope member": [
            {
              "name": "hub2"
            }
          ],
          "type": "devprof"
        }
      ],
      "status": {
        "code": 0,
        "message": "OK"
      },
      "url": "pm/devprof/adom/DEMO_009"
    }
  ]
}
4.5.2. How to clone a System Template?#
Caught in #0624808.
It is possible to clone the following kind of templates:
pm/devprof/adom/<adom>/<template>pm/ecprof/adom/<adom>/<template>pm/crprof/adom/<adom>/<template>pm/wanprof/adom/<adom>/<template>
REQUEST:
{
  "id": 1,
  "jsonrpc": "1.0",
  "method": "clone",
  "params": [
    {
      "data": {
        "name": "cloned-system-template-001"
      },
      "url": "/pm/devprof/adom/DEMO_013/system-template-001"
    }
  ],
  "session": "a2vokc0TuCVM73XKIE3YvVAeTpDLABEphNWBE93T9z9WVUJOiE9fLxRJrumlI1kbasQqjMQnAYUo3JTL96+wVQ==",
  "verbose": 1
}
RESPONSE:
{
  "id": 1,
  "result": [
    {
      "status": {
        "code": 0,
        "message": "OK"
      },
      "url": "/pm/devprof/adom/DEMO_013/system-template-001"
    }
  ]
}
4.5.3. System Template Assignment#
4.5.3.1. How to get assigned devices for a particular System Template?#
We get the list of assigned devices for System Template branches from ADOM
root:
REQUEST:
{
  "id": 3,
  "method": "get",
  "params": [
    {
      "fields": [
        "type",
        "scope member",
        "description",
        "enabled options"
      ],
      "url": "pm/devprof/adom/root/branches"
    }
  ],
  "session": "68un8YYUlzJXSCJzGdCXKE6EDqmZR2vLEq556xPb+JHXVcXhuxWr927VyLZ246msjoDgVJBZr/em4c6QUNToMnXOXBPOJu/L",
  "verbose": 1
}
RESPONSE:
{
  "id": 3,
  "result": [
    {
      "data": {
        "description": "",
        "enabled options": [
          "ntp",
          "ftgd"
        ],
        "name": "branches",
        "oid": 4405,
        "scope member": [
          {
            "name": "root_dev_001"
          },
          {
            "name": "root_dev_002"
          },
          {
            "name": "root_dev_003"
          }
        ],
        "type": "devprof"
      },
      "status": {
        "code": 0,
        "message": "OK"
      },
      "url": "pm/devprof/adom/root/branches"
    }
  ]
}
4.5.3.2. How to assign a System Template to a managed device?#
The following example shows how to assign the system_template_001 to the
dev_001 managed device in the demo ADOM:
{
  "id": 3,
  "method": "add",
  "params": [
    {
      "data": {
        "name": "dev_001",
        "vdom": "root"
      },
      "url": "pm/devprof/adom/demo/system_template_001/scope member"
    }
  ],
  "session": "{{session}}"
}
{
  "id": 3,
  "result": [
    {
      "status": {
        "code": 0,
        "message": "OK"
      },
      "url": "pm/devprof/adom/demo/system_template_001/scope member"
    }
  ]
}
Note
The list of existing assigned managed devices is preserved.
4.5.3.3. How to unassign a System Template from a device?#
Just replace add with delete.
REQUEST:
{
  "id": 1,
  "jsonrpc": "1.0",
  "method": "delete",
  "params": [
    {
      "data": [
        {
          "name": "branch2_fgt",
          "vdom": "root"
        }
      ],
      "url": "/pm/devprof/adom/DEMO/system.template.branches/scope member"
    }
  ],
  "session": "ADeQPTL6U2bxwKra2E6NArY/6B6sQ8pixJf0g0ic46FpW3AZSXqPGzSrY8VJpgC0AsznEhlqgH7xYcJrl2VYCQ==",
  "verbose": 1
}
RESPONSE:
{
  "id": 1,
  "result": [
    {
      "status": {
        "code": 0,
        "message": "OK"
      },
      "url": "/pm/devprof/adom/DEMO/system.template.branches/scope member"
    }
  ]
}
4.5.4. Modify a System Template content?#
To change a template configuration, we can use this URL:
/pm/config/adom/<adom>/devprof/<template>/<widget>
where widget could be the following paths:
Widget Name in GUI |
Widget path in API |
|---|---|
|
|
|
|
|
|
|
|
|
|
|
|
|
|
|
|
|
|
Legacy widget
The legacy widget are the ones without override or per-device mapping support.
Here we’re showing how to modify the syslog severity for System Template
default in ADOM root (caught in #0593505):
{
  "id": 96,
        "method": "set",
        "params": [
          {
            "data": {
        "exclude-list": null,
        "severity": 3
            },
      "url":
              "pm/config/adom/demo/devprof/default/log/syslogd/filter"
    },
  ],
          "session": "{{session}}"
        }
{
  "id": 96,
  "result": [
    {
      "data": {
        "exclude-list": null,
              "severity": 3
      },
      "status": {
        "code": 0,
              "message": "OK"
      },
      "url":
      "pm/config/adom/demo/devprof/default/log/syslogd/filter"
    }
  ]
}
Widget with override or per-device mapping support
The widgets of the form device/template/widget/<something> support
override or per-device mapping. They have been introduced in FMG 6.4.2.
We want to add an override for device hub1 which is linked to system
template sys_template in ADOM DEMO_009.
Firt the DNS widget content:
REQUEST:
{
  "id": 1,
  "jsonrpc": "1.0",
  "method": "get",
  "params": [
    {
      "url": "/pm/config/adom/DEMO_009/devprof/sys_template/device/template/widget/dns"
    }
  ],
  "session": "Sgx5EOLLXT97rfuIuZgYnF8gQERyS04Byr/5B7TzUTixGCM/Ylixdgevz49VC65I/h6gA6sTaHCxvxQaBKaQxA==",
  "verbose": 1
}
RESPONSE:
{
  "id": 1,
  "result": [
    {
      "data": {
        "action-list": [
          {
            "action": "conf-sys-dns",
            "dynamic_mapping": [
              {
                "_scope": [
                  {
                    "name": "hub2",
                    "vdom": "root"
                  }
                ],
                "local-value": "{\"secondary\":\"8.8.8.8\",\"primary\":\"172.16.100.100\"}"
              }
            ],
            "model": "all",
            "seq": 1,
            "value": "{\"primary\":\"172.16.100.100\",\"secondary\":\"208.91.112.53\"}",
            "var-list": [
              {
                "name": "system dns/timeout",
                "override": null
              },
              {
                "name": "system dns/ssl-certificate",
                "override": null
              },
              {
                "name": "system dns/server-hostname",
                "override": null
              },
              {
                "name": "system dns/retry",
                "override": null
              },
              {
                "name": "system dns/dns-over-tls",
                "override": null
              },
              {
                "name": "system dns/dns-cache-ttl",
                "override": null
              },
              {
                "name": "system dns/dns-cache-limit",
                "override": null
              },
              {
                "name": "system dns/cache-notfound-responses",
                "override": null
              },
              {
                "name": "system dns/domain",
                "override": null
              },
              {
                "name": "system dns/secondary",
                "override": "enable"
              },
              {
                "name": "system dns/primary",
                "override": "enable"
              }
            ]
          }
        ],
        "name": "dns"
      },
      "status": {
        "code": 0,
        "message": "OK"
      },
      "url": "/pm/config/adom/DEMO_009/devprof/sys_template/device/template/widget/dns"
    }
  ]
}
We can observe there’s an existing per-device mapping for device hub2.
We set a similar override or per-device mapping for device hub1.
REQUEST:
{
  "id": 1,
  "jsonrpc": "1.0",
  "method": "add",
  "params": [
    {
      "data": {
        "_scope": [
          {
            "name": "hub1",
            "vdom": "root"
          }
        ],
        "local-value": "{\"primary\":\"1.1.1.1\",\"secondary\":\"2.2.2.2\"}"
      },
      "url": "/pm/config/adom/DEMO_009/devprof/sys_template/device/template/widget/dns/action-list/1/dynamic_mapping"
    }
  ],
  "session": "5Gd5SMRuz+Af9/2Zf200NN3lqQk2yUCKbEWeGLvfvkGnkARgJ99hoMbp8qzyqXHZw+hNLV4jt3YKiIcGHM+Qjg==",
  "verbose": 1
}
RESPONSE:
{
  "id": 1,
  "result": [
    {
      "data": {
        "_scope": null
      },
      "status": {
        "code": 0,
        "message": "OK"
      },
      "url": "/pm/config/adom/DEMO_009/devprof/sys_template/device/template/widget/dns/action-list/1/dynamic_mapping"
    }
  ]
}
4.5.4.1. How to add the interface widget?#
There are two methods, but both of them require to get the existing widgets list first.
Using
/pm/devprof/<adom>/<template>entryTo add the Interface widget, we have to update the
enabled optionslist by adding keywordinterface:{ "id": 3, "method": "set", "params": [ { "data": { "enabled options": [ "dns", "admin", "snmp", "interface" ] }, "url": "pm/devprof/adom/demo/system_template_001" } ], "session": "{{session}}" }
{
  "id": 3,
  "result": [
    {
      "status": {
        "code": 0,
        "message": "OK"
      },
      "url": "pm/devprof/adom/demo/system_template_001"
    }
  ]
}
Using
/pm/config/<adom>/devprof/<template>/device/profile/settingentryTo add the Interface widget, we have to update the
enabled-pageslist by adding keywordinterface:{ "id": 3, "method": "set", "params": [ { "data": { "enabled-pages": [ "dns", "admin", "snmp", "interface" ] }, "url": "pm/config/adom/demo/devprof/system_template_001/device/profile/setting" } ], "session": "{{session}}" }
{
  "id": 3,
  "result": [
    {
      "status": {
        "code": 0,
        "message": "OK"
      },
      "url": "pm/config/adom/demo/devprof/system_template_001/device/profile/setting"
    }
  ]
}
4.5.4.2. How to add a new Config Interface action in the interface widget?#
{
  "id": 1,
  "jsonrpc": "1.0",
  "method": "set",
  "params": [
    {
      "data": [
        {
          "action": "conf-intf",
          "model": "all",
          "value": {
            "name": "wan1",
            "ip": "172.16.$(region_id).$(site_id)/24",
            "allowaccess": [
               "ping",
               "https",
               "ssh"
            ],
            "mode": "static"
          },
          "var-list": [
            {
              "name": "system interface/allowaccess",
              "override": 0
            },
            {
              "name": "system interface/ip",
              "override": 0
            },
            {
              "name": "system interface/name",
              "override": 0
            }
          ]
        }
      ],
      "url": "pm/config/adom/demo/devprof/system_interface_001/device/template/widget/interface/action-list"
    }
  ],
  "session": "{{session}}"
}
Note
The mode attribute is not available in the FortiManager GUI when
configuring an interface entry on the System Template page. The
example above demonstrates a scenario where other interface attributes
can still be configured. You can then safely edit the System Template
through the GUI to make further changes, as these additional
attributes will not be removed or modified.
{
  "id": 1,
  "result": [
    {
      "data": {
        "seq": 2
      },
      "status": {
        "code": 0,
        "message": "OK"
      },
      "url": "pm/config/adom/demo/devprof/system_template_001/device/template/widget/interface/action-list"
    }
  ]
}
4.5.4.3. How to get the list of interface actions?#
The following example shows how to get the list of interface actions in a the st_001 in the demo ADOM:
{
  "id": 3,
  "method": "get",
  "params": [
    {
      "url": "/pm/config/adom/demo/devprof/st_001/device/template/widget/interface/action-list"
    }
  ],
  "session": "{{session}}",
  "verbose": 1
}
{
  "id": 3,
  "result": [
    {
      "data": [
        {
          "action": "conf-intf",
          "dynamic_mapping": null,
          "model": "all",
          "oid": 18356,
          "seq": 1,
          "value": {
            "allowaccess": [
              "ping",
              "snmp",
              "http",
              "probe-response",
              "dnp",
              "ftm"
            ],
            "name": "$(ul_isp1)"
          },
          "var-list": null
        }
      ],
      "status": {
        "code": 0,
        "message": "OK"
      },
      "url": "/pm/config/adom/demo/devprof/st_001/device/template/widget/interface/action-list"
    }
  ]
}
4.5.4.4. How to trigger a Post Action View?#
The Post Action View allows you to preview the interfaces configuration as modified by the current System Template before applying it to the managed devices.
The following example shows how to trigger the Post Action View for
the system_template_001 System Template in the demo ADOM
for Platform FortiGate-600F:
{
  "id": 3,
  "method": "exec",
  "params": [
    {
      "data": {
        "devmodel": "FortiGate-600F",
        "devprof": "system_template_001",
        "fetch": {
          "system interface": {},
          "system zone": {}
        }
      },
      "url": "/dvmdb/post/action/preview/adom/demo"
    }
  ],
  "session": "{{session}}"
}
{
  "cid": 51,
  "id": 3,
  "result": [
    {
      "data": {
        "system interface": [
          { "...": "..." }
        ],
        "system zone": [
          {
            "description": null,
            "interface": [
              "port9",
              "port10"
            ],
            "intrazone": 1,
            "name": "zone_001",
            "tagging": null
          }
        ]
      },
      "status": {
        "code": 0,
        "message": "OK"
      },
      "url": "/dvmdb/post/action/preview/adom/demo"
    }
  ]
}
Note
The system interface section is truncated for brevity.
You can also trigger the Post Action View for a specific managed
device. The following example shows how to trigger the Post Action
View for the managed device dev_001 linked to System Template
system_template_001 in the demo ADOM:
{
  "id": 3,
  "method": "exec",
  "params": [
    {
      "data": {
        "device": "dev_001",
        "devprof": "system_template_001",
        "fetch": {
          "system dhcp server": {},
          "system dns": {},
          "system zone": {}
        }
      },
      "url": "/dvmdb/post/action/preview/adom/demo"
    }
  ],
  "session": "{{session}}"
}
Note
The device attribute should refer to an existing
managed device linked to the System Template.
This time, the request is asking to preview the system
dhcp server, the system dns and the system zone.
{
  "cid": 71,
  "id": 3,
  "result": [
    {
      "data": {
        "system dhcp server": [
          { "...", "..." },
        ],
        "system dns": {
          "...", "..."
        },
        "system zone": [
          {
            "description": null,
            "interface": [
              "port9",
              "port10"
            ],
            "intrazone": 1,
            "name": "zone_001",
            "tagging": null
          }
        ]
      },
      "status": {
        "code": 0,
        "message": "OK"
      },
      "url": "/dvmdb/post/action/preview/adom/demo"
    }
  ]
}
4.5.4.5. How to get the DNS entries in a System Template?#
Starting with FortiManager 7.6.5
Caught in #1228182.
The following example example shows how to get the DNS detail from the
system_template_001System Template in thedemoADOM:{ "id": 3, "method": "get", "params": [ { "url": "/pm/config/adom/demo/devprof/system_template_001/system/dns" } ], "session": "{{session}}", "verbose": 1 }
{
  "id": 3,
  "result": [
    {
      "data": {
        "alt-primary": "0.0.0.0",
        "alt-secondary": "0.0.0.0",
        "cache-notfound-responses": "disable",
        "dns-cache-limit": 5000,
        "dns-cache-ttl": 1800,
        "domain": [],
        "fqdn-cache-ttl": 0,
        "fqdn-max-refresh": 3600,
        "fqdn-min-refresh": 60,
        "hostname-limit": 5000,
        "hostname-ttl": 86400,
        "interface": [],
        "interface-select-method": "auto",
        "ip6-primary": "::",
        "ip6-secondary": "::",
        "log": "disable",
        "oid": 7472,
        "primary": "8.8.8.8",
        "protocol": "cleartext",
        "retry": 2,
        "root-servers": null,
        "secondary": "8.8.4.4",
        "server-select-method": "least-rtt",
        "source-ip": "0.0.0.0",
        "source-ip-interface": [],
        "ssl-certificate": [
          "Fortinet_Factory"
        ],
        "timeout": 5,
        "vrf-select": 0
      },
      "status": {
        "code": 0,
        "message": "OK"
      },
      "url": "/pm/config/adom/demo/devprof/system_template_001/system/dns"
    }
  ]
}
Before FortiManager 7.6.5
The following example example shows how to get the DNS detail from the
system_template_001System Template in thedemoADOM:{ "id": 3, "method": "get", "params": [ { "url": "pm/config/adom/demo/devprof/system_template_001/device/template/widget/dns/action-list" } ], "session": "{{session}}", "verbose": 1 }
{
  "id": 3,
  "result": [
    {
      "data": [
        {
          "action": "conf-sys-dns",
          "dynamic_mapping": null,
          "model": "all",
          "seq": 1,
          "value": {
            "primary": "8.8.8.8",
            "secondary": "1.1.1.1"
          },
          "var-list": [
            {
              "name": "system dns/timeout",
              "override": null
            },
            {
              "name": "system dns/ssl-certificate",
              "override": null
            },
            {
              "name": "system dns/server-hostname",
              "override": null
            },
            {
              "name": "system dns/retry",
              "override": null
            },
            {
              "name": "system dns/dns-over-tls",
              "override": null
            },
            {
              "name": "system dns/dns-cache-ttl",
              "override": null
            },
            {
              "name": "system dns/dns-cache-limit",
              "override": null
            },
            {
              "name": "system dns/cache-notfound-responses",
              "override": null
            },
            {
              "name": "system dns/domain",
              "override": null
            },
            {
              "name": "system dns/secondary",
              "override": null
            },
            {
              "name": "system dns/primary",
              "override": null
            }
          ]
        }
      ],
      "status": {
        "code": 0,
        "message": "OK"
      },
      "url": "pm/config/adom/demo/devprof/system_template_001/device/template/widget/dns/action-list"
    }
  ]
}
4.5.4.6. How to change the FortiAnalyzer setting?#
We change the FortiAnalyzer IP address and Serial Number set in System Template
branches from ADOM root:
REQUEST:
{
  "id": 3,
  "method": "set",
  "params": [
    {
      "data": {
        "target-ip": "10.0.0.4",
        "target-sn": [
          "FAZVMTM0000000004"
        ]
      },
      "url": "pm/config/adom/root/devprof/branches/device/profile/fortianalyzer"
    }
  ],
  "session": "k2t4ybTRkj1mdqflN3EtkoCpCeDgVMsW/eTgSFfHbZ+c/Dut8dHLecHHd/nPhiafAg7NwAjUrG0KbaNyzyX//EjK6GwimW9q"
}
RESPONSE:
{
  "id": 3,
  "result": [
    {
      "status": {
        "code": 0,
        "message": "OK"
      },
      "url": "pm/config/adom/root/devprof/branches/device/profile/fortianalyzer"
    }
  ]
}
4.5.5. How to import a system template?#
Caught in #069924.
TBC.
URL is:
/pm/config/adom/<adom>/_devprof/import
4.6. FortiAP Management#
4.6.1. FortiAP Devices#
4.6.1.1. How to create a Model FortiAP?#
The example below demonstrates how to add the Model FortiAP named fap_001
using the fap_profile_001 for the dev_001 managed device, and with a
firmware enforcement set to firmware version 6.4.3-b00451:
{
  "id": 3,
  "method": "add",
  "params": [
    {
      "data": {
        "_prefer-img-ver": "6.4.3-b00451",
        "name": "fap_001",
        "wtp-id": "FP221E0000000001",
        "wtp-profile": "fap_profile_001"
      },
      "push": 1,
      "url": "/pm/config/device/dev_001/vdom/root/wireless-controller/wtp"
    }
  ],
  "session": "{{session}}"
}
Note
The request above is declaring a FortiAP device in dev_001 device’s
DB. Then the push attribute instructs FortiManager to consider
it for Central Management and this is why it becomes visible in the
AP Manager > Managed FortiAPs page.
{
  "id": 3,
  "result": [
    {
      "data": {
        "wtp-id": "FP221E0000000001"
      },
      "status": {
        "code": 0,
        "message": "OK"
      },
      "taskid": 111,
      "url": "/pm/config/device/dev_001/vdom/root/wireless-controller/wtp"
    }
  ]
}
Recent versions of FortiManager (7.0.x) seem to use a different API request:
{
  "id": 3,
  "method": "add",
  "params": [
    {
      "data": {
        "_platform-type": 50,
        "name": "fap_001",
        "wtp-id": "FP221E0000000001",
        "wtp-profile": "fap_profile_001"
      },
      "scope member": [
        {
          "name": "dev_001",
          "vdom": "root"
        }
      ],
      "url": "/pm/config/adom/demo/obj/wireless-controller/wtp"
    }
  ],
  "session": "{{session}}"
}
Note
The request above is declaring a FortiAP device in the demo ADOM DB
directly. If you look in dev_001 device’s Device DB, then you won’t
see your FortiAP device. It will show up after an install operation.
For the _platform-type attribute, please refer to the section
How to get the Platform Type?
{
  "id": 3,
  "result": [
    {
      "data": {
        "wtp-id": "FP221E0000000001"
      },
      "status": {
        "code": 0,
        "message": "OK"
      },
      "url": "/pm/config/adom/production/obj/wireless-controller/wtp"
    }
  ]
}
And more recently, this new API request form (using an explicit _is-model
attribute):
{
  "id": 3,
  "method": "add",
  "params": [
    {
      "url": "/pm/config/adom/demo/obj/wireless-controller/wtp",
      "scope member": [
        {
          "name": "dev_001",
          "vdom":"root"
        }
      ],
      "data": {
        "name": "fap_001",
        "wtp-id": "FP221E0000000001",
        "wtp-profile": "fap_profile_001",
        "_is-model": 1,
        "_platform-type": 50,
        "_prefer-img-ver": "7.2.2-b0318"
      }
    }
  ],
  "session": "{{session}}"
}
Note
The request above is declaring a FortiAP device in the demo ADOM DB
directly. If you look in dev_001 device’s Device DB, then you won’t
see your FortiAP device. It will show up after an install operation.
For the _platform-type attribute, please refer to the section
How to get the Platform Type?
{
  "id": 3,
  "result": [
    {
      "data": {
        "wtp-id": "FP221E0000000001"
      },
      "status": {
        "code": 0,
        "message": "OK"
      },
      "url": "/pm/config/adom/demo/obj/wireless-controller/wtp"
    }
  ]
}
Starting with FortiManager 7.6.2, Firmware Enforcement is now configured within
the Firmware Template (#1082490). The example below demonstrates how to add a
new Model FortiAP named fap_001 using the fap_profile_001 FortiAP
Profile for the dev_001 managed device in the demo ADOM:
{
  "id": 3,
  "method": "add",
  "params": [
    {
      "data": {
        "_is-model": 1,
        "_platform-type": 50,
        "name": "fap_001",
        "wtp-id": "FP221E0000000001",
        "wtp-profile": "fap_profile_001"
      },
      "scope member": [
        {
          "name": "dev_001",
          "vdom": "root"
        }
      ],
      "url": "/pm/config/adom/demo/obj/wireless-controller/wtp"
    }
  ],
  "session": "{{session}}"
}
Note
The request above is declaring a FortiAP device in the demo ADOM DB
directly. If you look in dev_001 device’s Device DB, then you won’t
see your FortiAP device. It will show up after an install operation.
For the _platform-type attribute, please refer to the section
How to get the Platform Type?
{
  "id": 3,
  "result": [
    {
      "data": {
        "wtp-id": "FP221E0000000001"
      },
      "status": {
        "code": 0,
        "message": "OK"
      },
      "url": "/pm/config/adom/demo/obj/wireless-controller/wtp"
    }
  ]
}
4.6.1.2. How to get the Platform Type?#
To add a Model FortiAP, you need to specify the _platform-type.
You can obtain the list of supported FortiAP platforms along with their
respective _platform-type values using the following API request:
{
  "id": 3,
  "method": "get",
  "params": [
    {
      "url": "pm/config/adom/demo/_data/attropts/wireless-controller/wtp-profile/platform/type"
    }
  ],
  "session": "{{session}}",
  "verbose": 1
}
{
  "id": 1,
  "result": [
    {
      "data": [
        {
          "help": "FortiWiFi local radio.",
          "name": "FWF",
          "val": 30
        },
        {
          "help": "Default 11n AP.",
          "name": "AP-11N",
          "val": 33
        },
        {
          "help": "FAP220B/221B.",
          "name": "220B",
          "val": 5
        },
        {"...": "..."},
        {
          "help": "FAP433F.",
          "name": "433F",
          "val": 67
        }
      ],
      "status": {
        "code": 0,
        "message": "OK"
      },
      "url": "pm/config/adom/demo/_data/attropts/wireless-controller/wtp-profile/platform/type"
    }
  ]
}
The returned val attribute is the _platform-type value to use when
adding a Model AP.
4.6.1.3. How to get list of FortiAPs for an ADOM?#
Caught in #0610724.
The following example shows how to get the list of FortiAPs controlled by the
dev_001 mmanaged device and its root VDOM in the demo ADOM:
{
  "id": 3,
  "method": "get",
  "params": [
    {
      "scope member": [
        {
          "name": "dev_001",
          "vdom": "root"
        }
      ],
      "url": "/pm/config/adom/demo/obj/wireless-controller/wtp"
    }
  ],
  "session": "{{session}}",
  "verbose": 1
}
{
  "id": 3,
  "result": [
    {
      "data": [
        {
          "_conn-state": "unknown",
          "_data-chan-sec": 0,
          "_last-checked": 0,
          "_lldp-vlan": 0,
          "_mesh-downlink": "disable",
          "_mesh-hop-count": 0,
          "_mesh-mode": 0,
          "_mgmt-vlan-id": 0,
          "_platform-type": 63,
          "_rogue-ap-count": 0,
          "_sensors-temperatures": [],
          "_update-time": 0,
          "_upgrade-time": 0,
          "_wtp-port": 0,
          "admin": "enable",
          "apcfg-profile": [],
          "bonjour-profile": [],
          "firmware-provision-latest": "disable",
          "image-download": "enable",
          "index": 0,
          "ip-fragment-preventing": "tcp-mss-adjust",
          "lan": {
            "port-esl-mode": "offline",
            "port-esl-ssid": [],
            "port-mode": "offline",
            "port-ssid": [],
            "port1-mode": "offline",
            "port1-ssid": [],
            "port2-mode": "offline",
            "port2-ssid": [],
            "port3-mode": "offline",
            "port3-ssid": [],
            "port4-mode": "offline",
            "port4-ssid": [],
            "port5-mode": "offline",
            "port5-ssid": [],
            "port6-mode": "offline",
            "port6-ssid": [],
            "port7-mode": "offline",
            "port7-ssid": [],
            "port8-mode": "offline",
            "port8-ssid": []
          },
          "led-state": "enable",
          "mesh-bridge-enable": "default",
          "name": "fap_site_2",
          "override-allowaccess": "disable",
          "override-ip-fragment": "disable",
          "override-lan": "disable",
          "override-led-state": "disable",
          "override-login-passwd-change": "disable",
          "override-split-tunnel": "disable",
          "radio-1": {
            "_bssid": null,
            "_client-count": 0,
            "_country-code": 0,
            "_country-name": null,
            "_max-vaps": 0,
            "_mesh-downlink": "disable",
            "_mode": 0,
            "_oper-chan": 0,
            "_oper-txpower": 0,
            "auto-power-target": "-70",
            "drma-manual-mode": "ncf",
            "override-band": "disable",
            "override-channel": "disable",
            "override-txpower": "disable",
            "override-vaps": "disable",
            "power-mode": "percentage",
            "power-value": 27,
            "radio-id": 0,
            "vap1": null,
            "vap2": null,
            "vap3": null,
            "vap4": null,
            "vap5": null,
            "vap6": null,
            "vap7": null,
            "vap8": null
          },
          "radio-2": {
            "_bssid": null,
            "_client-count": 0,
            "_country-code": 0,
            "_country-name": null,
            "_max-vaps": 0,
            "_mesh-downlink": "disable",
            "_mode": 0,
            "_oper-chan": 0,
            "_oper-txpower": 0,
            "auto-power-target": "-70",
            "drma-manual-mode": "ncf",
            "override-band": "disable",
            "override-channel": "disable",
            "override-txpower": "disable",
            "override-vaps": "disable",
            "power-mode": "percentage",
            "power-value": 27,
            "radio-id": 1,
            "vap1": null,
            "vap2": null,
            "vap3": null,
            "vap4": null,
            "vap5": null,
            "vap6": null,
            "vap7": null,
            "vap8": null
          },
          "radio-3": {
            "_bssid": null,
            "_client-count": 0,
            "_country-code": 0,
            "_country-name": null,
            "_max-vaps": 0,
            "_mesh-downlink": "disable",
            "_mode": 0,
            "_oper-chan": 0,
            "_oper-txpower": 0,
            "auto-power-target": "-70",
            "drma-manual-mode": "ncf",
            "override-band": "disable",
            "override-channel": "disable",
            "override-txpower": "disable",
            "override-vaps": "disable",
            "power-mode": "percentage",
            "power-value": 27,
            "radio-id": 2,
            "vap1": null,
            "vap2": null,
            "vap3": null,
            "vap4": null,
            "vap5": null,
            "vap6": null,
            "vap7": null,
            "vap8": null
          },
          "radio-4": {
            "auto-power-target": "-70",
            "override-band": "disable",
            "override-channel": "disable",
            "override-txpower": "disable",
            "override-vaps": "disable",
            "power-mode": "percentage",
            "power-value": 27,
            "radio-id": 3,
            "vap1": null,
            "vap2": null,
            "vap3": null,
            "vap4": null,
            "vap5": null,
            "vap6": null,
            "vap7": null,
            "vap8": null
          },
          "region": [],
          "region-x": "0",
          "region-y": "0",
          "scope member": [
            {
              "name": "dev_001",
              "vdom": "root"
            }
          ],
          "split-tunneling-acl": null,
          "split-tunneling-acl-local-ap-subnet": "disable",
          "split-tunneling-acl-path": "local",
          "tun-mtu-downlink": 0,
          "tun-mtu-uplink": 0,
          "uuid": "71b0b548-93bd-51ec-a584-aa9d086c7a2f",
          "wtp-id": "PU431FREDACTED60",
          "wtp-mode": "normal",
          "wtp-profile": [
            "wtp_profile_001"
          ]
        }
      ],
      "status": {
        "code": 0,
        "message": "OK"
      },
      "url": "/pm/config/adom/demo/obj/wireless-controller/wtp"
    }
  ]
}
Should you want to retrieve the list of FortiAPs controlled by multiples managed
devices, you could use any of the following scope member combinations.
To get the list of FortiAPs controlled by the dev_001 and dev_002
managed devices:
"scope member": [
  {
    "name": "dev_001",
    "vdom": "root"
  },
  {
    "name": "dev_002",
    "vdom": "root"
  },
]
To get the list of FortiAPs controlled by the managed devices belonging to the
dev_grp_001 and dev_grp_002 device groups:
"scope member": [
  {
    "name": "dev_grp_001"
  },
  {
    "name": "dev_grp_002"
  },
]
To get the list of FortiAPs controlled by the dev_001 and dev_002
managed devices and the managed devices belonging to the dev_grp_001 and
dev_grp_002 device groups:
"scope member": [
  {
    "name": "dev_grp_001"
  },
  {
    "name": "dev_grp_002"
  },
  {
    "name": "dev_001",
    "vdom": "root"
  },
  {
    "name": "dev_002",
    "vdom": "root"
  },
]
To get the list of FortiAPs controlled by all managed devices of your ADOM:
"scope member": [
  {
    "name": "All_FortiGare"
  },
]
You can filter the returned FortiAP details using the filter attribute as
shown in the below example where the goal is to retrieve the connection status
of the FortiAP controlled by the dev_001, dev_002 and dev_003
managed devices in the demo ADOM:
{
  "id": 3,
  "method": "get",
  "params": [
    {
      "fields": [
        "name",
        "admin",
        "_conn-state"
      ],
      "loadsub": 0,
      "scope member": [
        {
          "name": "dev_001",
          "vdom": "root"
        },
        {
          "name": "dev_002",
          "vdom": "root"
        },
        {
          "name": "dev_003",
          "vdom": "root"
        }
      ],
      "url": "/pm/config/adom/demo/obj/wireless-controller/wtp"
    }
  ],
  "session": "{{session}}",
  "verbose": 1
}
{
  "id": 3,
  "result": [
    {
      "data": [
        {
          "_conn-state": "idle",
          "admin": "enable",
          "name": "FP23JREDACTED594",
          "scope member": [
            {
              "name": "dev_001",
              "vdom": "root"
            }
          ]
        }
      ],
      "status": {
        "code": 0,
        "message": "OK"
      },
      "url": "/pm/config/adom/demo/obj/wireless-controller/wtp"
    }
  ]
}
Note
This output shows that dev_001, only, is managing a FortiAP
device, which currently has its connection in the idle state.
4.6.1.4. How to rename a managed FAP?#
The following example shows how to rename the managed FortiAP with wtp-id
set to PU431FREDACTED6060 to the name fap_002 for the dev_001 managed device in the demo ADOM:
{
  "id": 3,
  "method": "update",
  "params": [
    {
      "data": {
        "name": "fap_002",
        "wtp-id": "PU431FREDACTED6060"
      },
      "scope member": [
        {
          "name": "dev_001",
          "vdom": "root"
        }
      ],
      "url": "/pm/config/adom/demo/obj/wireless-controller/wtp"
    }
  ],
  "session": "{{session}}"
}
{
  "id": 3,
  "result": [
    {
      "data": {
        "wtp-id": "PU431FREDACTED6060"
      },
      "status": {
        "code": 0,
        "message": "OK"
      },
      "url": "/pm/config/adom/demo/obj/wireless-controller/wtp"
    }
  ]
}
4.6.1.5. How to get the FortiAP status?#
Caught in #1058875.
The following example shows how get the status for all of the FortiAP devices
controlled by the dev_001 managed device and its root VDOM, in the
demo ADOM:
{
  "id": 3,
  "method": "get",
  "params": [
    {
      "scope member": [
        {
          "name": "dev_001",
          "vdom": "root"
        }
      ],
      "url": "/pm/config/adom/demo/_controller/status/fap"
    }
  ],
  "session": "{{session}}",
  "verbose": 1
}
Note
The
scope memberattribute could also contains device groups, just omit thevdomattributeFor instance:
"scope member": [
  {
    "name": "dev_grp_001"
  },
  {
    "name": "dev_grp_002"
  }
]
It could also be the
All_FortiGatespecial device group if you want the FortiAP status for all managed devices in the specified ADOM:"scope member": [ { "name": "All_FortiGate" } ]
{
"id": 3,
"result": [
{
"data": [
{
"data": "{ \"wtp_id\": \"FP433G0000000001\", \"name\": \"fap_002\", \"wtp_mode\": \"normal\", \"location\": \"\", \"admin\": \"authorized\", \"connection_state\": \"Disconnected\", \"data_chan_sec\": \"clear-text\", \"mesh_mode\": \"ethernet\", \"client_count\": 0, \"mgmt_vdom\": \"root\", \"mgmt_vlanid\": 0, \"local_ip\": \"0.0.0.0\", \"board_mac\": \"00:00:00:00:00:00\", \"image_download_progress\": 0, \"mesh_hop_count\": 0, \"lldp_enable\": true, \"last_failure\": \"N\\/A\", \"last_failure_code\": 0, \"led_blink\": false, \"radio\": [ { \"mode\": \"AP\", \"country_name\": \"--\", \"country_code\": 0, \"client_count\": 0, \"base_bssid\": \"00:00:00:00:00:00\", \"max_vaps\": 8, \"oper_chan\": 0, \"oper_txpower\": 0, \"override_band\": false, \"override_channel\": false, \"override_txpower\": false, \"override_vaps\": false, \"radio_type\": \"unknown\", \"channel_utilization\": true, \"channel_utilization_percent\": 0, \"channel_utilization_timestamp\": 0, \"health\": { \"channel_utilization\": { \"severity\": \"good\", \"value\": 0 }, \"client_count\": { \"severity\": \"good\", \"value\": 0 }, \"infra_interfering_ssids\": { \"severity\": \"good\", \"value\": 0 }, \"interfering_ssids\": { \"severity\": \"good\", \"value\": 0 }, \"overall\": { \"severity\": \"good\", \"value\": 0 } }, \"detected_rogue_aps\": 0, \"detected_rogue_infra_aps\": 0, \"radio_id\": 1, \"vap-all\": \"tunnel\" }, { \"mode\": \"AP\", \"country_name\": \"--\", \"country_code\": 0, \"client_count\": 0, \"base_bssid\": \"00:00:00:00:00:00\", \"max_vaps\": 8, \"oper_chan\": 0, \"oper_txpower\": 0, \"override_band\": false, \"override_channel\": false, \"override_txpower\": false, \"override_vaps\": false, \"radio_type\": \"unknown\", \"channel_utilization\": true, \"channel_utilization_percent\": 0, \"channel_utilization_timestamp\": 0, \"health\": { \"channel_utilization\": { \"severity\": \"good\", \"value\": 0 }, \"client_count\": { \"severity\": \"good\", \"value\": 0 }, \"infra_interfering_ssids\": { \"severity\": \"good\", \"value\": 0 }, \"interfering_ssids\": { \"severity\": \"good\", \"value\": 0 }, \"overall\": { \"severity\": \"good\", \"value\": 0 } }, \"detected_rogue_aps\": 0, \"detected_rogue_infra_aps\": 0, \"radio_id\": 2, \"vap-all\": \"tunnel\" }, { \"mode\": \"AP\", \"country_name\": \"--\", \"country_code\": 0, \"client_count\": 0, \"base_bssid\": \"00:00:00:00:00:00\", \"max_vaps\": 8, \"oper_chan\": 0, \"oper_txpower\": 0, \"override_band\": false, \"override_channel\": false, \"override_txpower\": false, \"override_vaps\": false, \"radio_type\": \"unknown\", \"channel_utilization\": true, \"channel_utilization_percent\": 0, \"channel_utilization_timestamp\": 0, \"health\": { \"channel_utilization\": { \"severity\": \"good\", \"value\": 0 }, \"client_count\": { \"severity\": \"good\", \"value\": 0 }, \"infra_interfering_ssids\": { \"severity\": \"good\", \"value\": 0 }, \"interfering_ssids\": { \"severity\": \"good\", \"value\": 0 }, \"overall\": { \"severity\": \"good\", \"value\": 0 } }, \"detected_rogue_aps\": 0, \"detected_rogue_infra_aps\": 0, \"radio_id\": 3, \"vap-all\": \"tunnel\" }, { \"mode\": \"Virtual Lan AP\", \"radio_type\": \"unknown\", \"radio_id\": 4 }, { \"mode\": \"Not Exist\", \"radio_type\": \"unknown\", \"radio_id\": 5 } ] }",
"dev": "dev_001",
"sn": "FP433G0000000001",
"type": "fap",
"vdom": "root"
}
],
"url": "/pm/config/adom/demo/_controller/status/fap"
}
]
}
Note
The returned
datais a string!
Note
FortiManager isn’t getting the real time status of the controlled FortiAP using the FortiOS REST API; the data seems to come immediately from the latest FortiAP polling made by FortiManager
Should you want to trigger a refresh of the FortiAP status before, just see section How to refresh the FortiAP status?
4.6.1.6. How to refresh the FortiAP status?#
Warning
This API is depreciated or not published (hence not officially supported).
The following example shows how to refresh the status of the FortiAP devices
controlled by the device with OID 35009 in the demo ADOM:
{
"id": 3,
"method": "exec",
"params": [
{
"data": {
"adom": "demo",
"ctype": "wtp",
"device": [
35009
],
"options": [
"savedb",
"resync",
"create-task"
],
"resync": 1
},
"url": "/deployment/get/controller/status"
}
],
"session": "{{session}}"
}
Note
The
deviceattribute is a list; it could contains multiple OIDs of managed devices
{
"id": 3,
"result": [
{
"data": {
"task": 1609
},
"status": {
"code": 0,
"message": "OK"
},
"url": "/deployment/get/controller/status"
}
]
}
The goal isn’t to obtain the FortiAP status (see section How to get the FortiAP status?).
The goal is to get and save the FortiAP status somewhere in FortiManager to have the information available when needed.
4.6.1.7. How to update a FortiAP configuration?#
The following example shows how to update few attributes of the radio-1 for
the controlled FortiAP with wtp-id set to FP231E****000001 of the
dev_001 managed device in the demo ADOM:
{
"id": 3,
"method": "update",
"params": [
{
"data": {
"auto-power-target": "-70",
"drma-manual-mode": 3,
"override-band": 0,
"override-channel": 0,
"override-txpower": 0,
"override-vaps": 0,
"power-mode": 2,
"radio-id": 0
},
"scope member": {
"name": "dev_001",
"vdom": "root"
},
"url": "/pm/config/adom/demo/obj/wireless-controller/wtp/FP231E****000001/radio-1"
}
],
"session": "{{session}}"
}
{
"id": 3,
"result": [
{
"status": {
"code": 0,
"message": "OK"
},
"url": "/pm/config/adom/demo/obj/wireless-controller/wtp/FP231E****000001/radio-1"
}
]
}
Note
The attributes are only updated in ADOM DB. An installation is required to have those updated attributes copied to Device DB.
4.6.2. FortiAP Profiles#
4.6.2.1. How to get a specific FortiAP profile?#
To get the branches FortiAP profile from the root ADOM:
REQUEST:
{
"method": "get",
"params": [
{
"url": "pm/config/adom/root/obj/wireless-controller/wtp-profile/branches",
"option": [
"get flags",
"get used",
"get devobj mapping",
"get meta",
"extra info"
]
}
],
"id": "7e0d5a6d-9528-4613-9f49-f2c1c91e6abc"
}
RESPONSE:
{
"id": "7e0d5a6d-9528-4613-9f49-f2c1c91e6abc",
"result": [
{
"data": {
"_created timestamp": 1659044466,
"_created-by": "admin",
"_last-modified-by": "admin",
"_modified timestamp": 1659044467,
"allowaccess": 0,
"ap-country": 1126,
"ap-handoff": 0,
"apcfg-profile": [],
"ble-profile": [],
"... TRUNCATED ...",
"radio-1": {
"... TRUNCATED ...",
"vaps": [
"ssid_001"
],
"... TRUNCATED ..."
}
"... TRUNCATED ..."
},
"status": {
"code": 0,
"message": "OK"
},
"url": "pm/config/adom/root/obj/wireless-controller/wtp-profile/branches"
}
]
}
4.6.2.2. How to delete a FortiAP profile?#
Caught in #0600899.
When in Central FortiAP Management mode, we can use this trick where we delete what is matching the filter:
REQUEST:
{
"id": 1,
"method": "delete",
"params": [
{
"url": "pm/config/adom/62_NoVDOM/obj/wireless-controller/wtp-profile",
"filter": [
"name", "in", "foobar"
],
"confirm":1
}
]
}
4.7. FortiSwitch Management#
4.7.1. How to add a Model FortiSwich#
Adding a Model FortiSwitch using the FortiSwitch Manager page in FortiManager GUI will make the FortiSwitch device visible in the FortiSwitch Manager page only.
The FortiSwitch device will be visible within the associated Device DB only after an installation.
4.7.1.1. Add a Model FortiSwitch with FortiManager 7.0/7.2#
The example below demonstrates how to add a Model FortiSwitch named fsw_001
for the dev_001 managed device:
{
"id": 1,
"method": "add",
"params": [
{
"data": {
"name": "fsw_001",
"switch-id": "S108DVEN3ND-GG54"
},
"push": 1,
"url": "/pm/config/device/dev_001/vdom/root/switch-controller/managed-switch"
}
],
"session": "{{session}}"
}
Note
The request above is declaring a FortiSwitch device in dev_001
device’s DB. Then the push attribute instructs FortiManager to
consider it for Central Management and this is why it becomes visible
in the FortiSwitch Manager > Managed FortiSwitches page.
{
"id": 1,
"result": [
{
"data": {
"switch-id": "S108DVEN3ND-GG54"
},
"status": {
"code": 0,
"message": "OK"
},
"taskid": 503,
"url": "/pm/config/device/dev_001/vdom/root/switch-controller/managed-switch"
}
]
}
4.7.1.2. Add a Model FortiSwitch with FortiManager 7.4+#
You can also use the following recommended alternative, which aligns with the FortiManager GUI logic.
The example below shows how to add a Model FortiSwitch named fsw_001,
assigned to the fsw_template_001 FortiSwitch Template, for the managed
device dev_001 in the demo ADOM:
{
"id": 3,
"method": "add",
"params": [
{
"data": {
"is-model": 1,
"platform": "FortiSwitch-108F-FPOE",
"sn": "S108FFTV21021101",
"state": 2,
"switch-id": "fsw_001",
"template": "fsw_template_001",
"vlan-interface": "fortilink"
},
"scope member": [
{
"name": "dev_001",
"vdom": "root"
}
],
"url": "/pm/config/adom/demo/obj/fsp/managed-switch"
}
],
"session": "{{session}}"
}
Note
The request above is declaring a FortiSwitch device in the demo
ADOM DB directly. If you look in dev_001 device’s Device DB, then
you won’t see your FortiSwitch device. It will show up after an
install operation.
Warning
If you use the FortiManager CLI/GUI to debug what the FortiManager GUI is doing when you add a new FortiSwitch from the FortiSwitch Manager page, you will get a FortiManager JSON RPC API request similar to the following one:
{ "client": "gui json:30925", "id": "cbacc2f8-8d12-4020-91f6-186ba1ca9f64", "keep_session_idle": 1, "method": "add", "params": [ { "data": { "fsw-wan1-admin": 2, "fsw-wan1-peer": "fortilink", "name": "fsw_001", "platform": "FortiSwitch-108F-FPOE", "state": 2, "switch-id": "S108FFTV21021101", "template": "fsw_template_001", "vlan-interface": "fortilink" }, "scope member": [ { "name": "dev_001", "vdom": "root" } ], "url": "/pm/config/adom/demo/obj/fsp/managed-switch/" } ], "session": 54501 }
You can see the two
fsw-wan1-adminandfsw-wan1-peerattributeSurprinsingly, if you use them in your FortiManager JSON RPC API request, you will get an error like that:
{ "result": [ { "status": { "code": -10, "message": "The data is invalid for selected url" }, "url": "/pm/config/adom/demo/obj/fsp/managed-switch/" } ], "id": 1 }
{
"id": 3,
"result": [
{
"data": {
"switch-id": "fsw_001"
},
"status": {
"code": 0,
"message": "OK"
},
"url": "/pm/config/adom/demo/obj/fsp/managed-switch"
}
]
}
4.7.2. How to create a FortiSwitch Template?#
A FortiSwitch Template contains a large number of attributes. The key question is: which attributes need to be configured, and with what values?
You can use the FortiManager GUI to create a FortiSwitch Template and then retrieve its attributes via the FortiManager JSON RPC API. Alternatively, you can inspect the API calls made by the GUI using your browser’s developer tools. However, both approaches will expose a significant number of attributes, and many of the returned values may not be meaningful — often represented as raw digits rather than symbolic or human-readable values.
The approach outlined here uses the object_template mechanism. This allows
you to obtain the FortiSwitch Template’s object structure, including its default
values — presented symbolically where possible. That said, you’ll still need to
perform multiple API trial-and-error calls to determine which attributes should
be removed, updated, or left unchanged.
4.7.2.1. Retrieve the object template for the FortiSwitch Template#
The following example shows how to retrieve the object template for the
FortiSwitch Template in the demo ADOM:
{
"id": 3,
"method": "get",
"params": [
{
"object template": 1,
"url": "/pm/config/adom/demo/obj/switch-controller/managed-switch"
}
],
"session": "{{session}}",
"verbose": 1
}
Note
The
object templateattribute is set to1to get the object template of the FortiSwitch Template.The
verboseattribute is set to1to get the object template with symbolic values when possible.
{
"id": 3,
"result": [
{
"data": {
"custom-command": {
"oid": 0
},
"dhcp-server-access-list": "global",
"dhcp-snooping-static-client": {
"ip": "0.0.0.0",
"mac": "00:00:00:00:00:00",
"oid": 0
},
"firmware-provision": "disable",
"firmware-provision-latest": "disable",
"l3-discovered": 0,
"mclag-igmp-snooping-aware": "enable",
"mgmt-mode": 0,
"oid": 0,
"override-snmp-community": "disable",
"override-snmp-sysinfo": "disable",
"override-snmp-trap-threshold": "disable",
"override-snmp-user": "disable",
"poe-detection-type": 0,
"ports": {
"access-mode": "static",
"aggregator-mode": "bandwidth",
"allow-arp-monitor": "disable",
"allowed-vlans-all": "disable",
"arp-inspection-trust": "untrusted",
"authenticated-port": 0,
"bundle": "disable",
"dhcp-snoop-option82-override": {
"oid": 0
},
"dhcp-snoop-option82-trust": "disable",
"dhcp-snooping": "untrusted",
"discard-mode": "none",
"dsl-profile": [
"default"
],
"edge-port": "enable",
"encrypted-port": 0,
"fec-capable": 0,
"fec-state": "detect-by-module",
"flap-duration": 30,
"flap-rate": 5,
"flap-timeout": 0,
"flapguard": "disable",
"flow-control": "disable",
"igmp-snooping-flood-reports": "disable",
"ip-source-guard": "disable",
"lacp-speed": "slow",
"learning-limit": 0,
"lldp-profile": [
"default-auto-isl"
],
"lldp-status": "tx-rx",
"log-mac-event": "disable",
"loop-guard": "disabled",
"loop-guard-timeout": 45,
"max-bundle": 24,
"mcast-snooping-flood-traffic": "disable",
"mclag": "disable",
"mclag-icl-port": 0,
"member-withdrawal-behavior": "block",
"min-bundle": 1,
"mode": "static",
"oid": 0,
"p2p-port": 0,
"packet-sample-rate": 512,
"packet-sampler": "disabled",
"pause-meter": 0,
"pause-meter-resume": "50%",
"pd-capable": 0,
"poe-mode-bt-cabable": 0,
"poe-port-mode": "ieee802-3at",
"poe-port-power": "normal",
"poe-port-priority": "low-priority",
"poe-pre-standard-detection": "disable",
"poe-status": "enable",
"port-selection-criteria": "src-dst-ip",
"ptp-status": "enable",
"qos-policy": [
"default"
],
"restricted-auth-port": 0,
"rpvst-port": "disabled",
"sample-direction": "both",
"sflow-counter-interval": 0,
"speed": "auto",
"status": "up",
"sticky-mac": "disable",
"stp-bpdu-guard": "disabled",
"stp-bpdu-guard-timeout": 5,
"stp-root-guard": "disabled",
"stp-state": "enabled",
"trunk-member": 0,
"type": "physical"
},
"ptp-profile": [
"default"
],
"ptp-status": "disable",
"purdue-level": "3",
"qos-drop-policy": "taildrop",
"qos-red-probability": 12,
"radius-nas-ip": "0.0.0.0",
"radius-nas-ip-override": "disable",
"route-offload": "disable",
"route-offload-mclag": "disable",
"route-offload-router": {
"oid": 0,
"router-ip": "0.0.0.0"
},
"tunnel-discovered": 0,
"vlan": {
"assignment-priority": 128,
"oid": 0
}
},
"status": {
"code": 0,
"message": "OK"
},
"url": "/pm/config/adom/demo/obj/switch-controller/managed-switch"
}
]
}
Note
As you can see, that’s a lot of attributes!
4.7.2.2. Create a FortiSwitch Template#
With the help of the object template, you can now proceed to create a FortiSwitch Template. The exact attributes required may vary depending on your FortiManager version. However, based on the object template retrieved in the previous section - and the API trial-and-error calls you don’t need to perform - the following attributes have been removed:
custom-commanddhcp-snooping-static-clientoidportsroute-offload-routervlan
The following attributes have been added:
switch-id: Specifies the name of the FortiSwitch Template._platform: Indicates the FortiSwitch platform. (To retrieve the list of supported platforms, refer to: How to get the default port configuration for all supported FortiSwitch models?)
Bringing this together, the example below demonstrates how to create a
FortiSwitch Template named fsw_template_001 in the demo ADOM:
{
"id": 4,
"method": "add",
"params": [
{
"data": {
"_platform": "FortiSwitch-108E",
"dhcp-server-access-list": 50,
"firmware-provision": 0,
"firmware-provision-latest": 0,
"l3-discovered": 0,
"mclag-igmp-snooping-aware": 1,
"mgmt-mode": 0,
"override-snmp-community": 0,
"override-snmp-sysinfo": 0,
"override-snmp-trap-threshold": 0,
"override-snmp-user": 0,
"poe-detection-type": 0,
"ptp-profile": [
"default"
],
"ptp-status": 0,
"purdue-level": 3,
"qos-drop-policy": 0,
"qos-red-probability": 12,
"radius-nas-ip": "0.0.0.0",
"radius-nas-ip-override": 0,
"route-offload": 0,
"route-offload-mclag": 0,
"switch-id": "fsw_template_001",
"tunnel-discovered": 0
},
"url": "/pm/config/adom/demo/obj/switch-controller/managed-switch"
}
],
"session": "{{session}}"
}
{
"id": 4,
"result": [
{
"data": {
"switch-id": "fsw_template_001"
},
"status": {
"code": 0,
"message": "OK"
},
"url": "/pm/config/adom/demo/obj/switch-controller/managed-switch"
}
]
}
4.7.3. How to clone a FortiSwitch Template?#
Caught in #0511364.
The following example shows how to clone the
fsw_template_001 FortiSwitch Template in the demo ADOM. New FortiSwitch
Template name is fsw_template_002:
{
"id": 3,
"method": "clone",
"params": [
{
"data": {
"switch-id": "fsw_template_002"
},
"url": "pm/config/adom/demo/obj/switch-controller/managed-switch/fsw_template_001"
}
],
"session": "{{session}}"
}
{
"id": 3,
"result": [
{
"data": {
"switch-id": "fsw_template_002"
},
"status": {
"code": 0,
"message": "OK"
},
"url": "pm/config/adom/demo/obj/switch-controller/managed-switch/fsw_template_001"
}
]
}
4.7.4. How to create a custom command?#
{
"id": "1",
"method": "add",
"params": [
{
"url": "pm/config/adom/{{adom}}/obj/switch-controller/custom-command",
"data":
{
"command": "config user tacacs\n edit TACACS_SRV\n set authorization enable\n set authen-type ascii\n set key fortinet123456\n set server 10.0.0.1\n next\nend",
"command-name": "custom_command_002"
}
}
],
"session": "{{session}}"
}
Note
You have to use the
\ncharacter to pass a line in the CLI script
{
"id": "1",
"result": [
{
"data": {
"command-name": "custom_command_002"
},
"status": {
"code": 0,
"message": "OK"
},
"url": "pm/config/adom/production/obj/switch-controller/custom-command"
}
]
}
4.7.5. How to add a custom command to a FortiSwitch Template?#
{
"id": "1",
"verbose": 1,
"method": "add",
"params": [
{
"url": "/pm/config/adom/{{adom}}/obj/switch-controller/managed-switch/fsw_template_001/custom-command",
"data": {
"command-entry": "custom_command_002",
"command-name": "custom_command_002"
}
}
],
"session": "{{session}}"
}
Note
command-nameis an existing FortiSwitch custom command object (see How to create a custom command?)
{
"id": "1",
"result": [
{
"data": {
"command-entry": "custom_command_002"
},
"status": {
"code": 0,
"message": "OK"
},
"url": "/pm/config/adom/production/obj/switch-controller/managed-switch/fsw_template_001/custom-command"
}
]
}
4.7.6. How to assign a FortiSwitch template to a FortiSwitch?#
REQUEST:
{
"id": 1,
"jsonrpc": "1.0",
"method": "update",
"params": [
{
"data": {
"template": "fortiswitch.template.branches"
},
"scope member": [
{
"name": "branch2_fgt",
"vdom": "root"
}
],
"url": "/pm/config/adom/DEMO/obj/fsp/managed-switch/S108DVEN3ND-GG54"
}
],
"session": "choFZ1lhbjiexhxXCZyNqPhLO9V1N7gyVV29BoDixl1WuVvv7v7vrsd9H5mkAAqxt0/bVt/j4FPhWQOObbLSAg==",
"verbose": 1
}
RESPONSE:
{
"id": 1,
"result": [
{
"data": {
"switch-id": "S108DVEN3ND-GG54"
},
"status": {
"code": 0,
"message": "OK"
},
"url": "/pm/config/adom/DEMO/obj/fsp/managed-switch/S108DVEN3ND-GG54"
}
]
}
4.7.7. How to update a port in a FortiSwitch Template?#
The following example shows how to update the port port4 in the
fsw_template_001 FortiSwitch Template in the demo ADOM:
{
"id": 1,
"method": "update",
"params": [
{
"url":"/pm/config/adom/demo/obj/switch-controller/managed-switch/fsw_template_001/ports/port4",
"data": {
"allowed-vlans": [
"quarantine",
"vl_1002"
],
"vlan": [
"vl_1002"
]
}
}
],
"session": "{{session_id}}"
}
{
"id": 1,
"result": [
{
"data": {
"port-name": "port4"
},
"status": {
"code": 0,
"message": "OK"
},
"url": "/pm/config/adom/demo/obj/switch-controller/managed-switch/fsw_template_001/ports/port4"
}
]
}
4.7.8. How to import a FortiSwitch Template from a managed device?#
Caught in #612834.
{
"id": "70b61e3d-53fb-47e2-b763-64e8700331c8",
"method": "exec",
"params": [
{
"url": "pm/config/adom/root/_fsp/import/template",
"data": {
"switch": "S548DNREDACTED58",
"template": "sdfas",
"device": {
"name": "FortiGate-140E-POE",
"vdom": "root"
}
}
}
]
}
4.7.9. How to get the default port configuration for all supported FortiSwitch models?#
The following example shows how to get the default port configuration for all
the supported FortiSwitch models in the demo ADOM.
{
"id": 1,
"method": "get",
"params": [
{
"url": "/pm/config/adom/demo/_fsp/managed-switch/platforms"
}
],
"session": "{{session}}",
"verbose": 1
}
{
"id": 3,
"result": [
{
"data": [
{
"capability": "0x00000000000000001306ea751c75f9ff",
"capability32": "0x1c75f9ff",
"max-allowed-trunk-members": 8,
"name": "FortiSwitch-24VM",
"poe-detection-type": 3,
"poe_ports": [],
"ports": [
"port1",
"port2",
"port3",
"port4",
"port5",
"port6",
"port7",
"port8",
"port9",
"port10",
"port11",
"port12",
"port13",
"port14",
"port15",
"port16",
"port17",
"port18",
"port19",
"port20",
"port21",
"port22",
"port23",
"port24"
],
"prefix": "FS24VM"
},
"... TRUNCATED ..."
],
"status": {
"code": 0,
"message": "OK"
},
"url": "/pm/config/adom/demo/_fsp/managed-switch/platforms"
}
]
}
Tip
By examining all returned name attributes, you’ll get a list of all
FortiSwitch models supported by your FortiManager.
4.7.10. How to get the default port configuration for a particular FortiSwitch model?#
The following example shows how to get the default port configuration for
the FortiSwitch model FortiSwitch-124D in the demo ADOM.
{
"id": 1,
"method": "get",
"params": [
{
"url": "/pm/config/adom/demo/_fsp/managed-switch/platforms/FortiSwitch-124D"
}
],
"session": "{{session}}",
"verbose": 1
}
{
"id": 1,
"result": [
{
"data": [
{
"capability": "0x000000000000000000000015394dffd7",
"capability32": "0x394dffd7",
"max-allowed-trunk-members": 8,
"name": "FortiSwitch-124D",
"poe-detection-type": 3,
"poe_ports": [],
"ports": [
"port1",
"port2",
"port3",
"port4",
"port5",
"port6",
"port7",
"port8",
"port9",
"port10",
"port11",
"port12",
"port13",
"port14",
"port15",
"port16",
"port17",
"port18",
"port19",
"port20",
"port21",
"port22",
"port23",
"port24",
"port25",
"port26"
],
"prefix": "S124DN"
}
],
"status": {
"code": 0,
"message": "OK"
},
"url": "/pm/config/adom/demo/_fsp/managed-switch/platforms/FortiSwitch-124D"
}
]
}
4.7.11. How to add a per-device mapping to a vlan?#
We can just use the add method as shown below:
REQUEST:
{
"id": 1,
"jsonrpc": "1.0",
"method": "add",
"params": [
{
"data": {
"_dhcp-status": "enable",
"_scope": [
{
"name": "device_002",
"vdom": "root"
}
],
"dhcp-server": {
"auto-configuration": "enable",
"conflicted-ip-timeout": 1800,
"ddns-auth": "disable",
"ddns-server-ip": "0.0.0.0",
"ddns-ttl": 300,
"ddns-update": "disable",
"ddns-update-override": "disable",
"ddns-zone": null,
"default-gateway": "10.1.6.99",
"dns-server1": "0.0.0.0",
"dns-server2": "0.0.0.0",
"dns-server3": "0.0.0.0",
"dns-server4": "0.0.0.0",
"dns-service": "specify",
"domain": null,
"exclude-range": null,
"filename": null,
"forticlient-on-net-status": "enable",
"id": 0,
"ip-range": [
{
"end-ip": "10.1.6.200",
"id": 1,
"start-ip": "10.1.6.100"
}
],
"lease-time": 604800,
"mac-acl-default-action": "assign",
"netmask": "255.255.255.0",
"next-server": "0.0.0.0",
"ntp-server1": "0.0.0.0",
"ntp-server2": "0.0.0.0",
"ntp-server3": "0.0.0.0",
"ntp-service": "specify",
"options": [
{
"code": 0,
"id": 1,
"type": "hex",
"value": null
}
],
"reserved-address": [
{
"action": "reserved",
"circuit-id": null,
"circuit-id-type": "string",
"description": null,
"id": 1,
"ip": "0.0.0.0",
"mac": "00:00:00:00:00:00",
"remote-id": null,
"remote-id-type": "string",
"type": "mac"
}
],
"server-type": "regular",
"status": "enable",
"tftp-server": [],
"timezone": "00",
"timezone-option": "disable",
"vci-match": "disable",
"vci-string": [],
"wifi-ac-service": "specify",
"wifi-ac1": "0.0.0.0",
"wifi-ac2": "0.0.0.0",
"wifi-ac3": "0.0.0.0",
"wins-server1": "0.0.0.0",
"wins-server2": "0.0.0.0"
},
"interface": {
"dhcp-relay-agent-option": "enable",
"dhcp-relay-ip": [],
"dhcp-relay-service": "disable",
"dhcp-relay-type": "regular",
"ip": [
"10.1.6.99",
"255.255.255.0"
],
"ipv6": {
"autoconf": "disable",
"dhcp6-client-options": null,
"dhcp6-information-request": "disable",
"dhcp6-prefix-delegation": "disable",
"dhcp6-prefix-hint": "::/0",
"dhcp6-prefix-hint-plt": 604800,
"dhcp6-prefix-hint-vlt": 2592000,
"dhcp6-relay-ip": [],
"dhcp6-relay-service": "disable",
"dhcp6-relay-type": "regular",
"ip6-address": "::/0",
"ip6-allowaccess": [
"ping",
"ssh"
],
"ip6-default-life": 1800,
"ip6-delegated-prefix-list": null,
"ip6-dns-server-override": "enable",
"ip6-extra-addr": null,
"ip6-hop-limit": 0,
"ip6-link-mtu": 0,
"ip6-manage-flag": "disable",
"ip6-max-interval": 600,
"ip6-min-interval": 198,
"ip6-mode": "static",
"ip6-other-flag": "disable",
"ip6-prefix-list": null,
"ip6-reachable-time": 0,
"ip6-retrans-time": 0,
"ip6-send-adv": "disable",
"ip6-subnet": "::/0",
"ip6-upstream-interface": [],
"nd-mode": "basic",
"vrip6_link_local": "::",
"vrrp-virtual-mac6": "disable",
"vrrp6": null
},
"secondary-IP": "disable",
"secondaryip": null,
"vlanid": 1016
}
},
"url": "/pm/config/adom/TEST/obj/fsp/vlan/vl_marketing/dynamic_mapping"
}
],
"session": "O0CeySMnJwAbA9IWMYiw5gm4d/JsFKjm7nysBMomXhF76KvpCIiPoy0OV77J8RphQyC9BOtX3uSwGy4FDG8xePGD64aGirdg",
"verbose": 1
}
RESPONSE:
{
"id": 1,
"result": [
{
"data": {
"_scope": null
},
"status": {
"code": 0,
"message": "OK"
},
"url": "/pm/config/adom/TEST/obj/fsp/vlan/vl_marketing/dynamic_mapping"
}
]
}
4.7.12. How to delete a per-device mapping from a vlan?#
It is as simple as appending the device and vdom in the URL:
REQUEST:
{
"id": 1,
"jsonrpc": "1.0",
"method": "delete",
"params": [
{
"url": "/pm/config/adom/TEST/obj/fsp/vlan/vl_marketing/dynamic_mapping/device_001/root"
}
],
"session": "O19REjZMetkNVUapIPEpZduaWm6ibvUHfossFL/AuxLXM9fu2ruW0CCrC8Zp3YzDhU7y2+lBqtDvd9glT/hJ1JcVqQfHgCCo",
"verbose": 1
}
RESPONSE:
{
"id": 1,
"result": [
{
"status": {
"code": 0,
"message": "OK"
},
"url": "/pm/config/adom/TEST/obj/fsp/vlan/vl_marketing/dynamic_mapping/device_001/root"
}
]
}
4.7.13. How to get list of managed FortiSwitch?#
This is useful for instance, when we want to get the FortiSwitch status.
REQUEST:
{
"id": 3,
"method": "get",
"params": [
{
"fields": [
"name",
"switch-id",
"scope member",
"state",
"status"
],
"scope member": [
{
"name": "amer-12-fgt-01",
"vdom": "root"
},
{
"name": "amer-13-fgt-01",
"vdom": "root"
}
],
"url": "/pm/config/adom/demo/obj/fsp/managed-switch"
}
],
"session": "gYd7D9tR9I1diN8OifeR48Uk7QgPdxXpF5exoDMUHbX63+sJ6OFQKkVhFK7LLkuzjupy7rj2dDbiUwEeTeG8tw==",
"verbose": 1
}
RESPONSE::
{
"id": 3,
"result": [
{
"data": [
{
"name": "S108DVI_CWPKU64E",
"scope member": [
{
"name": "amer-12-fgt-01",
"vdom": "root"
}
],
"state": "enable",
"status": "idle",
"switch-id": "S108DVI_CWPKU64E"
},
{
"name": "S108DV89EWKQE248",
"scope member": [
{
"name": "amer-13-fgt-01",
"vdom": "root"
}
],
"state": "enable",
"status": "idle",
"switch-id": "S108DV89EWKQE248"
}
],
"status": {
"code": 0,
"message": "OK"
},
"url": "/pm/config/adom/demo/obj/fsp/managed-switch"
}
]
}
In the request, the scope member refers to two devices amer-12-fgt-01 and
amer-13-fgt-01 (and their respective root VDOM).
We can also use device groups:
"scope member": [
{
"name": "device_group_01"
},
{
"name": "device_group_02"
}
]
We can specify the default all devices group:
"scope member": [
{
"name": "All_FortiGate"
},
]
We can combine devices and device groups:
"scope member": [
{
"name": "device_01",
"vdom": "root"
},
{
"name": "device_group_01"
},
{
"name": "device_group_02"
}
{
"name": "device_02",
"vdom": "root"
}
]
4.7.14. How to get the FortiSwitch Status?#
{
"method": "get",
"params": [
{
"url": "/pm/config/adom/demo/_controller/status/fsw",
"scope member": [
  {
    "name": "All_FortiGate"
  }
]
}
],
"id": "5a4dee65-f6ec-40bf-9f05-eea76940745c",
"session": "{{session}}"
}
4.8. FortiExtender#
4.8.1. How to add a Model FortiExtender?#
The following example shows how to add the fext_001 Model FortiExtender in the dev_001 managed device in the demo ADOM:
{
  "id": "1",
  "method": "add",
  "params": [
    {
      "data": {
        "name": "fext_001",
        "ext-name": "fext_001",
        "id": "FX212F0000000001",
        "extension-type": 1,
        "profile": "fext_branches",
        "_is_model": true,
        "authorized": true,
        "_prefer-img-ver": null
      },
      "scope member": [
        {
          "name": "dev_001",
          "vdom": "root"
        }
      ],
      "url": "pm/config/adom/demo/obj/extension-controller/extender"
    }
  ],
  "session": "{{session}}"
}
{
  "result": [
    {
      "data": {
        "name": "fext_001"
      },
      "status": {
        "code": 0,
        "message": "OK"
      },
      "url": "pm/config/adom/demo/obj/extension-controller/extender"
    }
  ],
  "id": "1"
}
4.8.2. How to get the list of FortiExtender devices for one ADOM?#
The following example shows how to get the managed FortiExtender devices from managed FortiGate devices or device groups:
{
    "id": "1",
    "method": "get",
    "params": [
        {
            "url": "pm/config/adom/demo/obj/extension-controller/extender",
            "scope member": [
                {
                    "name": "{device name}",
                    "vdom": "{vdom name}"
                },
                {
                    "...",
                },
                {
                    "name": "{device group name}",
                },
            ]
        }
    ]
}
To avoid passing specific scope member elements, you can use the
pre-defined All_FortiGate device group to get all the FortiExtender devices for the specified ADOM:
{
  "id": 3,
  "method": "get",
  "params": [
    {
      "scope member": [
        {
          "name": "All_FortiGate"
        }
      ],
      "url": "pm/config/adom/demo/obj/extension-controller/extender"
    }
  ],
  "session": "{session}",
  "verbose": 1
}
{
  "id": 3,
  "result": [
    {
      "data": [
        {
          "_extender_conn": "0",
          "_modem1": {
            "_activation_status": null,
            "_auto-switch": {
              "dataplan": null,
              "disconnect": null,
              "disconnect-period": 0,
              "disconnect-threshold": 0,
              "oid": 5552,
              "signal": null,
              "status": null,
              "switch-back": null,
              "switch-back-time": null,
              "switch-back-timer": 0
            },
            "_band": null,
            "_cdma_profile": {
              "_aaa_spi": null,
              "_ha_spi": null,
              "_home_addr": null,
              "_idx": null,
              "_nai": null,
              "_primary_ha": null,
              "_secondary_ha": null,
              "_status": null,
              "oid": 5548
            },
            "_connect_status": null,
            "_current_snr": null,
            "_data_plan": null,
            "_drc_cdma_evdo": null,
            "_esn_imei": null,
            "_gsm_profile": {
              "_apn": null,
              "_cid": null,
              "_type": null,
              "oid": 5549
            },
            "_imsi": null,
            "_lte_physical_cellid": null,
            "_lte_rs_throughput": null,
            "_lte_rssi": null,
            "_lte_sinr": null,
            "_lte_ts_throughput": null,
            "_manufacture": null,
            "_model": null,
            "_modem_type": null,
            "_oma_dm_version": null,
            "_operating_mode": null,
            "_physical_port": null,
            "_pin_status": null,
            "_plmn": null,
            "_product": null,
            "_revision": null,
            "_roaming_status": null,
            "_rssi": null,
            "_service": null,
            "_signal_rsrp": null,
            "_signal_rsrq": null,
            "_signal_strength": null,
            "_sim1": {
              "_carrier": null,
              "_data_usage": 0,
              "_iccid": null,
              "_imsi": null,
              "_is_active": 0,
              "_maximum_allowed_data": 0,
              "_modem": 0,
              "_next_billing_date": null,
              "_overage_allowed": null,
              "_phone_number": null,
              "_slot": 0,
              "_status": null,
              "oid": 5550
            },
            "_sim2": {
              "_carrier": null,
              "_data_usage": 0,
              "_iccid": null,
              "_imsi": null,
              "_is_active": 0,
              "_maximum_allowed_data": 0,
              "_modem": 0,
              "_next_billing_date": null,
              "_overage_allowed": null,
              "_phone_number": null,
              "_slot": 0,
              "_status": null,
              "oid": 5551
            },
            "_usb_wan_mac": null,
            "_usim_status": null,
            "_wireless_operator": null,
            "_wireless_signal": null,
            "conn-status": 0,
            "default-sim": null,
            "gps": null,
            "ifname": [],
            "modem-id": 0,
            "oid": 5547,
            "preferred-carrier": null,
            "redundant-intf": null,
            "redundant-mode": null,
            "sim1-pin": null,
            "sim1-pin-code": [
              "ENC",
              "wAzU2vUukJt4urg6L/5pUEr0wOp67icWAmHV0xAfDqb4yhvs1mab45sl5bdjBA/tsKAuzwIqCZyjqGkQWbgz7+UahXoPkzrN9oepiYs2rwdat8AiltSSil1hGhN+Ojxm5ptF032kIu0uNmm6kveiM/8Z8x1ve1QUnOd+aD17g3QwEN/a"
            ],
            "sim2-pin": null,
            "sim2-pin-code": [
              "ENC",
              "4iyRkNUkNc3yrEqpFFzd+duvSZaoUrM2VFoud5cNKj9nWCn6mYX2Eql9P+ToqVGEF8NcPqB51NzYC6sgF2HHGWApuAar1YIcRtXgc4ZikfQfmX8CWv3s+VS+sykrKYaxckloniztq4DumBMPYg43lryWnMr/zp2sGcCZA1MWD1Vc5z/Y"
            ],
            "status": null
          },
          "_modem2": {
            "_activation_status": null,
            "_auto-switch": {
              "dataplan": null,
              "disconnect": null,
              "disconnect-period": 0,
              "disconnect-threshold": 0,
              "oid": 5558,
              "signal": null,
              "status": null,
              "switch-back": null,
              "switch-back-time": null,
              "switch-back-timer": 0
            },
            "_band": null,
            "_cdma_profile": {
              "_aaa_spi": null,
              "_ha_spi": null,
              "_home_addr": null,
              "_idx": null,
              "_nai": null,
              "_primary_ha": null,
              "_secondary_ha": null,
              "_status": null,
              "oid": 5554
            },
            "_connect_status": null,
            "_current_snr": null,
            "_data_plan": null,
            "_drc_cdma_evdo": null,
            "_esn_imei": null,
            "_gsm_profile": {
              "_apn": null,
              "_cid": null,
              "_type": null,
              "oid": 5555
            },
            "_imsi": null,
            "_lte_physical_cellid": null,
            "_lte_rs_throughput": null,
            "_lte_rssi": null,
            "_lte_sinr": null,
            "_lte_ts_throughput": null,
            "_manufacture": null,
            "_model": null,
            "_modem_type": null,
            "_oma_dm_version": null,
            "_operating_mode": null,
            "_physical_port": null,
            "_pin_status": null,
            "_plmn": null,
            "_product": null,
            "_revision": null,
            "_roaming_status": null,
            "_rssi": null,
            "_service": null,
            "_signal_rsrp": null,
            "_signal_rsrq": null,
            "_signal_strength": null,
            "_sim1": {
              "_carrier": null,
              "_data_usage": 0,
              "_iccid": null,
              "_imsi": null,
              "_is_active": 0,
              "_maximum_allowed_data": 0,
              "_modem": 0,
              "_next_billing_date": null,
              "_overage_allowed": null,
              "_phone_number": null,
              "_slot": 0,
              "_status": null,
              "oid": 5556
            },
            "_sim2": {
              "_carrier": null,
              "_data_usage": 0,
              "_iccid": null,
              "_imsi": null,
              "_is_active": 0,
              "_maximum_allowed_data": 0,
              "_modem": 0,
              "_next_billing_date": null,
              "_overage_allowed": null,
              "_phone_number": null,
              "_slot": 0,
              "_status": null,
              "oid": 5557
            },
            "_usb_wan_mac": null,
            "_usim_status": null,
            "_wireless_operator": null,
            "_wireless_signal": null,
            "conn-status": 0,
            "default-sim": null,
            "gps": null,
            "ifname": [],
            "modem-id": 0,
            "oid": 5553,
            "preferred-carrier": null,
            "redundant-intf": null,
            "redundant-mode": null,
            "sim1-pin": null,
            "sim1-pin-code": [
              "ENC",
              "uXot5E9uQdDojm/ovmf/7ahqUreca9JxuWsIGiEOv3EN8c3a4qRXptq+IcOKltReMkTFdhRWF2Qmml+KqzLjBg9zgge+avuJjVx6ybgwvYv3L7gSQPDZbE9H8vwjPwTkfeqsz7BsBToQvtIYXVGjHtsgfiTG/SJA5BZIYPfuTIK6DCy7"
            ],
            "sim2-pin": null,
            "sim2-pin-code": [
              "ENC",
              "ZAySYbFqADbVIi61RvJ2hTJ7L6cCksu29Hs6ff1PTOhLyhUwiCr/gbeeIrHZdjv3EsBN9rjnv3DVZ+ZwMPI8oziGT1q+shKsATN7XG3JBDfjkbiuike/bDpzmIZSSwO9I9HuxTQ3wO9h6kATvPG2uctz7g+jAi9z6A5TI2/pBQSAkY1e"
            ],
            "status": null
          },
          "_upgrade-time": 0,
          "authorized": "enable",
          "bandwidth-limit": 1024,
          "device-id": 1024,
          "enforce-bandwidth": "disable",
          "extension-type": "wan-extension",
          "firmware-provision-latest": "disable",
          "id": "FX311F**********",
          "login-password": [
            "ENC",
            "L9Wm51q6WxKcpx9ZJTaSxAPhuwAoU0wY0zAqxd3tTjJuJTwy2FEYTxJm4PJHgw1gyZuIE2KQRDJe1VEcWc+QFIbZEZ3hfcXUVg57XSkQtlimZ+E/DO2MmQnZjrDe6/VmcnwY/SLdkWigCrSvqe4ewD9rdoU1GUdLFL9s4ySZfD/uuXj9GCWihc5A9bPc2JgShwmvbw=="
          ],
          "login-password-change": "no",
          "name": "FX311F",
          "oid": 5545,
          "override-allowaccess": "disable",
          "override-enforce-bandwidth": "disable",
          "override-login-password-change": "disable",
          "profile": [],
          "scope member": [
            {
              "name": "dut_fgt_04",
              "vdom": "root"
            }
          ],
          "vdom": 0,
          "wan-extension": {
            "modem1-extension": [],
            "modem2-extension": [],
            "oid": 5546
          }
        }
      ],
      "status": {
        "code": 0,
        "message": "OK"
      },
      "url": "pm/config/adom/dc_amiens/obj/extension-controller/extender"
    }
  ]
}
4.8.3. How to delete a FortiExtender device?#
To delete the fext_001 FortiExtender device from the dc_emea ADOM:
{
  "id": 3,
  "method": "delete",
  "params": [
    {
      "scope member": [
        {
          "name": "dc_emea_dev_001",
          "vdom": "root"
        }
      ],
      "url": "pm/config/adom/dc_emea/obj/extension-controller/extender/fext_001"
    }
  ],
  "session": "{{session}}"
}
{
  "id": 3,
  "result": [
    {
      "status": {
        "code": 0,
        "message": "OK"
      },
      "url": "pm/config/adom/dc_emea/obj/extension-controller/extender/fext_001"
    }
  ]
}
4.8.4. How to get the FortiExtender Status?#
Following example is demonstrating how to get the status of the FortiExtender
devices controlled by all the managed devices in the demo ADOM:
{
  "id": 1,
  "verbose": 1,
  "method": "get",
  "params": [
    {
      "url": "/pm/config/adom/demo/_controller/status/fex",
      "scope member": [
        {
          "name": "All_FortiGate"
        }
      ]
    }
  ],
  "session": "{{session}}"
}
{
    "result": [
        {
            "data": [
                {
                    "conn": "",
                    "data": "{ \"id\": \"FX201EREDACTED02\", \"name\": \"FEX201E\", \"system\": { \"addr_type\": \"\", \"cpu_usage\": 0, \"mem_usage\": 16, \"ip_address\": \"192.168.77.2\", \"ext_mac\": \"e0:23:ff:f5:87:26\", \"netmask\": \"255.255.255.0\", \"gateway\": \"192.168.77.1\", \"sw_version\": \"FXT201E-v7.0.3-build056\", \"hw_version\": \"P23421-02\", \"temperature\": \"63.00\", \"gps_lat\": \"\", \"gps_long\": \"\" }, \"software_version\": \"{\\\"fex\\\":\\\"FXT201E-v7.0.3-build056\\\", \\\"fem\\\":\\\"\\\"}\", \"modem1\": { \"activation_status\": \"\", \"band\": \"\", \"connect_status\": \"CONN_STATE_IDLE\", \"current_snr\": \"\", \"drc_cdma_evdo\": \"\", \"esn_imei\": \"359073069194540\", \"imsi\": \"\", \"lte_physical_cellid\": \"\", \"lte_rs_throughput\": \"\", \"lte_rssi\": \"\", \"lte_sinr\": \"\", \"lte_ts_throughput\": \"\", \"manufacturer\": \"Sierra Wireless, Incorporated\", \"model\": \"EM7455\", \"modem_type\": \"EM7455\", \"oma_dm_version\": \"\", \"operating_mode\": \"\", \"physical_port\": \"2-1.2\", \"pin_status\": \"\", \"plmn\": \"\", \"product\": \"Sierra Wireless, Incorporated\", \"revision\": \"SWI9X30C_02.32.11.00 r8042 CARMD-EV-FRMWR2 2019\\/05\\/15 21:52:20\", \"roaming_status\": \"\", \"rssi\": \"\", \"service\": \"\", \"signal_rsrp\": \"\", \"signal_rsrq\": \"\", \"signal_strength\": \"\", \"usb_wan_mac\": \"\", \"usim_status\": \"\", \"wireless_operator\": \"\", \"wireless_signal\": \"\", \"cdma_profile\": { \"idx\": \"\", \"status\": \"\", \"NAI\": \"\", \"home_addr\": \"\", \"primary_ha\": \"\", \"secondary_ha\": \"\", \"aaa_spi\": \"\", \"ha_spi\": \"\" }, \"sim1\": { \"carrier\": \"\", \"data_usage\": 0, \"iccid\": \"\", \"imsi\": \"\", \"is_active\": 0, \"maximum_allowed_data\": 0, \"modem\": 1, \"next_billing_date\": \"\", \"overage_allowed\": \"\", \"phone_number\": \"\", \"slot\": 1, \"status\": \"disable\" }, \"sim2\": { \"carrier\": \"\", \"data_usage\": 0, \"iccid\": \"\", \"imsi\": \"\", \"is_active\": 0, \"maximum_allowed_data\": 0, \"modem\": 1, \"next_billing_date\": \"\", \"overage_allowed\": \"\", \"phone_number\": \"\", \"slot\": 2, \"status\":          \"disable\" } }, \"connection_state\": \"Connected\" }",
                    "dev": "dev_001",
                    "sn": "FX201EREDACTED02",
                    "state": "authorized",
                    "type": "fex",
                    "vdom": "root",
                    "version": "{\"fex\":\"FXT201E-v7.0.3-build056\", \"fem\":\"\"}"
                }
            ],
            "url": "pm/config/adom/demo/_controller/status/fex/"
        }
    ],
    "id": 1
}
4.9. CLI Template#
4.9.1. How to add a CLI Template?#
The following example shows how to add the cli_t_001 CLI Template in the
demo ADOM:
{
  "id": 1,
  "method": "add",
  "params": [
    {
      "data": {
        "name": "cli_t_001",
        "script": "config system global\nset hostname branch_$(site_id)\nend",
        "type": "cli",
      },
      "url": "/pm/config/adom/demo/obj/cli/template"
    }
  ],
  "session": "{{session}}",
}
Note
typecould becliorjinja
{
  "id": 1,
  "result": [
    {
      "data": {
        "name": "cli_t_001"
      },
      "status": {
        "code": 0,
        "message": "OK"
      },
      "url": "/pm/config/adom/demo/obj/cli/template"
    }
  ]
}
4.9.2. How to add a Pre-Run CLI Template?#
The API request is very similar to adding a CLI Template (see How to add a CLI Template?. You just need to add the provision attribute as shown in the
example below.
The following example shows how to add the pre_run_cli_t_001 CLI Template in
the demo ADOM:
{
  "id": 3,
  "method": "add",
  "params": [
    {
      "data": {
        "name": "pre_run_cli_t_001",
        "provision": "enable",
        "script": "config system global\nset hostname branch_$(site_id)\nend",
        "type": "cli"
      },
      "url": "/pm/config/adom/demo/obj/cli/template"
    }
  ],
  "session": "{{session}}"
}
Note
typecould becliorjinja
{
  "cid": 15,
  "id": 3,
  "result": [
    {
      "data": {
        "name": "pre_run_cli_t_001"
      },
      "status": {
        "code": 0,
        "message": "OK"
      },
      "url": "/pm/config/adom/demo/obj/cli/template"
    }
  ]
}
4.9.3. How to delete a CLI Template?#
The following example shows how to delete the cli_t_001 CLI Template from the demo ADOM:
{
  "id": 1,
  "method": "delete",
  "params": [
    {
      "url": "/pm/config/adom/demo/obj/cli/template/cli_t_001"
    }
  ],
  "session": "{{session}}"
}
{
  "id": 1,
  "result": [
    {
      "status": {
        "code": 0,
        "message": "OK"
      },
      "url": "/pm/config/adom/demo/obj/cli/template/cli_t_001"
    }
  ]
}
4.9.4. How to add a CLI Template Group ?#
The following example shows how to add the cli_t_g_001 CLI Template Group
in the demo ADOM which contains the cli_t_001 and cli_t_002 CLI Templates:
{
  "id": 1,
  "method": "add",
  "params": [
    {
      "data": {
        "member": [
          "cli_t_001",
          "cli_t_002"
        ],
        "name": "cli_t_g_001"
      },
      "url": "/pm/config/adom/demo/obj/cli/template-group"
    }
  ],
  "session": "{{session}}"
}
{
  "id": 1,
  "result": [
    {
      "data": {
        "name": "cli_t_g_001"
      },
      "status": {
        "code": 0,
        "message": "OK"
      },
      "url": "/pm/config/adom/demo/obj/cli/template-group"
    }
  ]
}
4.9.5. How to add a CLI Template in an CLI Template Group?#
The following example shows how to add the cli_t_003 and cli_t_003 CLI Templates into the cli_t_g_001 in the demo ADOM:
{
  "id": 1,
  "method": "add",
  "params": [
    {
      "data": [
        "cli_t_003",
        "cli_t_004"
      ],
      "url": "/pm/config/adom/demo/obj/cli/template-group/cli_t_g_001/member"
    }
  ],
  "session": "{{session}}"
}
{
  "id": 1,
  "result": [
    {
      "status": {
        "code": 0,
        "message": "OK"
      },
      "url": "/pm/config/adom/demo/obj/cli/template-group/cli_t_g_001/member"
    }
  ]
}
4.9.6. How to delete a CLI Template Group?#
The followinge example shows how to delete the cli_t_g_001 CLI Template Group from the demo ADOM:
{
  "id": 1,
  "method": "delete",
  "params": [
    {
      "url": "/pm/config/adom/demo/obj/cli/template-group/cli_t_g_001"
    }
  ],
  "session": "{{session}}"
}
{
  "id": 1,
  "result": [
    {
      "status": {
        "code": 0,
        "message": "OK"
      },
      "url": "/pm/config/adom/demo/obj/cli/template-group/cli_t_g_001"
    }
  ]
}
4.9.7. How to get the list of assigned devices for a CLI Template?#
The following example shows how to get the list of assigned devices for the cli_t_001 CLI Template in the demo ADOM:
{
  "id": 3,
  "method": "get",
  "params": [
    {
      "fields": [
        "name"
      ],
      "option": [
        "scope member",
        "extra option",
        "no loadsub"
      ],
      "url": "/pm/config/adom/demo/obj/cli/template/cli_t_001"
    }
  ],
  "session": "{{session}}",
  "verbose": 1
}
{
  "id": 3,
  "result": [
    {
      "data": {
        "name": "cli_t_001",
        "obj flags": 16,
        "oid": 5993,
        "scope member": [
          {
            "name": "dev_001",
            "vdom": "root"
          }
        ]
      },
      "status": {
        "code": 0,
        "message": "OK"
      },
      "url": "/pm/config/adom/demo/obj/cli/template/cli_t_001"
    }
  ]
}
Note
The
cli_t_001CLI Template is currently assigned to thedev_001managed device
4.9.8. How to get the list of assigned devices for a CLI Template Group?#
The following example shows how to get the list of assigned devices for the cli_t_g_001 CLI Template Group in the demo ADOM:
{
  "id": 3,
  "method": "get",
  "params": [
    {
      "fields": [
        "name"
      ],
      "option": [
        "scope member"
      ],
      "url": "/pm/config/adom/demo/obj/cli/template-group/cli_t_g_001"
    }
  ],
  "session": "{{session}}",
  "verbose": 1
}
{
  "id": 3,
  "result": [
    {
      "data": {
        "name": "cli_t_g_001",
        "obj flags": 16,
        "oid": 3725,
        "scope member": [
          {
            "name": "dev_001",
            "vdom": "root"
          }
        ]
      },
      "status": {
        "code": 0,
        "message": "OK"
      },
      "url": "/pm/config/adom/demo/obj/cli/template-group/cli_t_g_001"
    }
  ]
}
Note
The
cli_t_g_001CLI Template Group is currently assigned to thedev_001managed device
4.9.9. How to assign a CLI Template to a device?#
This section is applicable to CLI Templates and Pre-Run CLI Templates.
The following example shows how to assign the cli_t_001 CLI Template to
dev_001 and dev_002 managed devices in the demo ADOM:
{
  "id": 1,
  "method": "add",
  "params": [
    {
      "data": [
        {
          "name": "dev_001",
          "vdom": "root"
        },
        {
          "name": "dev_002",
          "vdom": "root"
        }
      ],
      "url": "/pm/config/adom/demo/obj/cli/template/cli_t_001/scope member"
    }
  ],
  "session": "{{session}}"
}
{
  "id": 1,
  "result": [
    {
      "status": {
        "code": 0,
        "message": "OK"
      },
      "url": "/pm/config/adom/demo/obj/cli/template/cli_t_001/scope member"
    }
  ]
}
4.9.10. How to assign a Pre-Run CLI Template to a device?#
A Pre-RUN CLI Template is just a CLI Template applied at a different time in the installation process.
To assign the test_001 Pre-Run CLI Template to the dc_emea_dev_003
device from the dc_emea ADOM:
{
  "id": 3,
  "method": "add",
  "params": [
    {
      "data": {
        "name": "dc_emea_dev_001",
        "vdom": "global"
      },
      "url": "/pm/config/adom/dc_emea/obj/cli/template/test_001/scope member"
    }
  ],
  "session": "TlAAeLDAWnuS1F9NMWPgmxvFxfscIwv9WOWXN31VskM+eMT9GluESP5Sg8foa1TPxWvpRdH9bGiew7pKO9kPMQ=="
}
{
  "id": 3,
  "result": [
    {
      "status": {
        "code": 0,
        "message": "OK"
      },
      "url": "/pm/config/adom/dc_emea/obj/cli/template/test_001/scope member"
    }
  ]
}
4.9.11. How to assign a CLI template group to a device?#
REQUEST:
{
  "id": 1,
  "jsonrpc": "1.0",
  "method": "add",
  "params": [
    {
      "data": [
        {
          "name": "branch2_fgt",
          "vdom": "root"
        }
      ],
      "url": "/pm/config/adom/DEMO/obj/cli/template-group/cli.template.group.branches/scope member"
    }
  ],
  "session": "oyeLwnK5I3/80mDfTv6sUjluR53QWJnVXAAWlknFJZ98shF5caZPDIwfs3/7OWKr9A3+XA4cRJK3qZ++gllqrQ==",
  "verbose": 1
}
RESPONSE:
{
  "id": 1,
  "result": [
    {
      "status": {
        "code": 0,
        "message": "OK"
      },
      "url": "/pm/config/adom/DEMO/obj/cli/template-group/cli.template.group.branches/scope member"
    }
  ]
}
4.9.12. How to assign a CLI Template (Group) to the global VDOM of a device?#
Just use global as VDOM name:
REQUEST:
{
  "id": 1,
  "jsonrpc": "1.0",
  "method": "add",
  "params": [
    {
      "data": {
        "name": "device_001",
        "vdom": "global"
      },
      "url": "/pm/config/adom/demo/obj/cli/template-group/branches/scope member"
    }
  ],
  "session": "zChH9+y8oP6Pejxr2xyu+zGJhj7wtgv9nBHSKeE+p8P3hNT+mXZGLl71v9YXEnFgPftwPwl2RciFWAvLq45IPQ==",
  "verbose": 1
}
RESPONSE:
{
  "id": 1,
  "result": [
    {
      "status": {
        "code": 0,
        "message": "OK"
      },
      "url": "/pm/config/adom/demo/obj/cli/template-group/branches/scope member"
    }
  ]
}
4.9.13. How to unassign a device from a cli template?#
REQUEST:
{
  "id": 1,
  "jsonrpc": "1.0",
  "method": "delete",
  "params": [
    {
      "data": [
        {
          "name": "branch2_fgt",
          "vdom": "vd_001"
        },
        {
          "name": "branch2_fgt",
          "vdom": "vd_002"
        }
      ],
      "url": "/pm/config/adom/DEMO/obj/cli/template/cli.template.005.router.bgp/scope member"
    }
  ],
  "session": "wbdeuDFUt7J7W/1o5vIpTvDT0fCIRBHyP2fL0BDmQnhIpob4ikYcQUijo3moWv467Q9XSQhpaK85K5MYZv51oA==",
  "verbose": 1
}
RESPONSE:
{
  "id": 1,
  "result": [
    {
      "status": {
        "code": 0,
        "message": "OK"
      },
      "url": "/pm/config/adom/DEMO/obj/cli/template/cli.template.005.router.bgp/scope member"
    }
  ]
}
4.9.14. How to unassign a device from a cli template group?#
REQUEST:
{
  "id": 1,
  "jsonrpc": "1.0",
  "method": "delete",
  "params": [
    {
      "data": {
        "name": "branch2_fgt",
        "vdom": "vd_001"
      },
      "url": "/pm/config/adom/DEMO/obj/cli/template-group/cli.template.group.branches/scope member"
    }
  ],
  "session": "PhOtZut4nOnRs+4tfGBHpVgigkF30snHKXDJkKB+645dAQjp9LGzjW6exMQsNCI12pOyNDwl7gqfbJ0HGQiZ0Q==",
  "verbose": 1
}
RESPONSE:
{
  "id": 1,
  "result": [
    {
      "status": {
        "code": 0,
        "message": "OK"
      },
      "url": "/pm/config/adom/DEMO/obj/cli/template-group/cli.template.group.branches/scope member"
    }
  ]
}
4.9.15. How to check a CLI Template or a CLI Template Group?#
This operation is triggered by the GUI when you use right-click a CLI Template or CLI Template Group and select Validate. It is also triggered when you right-click a CLI Template or CLI Template Group and you choose Preview On Device with the Run Validation toggle enabled.
The following example shows how to check the cli_template_001 CLI
Template for the dev_001 managed device in the demo ADOM.
{
  "id": 3,
  "method": "exec",
  "params": [
    {
      "data": {
        "adom": "demo",
        "cliprof": "cli_template_001",
        "scope": [
          {
            "name": "dev_001",
            "vdom": "root"
          }
        ]
      },
      "url": "/securityconsole/cliprof/check"
    }
  ],
  "session": "{{session}}"
}
{
  "id": 3,
  "result": [
    {
      "data": {
        "task": 2801
      },
      "status": {
        "code": 0,
        "message": "OK"
      },
      "url": "/securityconsole/cliprof/check"
    }
  ]
}
You need to monitor the task. Below is an example of the task output when it completes:
{
  "id": 5,
  "method": "get",
  "params": [
    {
      "url": "/task/task/2801"
    }
  ],
  "session": "{{session}}",
  "verbose": 1
}
{
  "id": 5,
  "result": [
    {
      "data": {
        "adom": 40500,
        "end_tm": 1740553300,
        "flags": 0,
        "id": 2801,
        "line": [
          {
            "detail": "Missing variable mapping on this device.",
            "end_tm": 1740553300,
            "err": 0,
            "history": [
              {
                "detail": "2025-02-26 08:01:38:check device variables",
                "name": "dev_001(root)",
                "percent": 0,
                "state": 0,
                "vdom": "root"
              },
              {
                "detail": "2025-02-26 08:01:40:Missing variable mapping on this device.",
                "name": "dev_001(root)",
                "percent": 100,
                "state": 5,
                "vdom": "root"
              }
            ],
            "ip": "",
            "name": "dev_001(root)",
            "oid": 40756,
            "percent": 100,
            "poid": 0,
            "start_tm": 1740553298,
            "state": "error",
            "vdom": "root"
          }
        ],
        "num_done": 0,
        "num_err": 1,


        "num_lines": 1,
        "num_warn": 0,
        "percent": 100,
        "pid": 0,
        "src": "security console",
        "start_tm": 1740553298,
        "state": "error",
        "title": "cli template 'cli_template_001' validation",
        "tot_percent": 100,
        "user": "devops"
      },
      "status": {
        "code": 0,
        "message": "OK"
      },
      "url": "/task/task/2801"
    }
  ]
}
Note
In this example, the dev_001 device is not having a value for a
used metadata.
4.10. SD-WAN Template#
4.10.1. SD-WAN Template Assignement#
4.10.1.1. How to assign a SD-WAN template to a device?#
REQUEST:
{
  "id": 1,
  "jsonrpc": "1.0",
  "method": "add",
  "params": [
    {
      "data": [
        {
          "name": "branch2_fgt",
          "vdom": "root"
        }
      ],
      "url": "/pm/wanprof/adom/DEMO/sdwan.template.branches/scope member"
    }
  ],
  "session": "WYy1EnQn09jiTFIM4kKJLfn7OFi4HkP7eGfoNAQcI4tzXfNX+n1nlcqS6x4N3H5WfUJGr1D4GCYv7Dmp5Whxcg==",
  "verbose": 1
}
RESPONSE:
{
  "id": 1,
  "result": [
    {
      "status": {
        "code": 0,
        "message": "OK"
      },
      "url": "/pm/wanprof/adom/DEMO/sdwan.template.branches/scope member"
    }
  ]
}
4.10.1.2. How to unassign a SD-WAN template from a device?#
Just replace add with delete.
REQUEST:
{
  "id": 1,
  "jsonrpc": "1.0",
  "method": "delete",
  "params": [
    {
      "data": [
        {
          "name": "branch2_fgt",
          "vdom": "root"
        }
      ],
      "url": "/pm/wanprof/adom/DEMO/sdwan.template.branches/scope member"
    }
  ],
  "session": "WYy1EnQn09jiTFIM4kKJLfn7OFi4HkP7eGfoNAQcI4tzXfNX+n1nlcqS6x4N3H5WfUJGr1D4GCYv7Dmp5Whxcg==",
  "verbose": 1
}
RESPONSE:
{
  "id": 1,
  "result": [
    {
      "status": {
        "code": 0,
        "message": "OK"
      },
      "url": "/pm/wanprof/adom/DEMO/sdwan.template.branches/scope member"
    }
  ]
}
4.10.2. How to get list of SD-WAN template with assigned devices?#
REQUEST:
{
  "id": 1,
  "jsonrpc": "1.0",
  "method": "get",
  "params": [
    {
      "fields": [
        "scope member",
        "description"
      ],
      "sortings": [
        {
          "name": 1
        }
      ],
      "url": "/pm/wanprof/adom/DEMO"
    }
  ],
  "session": "lXvZLSAvsKGIqn63OKVOmfUd0dgDhiBGmV9tZf3/fKRoG42Wm1wtyB+WJoT3VMHm1xJkv2i+mFS0Wbx3zbWBlg==",
  "verbose": 1
}
RESPONSE:
{
  "id": 1,
  "result": [
    {
      "data": [
        {
          "description": "",
          "name": "sdwan.template.branch3",
          "oid": 1905,
          "scope member": [
            {
              "name": "branch3_fgt",
              "vdom": "root"
            }
          ]
        },
        {
          "description": "",
          "name": "sdwan.template.branches",
          "oid": 1540,
          "scope member": [
            {
              "name": "branch1_fgt",
              "vdom": "root"
            }
          ]
        },
                 {
          "description": "",
          "name": "sdwan.template.datacenter",
          "oid": 1710,
          "scope member": [
            {
              "name": "datacenter_fgt",
              "vdom": "root"
                           }
                         ]
        }
      ],
      "status": {
        "code": 0,
        "message": "OK"
      },
      "url": "/pm/wanprof/adom/DEMO"
    }
  ]
}
4.10.3. How to get historical data for devices?#
This is about getting the date used to produce the Device Manager > SD-WAN > Monitoring > Table View historical graphs…
To capture the used FMG JSON API:
# diagnose debug service rtm 255
# diagnose debug enable
# diagnose debug timestamp enable
One example of what we get, when we click the device in the Table View page:
REQUEST:
{
  "id": 1,
  "jsonrpc": "1.0",
  "method": "get",
  "params": [
    {
      "filter": {
        "key": [
                [
                  "interface",
                ]
              ],
              "timestamp": [
                [
                  "start",
                  "==",
                  1583496501
                ],
                [
                  "end",
                  "==",
                  1583500101
                ]
              ]
      },
      "url": "/rtm/global/rhistory/monitor/sd-wan-intf-log/device/branch1_fgt"
    }
  ],
  "session": "KIV4BMu67GdlpGBpU7LqGQ34I4vIlsaHBD5jyNQwxNTSUUlsXZn2gaO4CJmvVe1dT7Jd9AatFqQaAIV1oN3pYA==",
  "verbose": 1
}
RESPONSE:
{
  "id": 1,
  "result": [
    {
      "data": [
        {
          "interface": "ol_inet_0",
          "log": [
            {
              "timestamp": 1583496552,
              "value": {
                "bi_bandwidth": 38,
                "egress_queue": [],
                "rx_bandwidth": 19,
                "rx_bytes": 31460,
                "tx_bandwidth": 19,
                "tx_bytes": 31340
              }
            },
          [...]
4.10.4. TODO: SD-WAN Monitoring - Table View#
Caught in #0598650.
REQUEST:
{
  "client": "rtmmond:544",
  "id": 5801,
  "method": "exec",
  "params": [
    {
      "data": {
        "dir": "/var/upload/virtual-wan/sla-log"
      },
      "url": "proc/rest/data"
    }
  ],
  "root": "dmworker"
}
4.10.5. FortiManager 6.4 and older#
4.10.5.1. How to create an interface member?#
In ADOM jpf_demo, we add interface member ul_inet2 pointing to the same
name and existing normalized interface ul_inet2:
REQUEST:
{
  "id": 3,
  "method": "add",
  "params": [
    {
      "data": {
        "interface": [
          "ul_inet2"
        ],
        "name": "ul_inet2"
      },
      "url": "/pm/config/adom/jpf_demo/obj/dynamic/virtual-wan-link/members"
    }
  ],
  "session": "raFZDHgo5kjbL1965fd4i0Y2bCygF7DB5tdVHVT7E260rcBfqEoyg6RiLijPEnBAJdaeJ7xPg63Dfs3NFMazfA=="
}
RESPONSE:
{
  "id": 3,
  "result": [
    {
      "data": {
        "name": "ul_inet2"
      },
      "status": {
        "code": 0,
        "message": "OK"
      },
      "url": "/pm/config/adom/jpf_demo/obj/dynamic/virtual-wan-link/members"
    }
  ]
}
4.10.5.2. How to create an SD-WAN Template?#
In ADOOM jpf_demo, we create SD-WAN Template branches:
REQUEST:
{
  "id": 3,
  "method": "add",
  "params": [
    {
      "data": [
        {
          "name": "branches",
          "type": "wanprof"
        }
      ],
      "url": "/pm/wanprof/adom/jpf_demo"
    }
  ],
  "session": "f6dC0P+/KW1FafCOFvl7TbxZZv4Jr8uJx5gEFpm1KPdB0uLPGUpsOuofucGMSMJry5vVIffH8c/8fFbYKUi02g=="
}
RESPONSE:
{
  "id": 3,
  "result": [
    {
      "status": {
        "code": 0,
        "message": "OK"
      },
      "url": "/pm/wanprof/adom/jpf_demo"
    }
  ]
}
4.11. IPsec Tunnel Template#
4.11.1. How to get the list of IPsec Tunnel Templates?#
The following example shows how to get the list of existing IPsec Tunnel
Template in the demo ADOM:
{
  "id": 3,
  "method": "get",
  "params": [
    {
      "url": "/pm/template/_ipsec/adom/demo"
    }
  ],
  "session": "{{session}}"
  "verbose": 1
}
{
  "id": 3,
  "result": [
    {
      "data": [
        {
          "name": "IPsec_Fortinet_Recommended",
          "oid": 5480,
          "template setting": {
            "option": "readonly",
            "stype": "_ipsec",
            "widgets": [
              "_ipsec"
            ]
          },
          "type": "template"
        },
        {
          "name": "BRANCH_IPsec_Recommended",
          "oid": 5484,
          "template setting": {
            "option": "readonly",
            "stype": "_ipsec",
            "widgets": [
              "_ipsec"
            ]
          },
          "type": "template"
        },
        {
          "name": "HUB_IPsec_Recommended",
          "oid": 5490,
          "template setting": {
            "option": "readonly",
            "stype": "_ipsec",
            "widgets": [
              "_ipsec"
            ]
          },
          "type": "template"
        },
        {
          "name": "ipsec_tunnel_template_001",
          "oid": 5584,
          "scope member": [
            {
              "name": "dev_001",
              "vdom": "root"
            },
            {
              "name": "dev_002",
              "vdom": "root"
            }
          ],
          "template setting": {
            "description": "New IPsec Tunnel Template",
            "stype": "_ipsec",
            "widgets": [
              "_ipsec"
            ]
          },
          "type": "template"
        }
      ],
      "status": {
        "code": 0,
        "message": "OK"
      },
      "url": "/pm/template/_ipsec/adom/demo"
    }
  ]
}
Note
The
*_Recommendeddefault IPsec Tunnel Templates are returnedWhen devices are device groups are assigned to IPsec Tunnel Template, FortiManager returns the corresponding
scope memberattribute, as shown for theipsec_tunnel_template_001.
4.11.2. How to get a specific IPsec Tunnel Template?#
The following example shows how to get the ipsec_tunnel_template_001 IPsec Tunnel Template in the demo ADOM using:
{
  "id": 3,
  "method": "get",
  "params": [
    {
      "url": "/pm/template/_ipsec/adom/demo/ipsec_tunnel_template_001"
    }
  ],
  "session": "{{session}}"
  "verbose": 1
}
{
  "id": 3,
  "result": [
    {
      "data": {
        "name": "ipsec_tunnel_template_001",
        "oid": 5584,
        "scope member": [
          {
            "name": "dev_001",
            "vdom": "root"
          },
          {
            "name": "dev_002",
            "vdom": "root"
          }
        ],
        "template setting": {
          "description": "New IPsec Tunnel Template",
          "option": null,
          "stype": "_ipsec",
          "widgets": [
            "_ipsec"
          ]
        },
        "type": "template"
      },
      "status": {
        "code": 0,
        "message": "OK"
      },
      "url": "/pm/template/_ipsec/adom/demo/ipsec_tunnel_template_001"
    }
  ]
}
It is also possible to use the filter way to get the same result:
{
  "id": 3,
  "method": "get",
  "params": [
    {
      "filter": [
        "name",
        "==",
        "ipsec_tunnel_template_001"
      ],
      "url": "/pm/template/_ipsec/adom/demo"
    }
  ],
  "session": "{{session}}"
  "verbose": 1
}
{
  "id": 3,
  "result": [
    {
      "data": [
        {
          "name": "ipsec_tunnel_template_001",
          "oid": 5584,
          "scope member": [
            {
              "name": "dev_001",
              "vdom": "root"
            },
            {
              "name": "dev_002",
              "vdom": "root"
            }
          ],
          "template setting": {
            "description": "New IPsec Tunnel Template",
            "stype": "_ipsec",
            "widgets": [
              "_ipsec"
            ]
          },
          "type": "template"
        }
      ],
      "status": {
        "code": 0,
        "message": "OK"
      },
      "url": "/pm/template/_ipsec/adom/demo"
    }
  ]
}
4.11.3. How to get the tunnels of an IPsec Tunnel Template?#
The following example shows how to get the tunnel entries in the
ipsec_tunnel_template_001 IPsec Tunnel Template in the demo ADOM:
{
  "id": 3,
  "method": "get",
  "params": [
    {
      "url": "/pm/config/adom/demo/template/_ipsec/ipsec_tunnel_template_001/action-list"
    }
  ],
  "session": "{{session}}",
  "verbose": 1
}
Click to expand
{
  "id": 3,
  "result": [
    {
      "data": [
        {
          "action": "conf-ipsec-template",
          "dynamic_mapping": null,
          "oid": 5591,
          "seq": 1,
          "value": {
            "automatic-routing": "enable",
            "local-addr-type": "dynamic",
            "name": "ol_isp1",
            "nat": "disable",
            "remote-subnet": [
              "0.0.0.0/0.0.0.0"
            ],
            "system interface": {
              "ip": "0.0.0.0/0.0.0.0",
              "remote-ip": "0.0.0.0/0.0.0.0"
            },
            "vpn ipsec phase1-interface": {
              "acct-verify": "disable",
              "add-gw-route": "disable",
              "aggregate-member": "disable",
              "authmethod": "psk",
              "auto-discovery-crossover": "allow",
              "auto-discovery-forwarder": "disable",
              "auto-discovery-offer-interval": 5,
              "auto-discovery-psk": "disable",
              "auto-discovery-receiver": "disable",
              "auto-discovery-sender": "disable",
              "auto-negotiate": "enable",
              "backup-gateway": [],
              "childless-ike": "disable",
              "client-auto-negotiate": "disable",
              "client-keep-alive": "disable",
              "comments": null,
              "dhgrp": [
                "14",
                "5"
              ],
              "distance": 15,
              "dpd": "on-demand",
              "dpd-retrycount": 3,
              "dpd-retryinterval": [
                20
              ],
              "eap-cert-auth": "disable",
              "eap-exclude-peergrp": [],
              "eap-identity": "use-id-payload",
              "ems-sn-check": "disable",
              "encap-local-gw4": "0.0.0.0",
              "encap-local-gw6": "::",
              "encap-remote-gw4": "0.0.0.0",
              "encap-remote-gw6": "::",
              "encapsulation": "none",
              "encapsulation-address": "ike",
              "enforce-unique-id": "disable",
              "esn": "disable",
              "exchange-fgt-device-id": "disable",
              "exchange-interface-ip": "disable",
              "exchange-ip-addr4": "0.0.0.0",
              "exchange-ip-addr6": "::",
              "fallback-tcp-threshold": 15,
              "fec-egress": "disable",
              "fec-health-check": [],
              "fec-ingress": "disable",
              "fec-mapping-profile": [],
              "fgsp-sync": "disable",
              "fortinet-esp": "disable",
              "fragmentation": "enable",
              "fragmentation-mtu": 1200,
              "group-authentication": "disable",
              "group-authentication-secret": [
                "ENC",
                "vWtqtv0dyV9YmI2AVPGvHksmmGvaIQ0BPKapHEWAaZTomwBa3+cDcSVGHyGAVY73P5v58A1coRE7YJ6Nr9QKTgXTtPpJnTizVaju7iduNiLI6Ip82yHg6eBd6GiwX79JEmm67CA1GCJxisS/Ab7tJH7O8sn4JQby9FeGK9rxMD3zaC2h/g56sbmC74TRrrUj61HE0Q=="
              ],
              "ha-sync-esp-seqno": "enable",
              "idle-timeout": "disable",
              "ike-version": "1",
              "inbound-dscp-copy": "disable",
              "include-local-lan": "disable",
              "interface": [
                "port1"
              ],
              "ip-fragmentation": "post-encapsulation",
              "ip-version": "4",
              "ipsec-tunnel-slot": "auto",
              "ipv4-split-exclude": [],
              "ipv4-split-include": [],
              "ipv6-dns-server1": "::",
              "ipv6-dns-server2": "::",
              "ipv6-dns-server3": "::",
              "ipv6-split-exclude": [],
              "ipv6-split-include": [],
              "keepalive": 10,
              "keylife": 86400,
              "kms": [],
              "link-cost": 0,
              "local-gw": "0.0.0.0",
              "localid": "$(local_id)",
              "localid-type": "auto",
              "mesh-selector-type": "disable",
              "mode": "main",
              "mode-cfg": "disable",
              "monitor": [],
              "monitor-hold-down-delay": 0,
              "monitor-hold-down-time": "00:00",
              "monitor-hold-down-type": "immediate",
              "monitor-min": 0,
              "name": "ol_isp1",
              "nattraversal": "enable",
              "negotiate-timeout": 30,
              "net-device": "disable",
              "npu-offload": "enable",
              "oid": 5589,
              "packet-redistribution": "disable",
              "passive-mode": "disable",
              "peertype": "any",
              "ppk": "disable",
              "ppk-identity": null,
              "ppk-secret": [
                "ENC",
                "NQ700fmIoUlU5b4CTWn/STfnb0a5+oFLyiWrlV3pVKjtPvDcnHl7hANCiors48fMGnpd8ftwf5iKRisHrySywxQ7+Xulrn3vBrfzotfqVZ0uG2kUQ4e6DYSqI25IH9DqvCWy6R1uc6Wv9BqWCPMYM1ZAomfoMId86EsnphUeu1cvNEcPIiKQajAEkr53/2xWKYxhlg=="
              ],
              "priority": 1,
              "proposal": [
                "aes128-sha256",
                "aes256-sha256"
              ],
              "psksecret": [
                "ENC",
                "q5YWHfF1iymMLOiQK4rkHQtQkvvbp4uMNY2F1JBZjm2spZVs4KDygSkZR7ZGYUVgrsg2rFyuOkONSe8hvPf2AqT43a8SCjQxHNJoODllPgHdZE8UOfzlEVWDNgGK25VWe2aa7TVmsPoGED2gVSk1tPcJV92oxcVdUTfYaukumwnXD2kT"
              ],
              "qkd": "disable",
              "qkd-profile": [],
              "reauth": "disable",
              "rekey": "enable",
              "remote-gw": "10.1.0.1",
              "rsa-signature-format": "pkcs1",
              "rsa-signature-hash-override": "disable",
              "save-password": "disable",
              "split-include-service": [],
              "suite-b": "disable",
              "transit-gateway": "disable",
              "transport": "udp",
              "type": "static",
              "vni": 0,
              "wizard-type": "custom",
              "xauthtype": "disable"
            },
            "vpn ipsec phase2-interface": []
          },
          "var-list": null
        },
        {
          "action": "conf-ipsec-template",
          "dynamic_mapping": null,
          "oid": 5592,
          "seq": 2,
          "value": {
            "automatic-routing": "enable",
            "local-addr-type": "dynamic",
            "name": "ol_isp2",
            "nat": "disable",
            "remote-subnet": [
              "0.0.0.0/0.0.0.0"
            ],
            "system interface": {
              "ip": "0.0.0.0/0.0.0.0",
              "remote-ip": "0.0.0.0/0.0.0.0"
            },
            "vpn ipsec phase1-interface": {
              "acct-verify": "disable",
              "add-gw-route": "disable",
              "aggregate-member": "disable",
              "authmethod": "psk",
              "auto-discovery-crossover": "allow",
              "auto-discovery-forwarder": "disable",
              "auto-discovery-offer-interval": 5,
              "auto-discovery-psk": "disable",
              "auto-discovery-receiver": "disable",
              "auto-discovery-sender": "disable",
              "auto-negotiate": "enable",
              "backup-gateway": [],
              "childless-ike": "disable",
              "client-auto-negotiate": "disable",
              "client-keep-alive": "disable",
              "comments": null,
              "dhgrp": [
                "14",
                "5"
              ],
              "distance": 15,
              "dpd": "on-demand",
              "dpd-retrycount": 3,
              "dpd-retryinterval": [
                20
              ],
              "eap-cert-auth": "disable",
              "eap-exclude-peergrp": [],
              "eap-identity": "use-id-payload",
              "ems-sn-check": "disable",
              "encap-local-gw4": "0.0.0.0",
              "encap-local-gw6": "::",
              "encap-remote-gw4": "0.0.0.0",
              "encap-remote-gw6": "::",
              "encapsulation": "none",
              "encapsulation-address": "ike",
              "enforce-unique-id": "disable",
              "esn": "disable",
              "exchange-fgt-device-id": "disable",
              "exchange-interface-ip": "disable",
              "exchange-ip-addr4": "0.0.0.0",
              "exchange-ip-addr6": "::",
              "fallback-tcp-threshold": 15,
              "fec-egress": "disable",
              "fec-health-check": [],
              "fec-ingress": "disable",
              "fec-mapping-profile": [],
              "fgsp-sync": "disable",
              "fortinet-esp": "disable",
              "fragmentation": "enable",
              "fragmentation-mtu": 1200,
              "group-authentication": "disable",
              "group-authentication-secret": [
                "ENC",
                "vWtqtv0dyV9YmI2AVPGvHksmmGvaIQ0BPKapHEWAaZTomwBa3+cDcSVGHyGAVY73P5v58A1coRE7YJ6Nr9QKTgXTtPpJnTizVaju7iduNiLI6Ip82yHg6eBd6GiwX79JEmm67CA1GCJxisS/Ab7tJH7O8sn4JQby9FeGK9rxMD3zaC2h/g56sbmC74TRrrUj61HE0Q=="
              ],
              "ha-sync-esp-seqno": "enable",
              "idle-timeout": "disable",
              "ike-version": "1",
              "inbound-dscp-copy": "disable",
              "include-local-lan": "disable",
              "interface": [
                "port2"
              ],
              "ip-fragmentation": "post-encapsulation",
              "ip-version": "4",
              "ipsec-tunnel-slot": "auto",
              "ipv4-split-exclude": [],
              "ipv4-split-include": [],
              "ipv6-dns-server1": "::",
              "ipv6-dns-server2": "::",
              "ipv6-dns-server3": "::",
              "ipv6-split-exclude": [],
              "ipv6-split-include": [],
              "keepalive": 10,
              "keylife": 86400,
              "kms": [],
              "link-cost": 0,
              "local-gw": "0.0.0.0",
              "localid": "$(local_id)",
              "localid-type": "auto",
              "mesh-selector-type": "disable",
              "mode": "main",
              "mode-cfg": "disable",
              "monitor": [],
              "monitor-hold-down-delay": 0,
              "monitor-hold-down-time": "00:00",
              "monitor-hold-down-type": "immediate",
              "monitor-min": 0,
              "name": "ol_isp2",
              "nattraversal": "enable",
              "negotiate-timeout": 30,
              "net-device": "disable",
              "npu-offload": "enable",
              "oid": 5590,
              "packet-redistribution": "disable",
              "passive-mode": "disable",
              "peertype": "any",
              "ppk": "disable",
              "ppk-identity": null,
              "ppk-secret": [
                "ENC",
                "NQ700fmIoUlU5b4CTWn/STfnb0a5+oFLyiWrlV3pVKjtPvDcnHl7hANCiors48fMGnpd8ftwf5iKRisHrySywxQ7+Xulrn3vBrfzotfqVZ0uG2kUQ4e6DYSqI25IH9DqvCWy6R1uc6Wv9BqWCPMYM1ZAomfoMId86EsnphUeu1cvNEcPIiKQajAEkr53/2xWKYxhlg=="
              ],
              "priority": 1,
              "proposal": [
                "aes128-sha256",
                "aes256-sha256"
              ],
              "psksecret": [
                "ENC",
                "kWsLpmFEmPg6+O1jkuhgUGWNW14f37YfY6BtY4qEWO8qiJ3zEgXtzK/3YYmj4c9FDyQ7qbV6RQXHJvuY/3Nt4hJGFAslnZxGj6xae6wd4xGpMsID7xeT1gJAsPLAU/tR2S1lnzXtJyvmErqH/zmkrPhhkz/Y0+BtsAfHS4BrY6tR93ds"
              ],
              "qkd": "disable",
              "qkd-profile": [],
              "reauth": "disable",
              "rekey": "enable",
              "remote-gw": "10.2.0.1",
              "rsa-signature-format": "pkcs1",
              "rsa-signature-hash-override": "disable",
              "save-password": "disable",
              "split-include-service": [],
              "suite-b": "disable",
              "transit-gateway": "disable",
              "transport": "udp",
              "type": "static",
              "vni": 0,
              "wizard-type": "custom",
              "xauthtype": "disable"
            },
            "vpn ipsec phase2-interface": []
          },
          "var-list": null
        }
      ],
      "status": {
        "code": 0,
        "message": "OK"
      },
      "url": "/pm/config/adom/demo/template/_ipsec/ipsec_tunnel_template_001/action-list"
    }
  ]
}
Note
With older FortiManager versions (can’t be more specific), it was possible to obtain the same result using a different FortiManager JSON RPC API
urlFor instance to get the tunnels of the
ipsec_tunnel_template_001IPsec Tunnel Template in thedemoADOM, the following API request was used:{ "id": 3, "method": "get", "params": [ { "url": "/pm/config/adom/demo/template/ipsec_tunnel_template_001/device/template/widget/ipsec/action-list/" } ], "session": "{{session}}" }
4.11.4. How to get a specific tunnel of an IPsec Tunnel Template?#
The tunnel master key is the seq attribute which can be obtained when getting tunnels of an IPsec Tunnel Template (see section How to get the tunnels of an IPsec Tunnel Template?).
The following example shows how to get the tunnel with ol_isp1 (seq is 1) from the ipsec_tunnel_template_001 in the demo ADOM:
{
  "id": 3,
  "method": "get",
  "params": [
    {
      "url": "/pm/config/adom/demo/template/_ipsec/ipsec_tunnel_template_001/action-list/1"
    }
  ],
  "session": "{{session}}",
  "verbose": 1
}
Click to expand
{
  "id": 3,
  "result": [
    {
      "data": {
        "action": "conf-ipsec-template",
        "dynamic_mapping": null,
        "model": null,
        "oid": 5591,
        "seq": 1,
        "value": {
          "automatic-routing": "enable",
          "local-addr-type": "dynamic",
          "name": "ol_isp1",
          "nat": "disable",
          "remote-subnet": [
            "0.0.0.0/0.0.0.0"
          ],
          "system interface": {
            "ip": "0.0.0.0/0.0.0.0",
            "remote-ip": "0.0.0.0/0.0.0.0"
          },
          "vpn ipsec phase1-interface": {
            "acct-verify": "disable",
            "add-gw-route": "disable",
            "aggregate-member": "disable",
            "authmethod": "psk",
            "auto-discovery-crossover": "allow",
            "auto-discovery-forwarder": "disable",
            "auto-discovery-offer-interval": 5,
            "auto-discovery-psk": "disable",
            "auto-discovery-receiver": "disable",
            "auto-discovery-sender": "disable",
            "auto-negotiate": "enable",
            "backup-gateway": [],
            "childless-ike": "disable",
            "client-auto-negotiate": "disable",
            "client-keep-alive": "disable",
            "comments": null,
            "dhgrp": [
              "14",
              "5"
            ],
            "distance": 15,
            "dpd": "on-demand",
            "dpd-retrycount": 3,
            "dpd-retryinterval": [
              20
            ],
            "eap-cert-auth": "disable",
            "eap-exclude-peergrp": [],
            "eap-identity": "use-id-payload",
            "ems-sn-check": "disable",
            "encap-local-gw4": "0.0.0.0",
            "encap-local-gw6": "::",
            "encap-remote-gw4": "0.0.0.0",
            "encap-remote-gw6": "::",
            "encapsulation": "none",
            "encapsulation-address": "ike",
            "enforce-unique-id": "disable",
            "esn": "disable",
            "exchange-fgt-device-id": "disable",
            "exchange-interface-ip": "disable",
            "exchange-ip-addr4": "0.0.0.0",
            "exchange-ip-addr6": "::",
            "fallback-tcp-threshold": 15,
            "fec-egress": "disable",
            "fec-health-check": [],
            "fec-ingress": "disable",
            "fec-mapping-profile": [],
            "fgsp-sync": "disable",
            "fortinet-esp": "disable",
            "fragmentation": "enable",
            "fragmentation-mtu": 1200,
            "group-authentication": "disable",
            "group-authentication-secret": [
              "ENC",
              "vWtqtv0dyV9YmI2AVPGvHksmmGvaIQ0BPKapHEWAaZTomwBa3+cDcSVGHyGAVY73P5v58A1coRE7YJ6Nr9QKTgXTtPpJnTizVaju7iduNiLI6Ip82yHg6eBd6GiwX79JEmm67CA1GCJxisS/Ab7tJH7O8sn4JQby9FeGK9rxMD3zaC2h/g56sbmC74TRrrUj61HE0Q=="
            ],
            "ha-sync-esp-seqno": "enable",
            "idle-timeout": "disable",
            "ike-version": "1",
            "inbound-dscp-copy": "disable",
            "include-local-lan": "disable",
            "interface": [
              "port1"
            ],
            "ip-fragmentation": "post-encapsulation",
            "ip-version": "4",
            "ipsec-tunnel-slot": "auto",
            "ipv4-split-exclude": [],
            "ipv4-split-include": [],
            "ipv6-dns-server1": "::",
            "ipv6-dns-server2": "::",
            "ipv6-dns-server3": "::",
            "ipv6-split-exclude": [],
            "ipv6-split-include": [],
            "keepalive": 10,
            "keylife": 86400,
            "kms": [],
            "link-cost": 0,
            "local-gw": "0.0.0.0",
            "localid": "$(local_id)",
            "localid-type": "auto",
            "mesh-selector-type": "disable",
            "mode": "main",
            "mode-cfg": "disable",
            "monitor": [],
            "monitor-hold-down-delay": 0,
            "monitor-hold-down-time": "00:00",
            "monitor-hold-down-type": "immediate",
            "monitor-min": 0,
            "name": "ol_isp1",
            "nattraversal": "enable",
            "negotiate-timeout": 30,
            "net-device": "disable",
            "npu-offload": "enable",
            "oid": 5589,
            "packet-redistribution": "disable",
            "passive-mode": "disable",
            "peertype": "any",
            "ppk": "disable",
            "ppk-identity": null,
            "ppk-secret": [
              "ENC",
              "NQ700fmIoUlU5b4CTWn/STfnb0a5+oFLyiWrlV3pVKjtPvDcnHl7hANCiors48fMGnpd8ftwf5iKRisHrySywxQ7+Xulrn3vBrfzotfqVZ0uG2kUQ4e6DYSqI25IH9DqvCWy6R1uc6Wv9BqWCPMYM1ZAomfoMId86EsnphUeu1cvNEcPIiKQajAEkr53/2xWKYxhlg=="
            ],
            "priority": 1,
            "proposal": [
              "aes128-sha256",
              "aes256-sha256"
            ],
            "psksecret": [
              "ENC",
              "OgEVpeNbadLJfCzF2xboH6jNNhCJxuDgQ6ZH6qjJO6vk9IPOOm/0MAqX8RJrQculrx76SbTZb9uAs21OTZdSGAi9+XAZF5f6AcBA31LcOjUrJZmJ5ESVKuSGQQbgiVrdbZdmrpF64wBnk+K1CglXt0a2c9+N3tYPgIWlCfS0CuroHamN"
            ],
            "qkd": "disable",
            "qkd-profile": [],
            "reauth": "disable",
            "rekey": "enable",
            "remote-gw": "10.1.0.1",
            "rsa-signature-format": "pkcs1",
            "rsa-signature-hash-override": "disable",
            "save-password": "disable",
            "split-include-service": [],
            "suite-b": "disable",
            "transit-gateway": "disable",
            "transport": "udp",
            "type": "static",
            "vni": 0,
            "wizard-type": "custom",
            "xauthtype": "disable"
          },
          "vpn ipsec phase2-interface": []
        },
        "var-list": null
      },
      "status": {
        "code": 0,
        "message": "OK"
      },
      "url": "/pm/config/adom/demo/template/_ipsec/ipsec_tunnel_template_001/action-list/1"
    }
  ]
}
4.11.5. How to create a new IPsec Tunnel Template?#
The following example shows how to create the ipsec_tunnel_template_001 in ADOM demo.
The created ipsec_tunnel_template_001 will be empty.
{
  "id": 3,
  "method": "add",
  "params": [
    {
      "data": {
        "name": "ipsec_tunnel_template_001",
        "template setting": {
          "description": "New IPsec Tunnel Template",
          "stype": "_ipsec",
          "widgets": [
            "_ipsec"
          ]
        },
        "type": "template"
      },
      "url": "/pm/template/_ipsec/adom/demo"
    }
  ],
  "session": "{{session}}"
}
{
  "id": 3,
  "result": [
    {
      "status": {
        "code": 0,
        "message": "OK"
      },
      "url": "/pm/template/_ipsec/adom/demo"
    }
  ]
}
4.11.6. How to create a new tunnel entry in an IPsec Tunnel Template?#
Considering the amount of possible settings that can be used to configure a tunnel entry within an IPsec Tunnel Template, the following process is recommended:
Use FortiManager GUI to create an IPsec Tunnel Template and the desired tunnel entry
Get the tunnel entry from the created IPsec Tunnel Template (see section How to get the tunnels of an IPsec Tunnel Template?).
Clean the tunnel entry; you need to remove all the possible seq or oid attributes
Update the tunnel entry with your desired settings
Use the following API request to add it in your existing IPsec Tunnel Template
Click to expand
{
"id": 4,
"method": "add",
"params": [
{
"data": {
"action": "conf-ipsec-template",
"dynamic_mapping": null,
"value": {
"automatic-routing": "enable",
"local-addr-type": "dynamic",
"name": "ol_isp4",
"nat": "disable",
"remote-subnet": [
"0.0.0.0/0.0.0.0"
],
"system interface": {
"ip": "0.0.0.0/0.0.0.0",
"remote-ip": "0.0.0.0/0.0.0.0"
},
"vpn ipsec phase1-interface": {
"acct-verify": "disable",
"add-gw-route": "disable",
"add-route": "enable",
"aggregate-member": "disable",
"authmethod": "psk",
"auto-discovery-crossover": "allow",
"auto-discovery-forwarder": "disable",
"auto-discovery-offer-interval": 5,
"auto-discovery-psk": "disable",
"auto-discovery-receiver": "disable",
"auto-discovery-sender": "disable",
"auto-negotiate": "enable",
"backup-gateway": [],
"childless-ike": "disable",
"client-auto-negotiate": "disable",
"client-keep-alive": "disable",
"comments": null,
"dhgrp": [
"14",
"5"
],
"distance": 15,
"dpd": "on-demand",
"dpd-retrycount": 3,
"dpd-retryinterval": [
20
],
"eap-cert-auth": "disable",
"eap-exclude-peergrp": [],
"eap-identity": "use-id-payload",
"ems-sn-check": "disable",
"encap-local-gw4": "0.0.0.0",
"encap-local-gw6": "::",
"encap-remote-gw4": "0.0.0.0",
"encap-remote-gw6": "::",
"encapsulation": "none",
"encapsulation-address": "ike",
"enforce-unique-id": "disable",
"esn": "disable",
"exchange-fgt-device-id": "disable",
"exchange-interface-ip": "disable",
"exchange-ip-addr4": "0.0.0.0",
"exchange-ip-addr6": "::",
"fallback-tcp-threshold": 15,
"fec-egress": "disable",
"fec-health-check": [],
"fec-ingress": "disable",
"fec-mapping-profile": [],
"fgsp-sync": "disable",
"fortinet-esp": "disable",
"fragmentation": "enable",
"fragmentation-mtu": 1200,
"group-authentication": "disable",
"group-authentication-secret": [
"ENC",
"vWtqtv0dyV9YmI2AVPGvHksmmGvaIQ0BPKapHEWAaZTomwBa3+cDcSVGHyGAVY73P5v58A1coRE7YJ6Nr9QKTgXTtPpJnTizVaju7iduNiLI6Ip82yHg6eBd6GiwX79JEmm67CA1GCJxisS/Ab7tJH7O8sn4JQby9FeGK9rxMD3zaC2h/g56sbmC74TRrrUj61HE0Q=="
],
"ha-sync-esp-seqno": "enable",
"idle-timeout": "disable",
"ike-version": "1",
"inbound-dscp-copy": "disable",
"include-local-lan": "disable",
"interface": [
"port4"
],
"ip-fragmentation": "post-encapsulation",
"ip-version": "4",
"ipsec-tunnel-slot": "auto",
"ipv4-dns-server1": "0.0.0.0",
"ipv4-dns-server2": "0.0.0.0",
"ipv4-dns-server3": "0.0.0.0",
"ipv4-split-exclude": [],
"ipv4-split-include": [],
"ipv6-dns-server1": "::",
"ipv6-dns-server2": "::",
"ipv6-dns-server3": "::",
"ipv6-split-exclude": [],
"ipv6-split-include": [],
"keepalive": 10,
"keylife": 86400,
"kms": [],
"link-cost": 0,
"local-gw": "0.0.0.0",
"localid": "$(local_id)",
"localid-type": "auto",
"mesh-selector-type": "disable",
"mode": "main",
"mode-cfg": "enable",
"monitor": [],
"monitor-hold-down-delay": 0,
"monitor-hold-down-time": "00:00",
"monitor-hold-down-type": "immediate",
"monitor-min": 0,
"name": "ol_isp4",
"nattraversal": "enable",
"negotiate-timeout": 30,
"net-device": "enable",
"npu-offload": "enable",
"packet-redistribution": "disable",
"passive-mode": "disable",
"peertype": "any",
"ppk": "disable",
"ppk-identity": null,
"ppk-secret": [
"ENC",
"NQ700fmIoUlU5b4CTWn/STfnb0a5+oFLyiWrlV3pVKjtPvDcnHl7hANCiors48fMGnpd8ftwf5iKRisHrySywxQ7+Xulrn3vBrfzotfqVZ0uG2kUQ4e6DYSqI25IH9DqvCWy6R1uc6Wv9BqWCPMYM1ZAomfoMId86EsnphUeu1cvNEcPIiKQajAEkr53/2xWKYxhlg=="
],
"priority": 1,
"proposal": [
"3des-sha256",
"aes128-sha256",
"aes256-sha256"
],
"psksecret": [
"ENC",
"g73TtefcuMRNMr7WN/AMtDoAIL9qSml2e0vC82V07B+g17Z4aZSCaomgx5pqFCfidmkFZ+w+wvA+/WD6tyz536owihc6zYbEBxSxdBGsUa44geMD2Be/o/yDmQZJo7R5UrRtWAweS1qpX+hZBKLt/Z/O0Ytbh72RS5VeRrqwqcz7kv+M"
],
"qkd": "disable",
"qkd-profile": [],
"reauth": "disable",
"rekey": "enable",
"remote-gw": "10.4.0.1",
"rsa-signature-format": "pkcs1",
"rsa-signature-hash-override": "disable",
"save-password": "disable",
"split-include-service": [],
"suite-b": "disable",
"transit-gateway": "disable",
"transport": "udp",
"type": "static",
"vni": 0,
"wizard-type": "custom",
"xauthtype": "disable"
},
"vpn ipsec phase2-interface": [
{
"add-route": "phase1",
"auto-discovery-forwarder": "phase1",
"auto-discovery-sender": "phase1",
"auto-negotiate": "disable",
"comments": null,
"dhcp-ipsec": "disable",
"diffserv": "disable",
"diffservcode": "000000",
"dst-addr-type": "subnet",
"dst-port": 0,
"dst-subnet": [
"0.0.0.0",
"0.0.0.0"
],
"encapsulation": "tunnel-mode",
"inbound-dscp-copy": "phase1",
"ipv4-df": "disable",
"keepalive": "enable",
"keylife-type": "seconds",
"keylifeseconds": 40000,
"name": "ol_isp4",
"pfs": "enable",
"phase1name": "ol_isp4",
"proposal": [
"aes128-sha256",
"aes256-sha256",
"aes128-sha1",
"aes256-sha1",
"aes128gcm",
"aes256gcm",
"chacha20poly1305"
],
"protocol": 0,
"replay": "enable",
"route-overlap": "use-new",
"single-source": "disable",
"src-addr-type": "subnet",
"src-port": 0,
"src-subnet": [
"0.0.0.0",
"0.0.0.0"
]
}
]
},
"var-list": null
},
"url": "/pm/config/adom/demo/template/_ipsec/ipsec_tunnel_template_001/action-list"
}
],
"session": "{{session}}"
}
{
"id": 4,
"result": [
{
"data": {
"seq": 4
},
"status": {
"code": 0,
"message": "OK"
},
"url": "/pm/config/adom/demo/template/_ipsec/ipsec_tunnel_template_001/action-list"
}
]
}
Click to expand
"""
Create a new tunnel in an IPsec Tunnel Template
"""
from pyFMG.fortimgr import FortiManager
IP = "10.210.34.120"
USERNAME = "devops"
PASSWORD = "fortinet"
with FortiManager(
IP,
USERNAME,
PASSWORD,
verbose=True,
disable_request_warnings=True,
) as fmg:
ADOM = "demo"
MKEY = "ipsec_tunnel_template_001"
url = f"/pm/config/adom/{ADOM}/template/_ipsec/{MKEY}/action-list"
# Get the existing tunnels, last one is the one you want to use as a
# reference
response = fmg.get(url)
# Extract the list of tunnels
tunnels = response[1]
# Last one is the one to be used as a reference
tunnel = tunnels[-1].copy()
# Get rid of seq, and OIDs (you have multiple OIDs)
del tunnel["oid"]
del tunnel["seq"]
del tunnel["value"]["vpn ipsec phase1-interface"]["oid"]
for p2 in tunnel["value"]["vpn ipsec phase2-interface"]:
del p2["oid"]
# Adapt the tunnel configuration
TUNNEL_NAME = "ol_isp4"
tunnel["value"]["name"] = TUNNEL_NAME
tunnel["value"]["vpn ipsec phase1-interface"]["remote-gw"] = "10.4.0.1"
tunnel["value"]["vpn ipsec phase1-interface"]["name"] = TUNNEL_NAME
tunnel["value"]["vpn ipsec phase1-interface"]["interface"] = ["port4"]
tunnel["value"]["vpn ipsec phase1-interface"]["mode-cfg"] = "enable"
tunnel["value"]["vpn ipsec phase1-interface"]["net-device"] = "enable"
tunnel["value"]["vpn ipsec phase2-interface"][0]["name"] = TUNNEL_NAME
tunnel["value"]["vpn ipsec phase2-interface"][0]["phase1name"] = TUNNEL_NAME
# Add this new tunnel in the IPsec Tunnel Template
fmg.debug = True
fmg.add(
url,
data=tunnel,
)
fmg.debug = False
4.11.7. How to rename an existing tunnel entry in an IPsec Tunnel Interface?#
Caught in #1300782.
The following example show how to rename the existing tunnel entry VPN1 into VPN1 for the ipsec_tunnel_template_001 in the demo ADOM:
{
"id": 3,
"method": "set",
"params": [
{
"data": {
"name": "VPN2"
},
"url": "/pm/config/adom/demo/template/_ipsec/ipsec_tunnel_template_001/vpn/ipsec/phase1-interface/VPN1"
}
],
"session": "{{session}}"
}
{
"cid": 11,
"id": 3,
"result": [
{
"data": {
"name": "VPN2"
},
"status": {
"code": 0,
"message": "OK"
},
"url": "/pm/config/adom/demo/template/_ipsec/ipsec_tunnel_template_001/vpn/ipsec/phase1-interface/VPN2"
}
]
}
4.11.8. How to update an existing tunnel entry in an IPsec Tunnel Interface?#
Like for the add a new tunnel case (see section How to create a new tunnel entry in an IPsec Tunnel Template?) this is not trivial.
The following process is recommended:
Get the tunnel you want to modify using How to get a specific tunnel of an IPsec Tunnel Template?
Clean the tunnel entry; you need to remove all the possible seq or oid attributes
Update the tunnel entry with your desired settings
Use the following API request to update the IPsec Tunnel Template with your updated tunnel entry:
Click to expand
{
"id": 4,
"method": "update",
"params": [
{
"data": {
"action": "conf-ipsec-template",
"dynamic_mapping": null,
"model": null,
"value": {
"automatic-routing": "enable",
"local-addr-type": "dynamic",
"name": "ol_isp4",
"nat": "disable",
"remote-subnet": [
"0.0.0.0/0.0.0.0"
],
"system interface": {
"ip": "0.0.0.0/0.0.0.0",
"remote-ip": "0.0.0.0/0.0.0.0"
},
"vpn ipsec phase1-interface": {
"acct-verify": "disable",
"add-gw-route": "disable",
"add-route": "enable",
"aggregate-member": "disable",
"authmethod": "psk",
"auto-discovery-crossover": "allow",
"auto-discovery-forwarder": "disable",
"auto-discovery-offer-interval": 5,
"auto-discovery-psk": "disable",
"auto-discovery-receiver": "disable",
"auto-discovery-sender": "disable",
"auto-negotiate": "enable",
"backup-gateway": [],
"childless-ike": "disable",
"client-auto-negotiate": "disable",
"client-keep-alive": "disable",
"comments": null,
"dhgrp": [
"14",
"5"
],
"distance": 15,
"dpd": "on-demand",
"dpd-retrycount": 3,
"dpd-retryinterval": [
20
],
"eap-cert-auth": "disable",
"eap-exclude-peergrp": [],
"eap-identity": "use-id-payload",
"ems-sn-check": "disable",
"encap-local-gw4": "0.0.0.0",
"encap-local-gw6": "::",
"encap-remote-gw4": "0.0.0.0",
"encap-remote-gw6": "::",
"encapsulation": "none",
"encapsulation-address": "ike",
"enforce-unique-id": "disable",
"esn": "disable",
"exchange-fgt-device-id": "disable",
"exchange-interface-ip": "disable",
"exchange-ip-addr4": "0.0.0.0",
"exchange-ip-addr6": "::",
"fallback-tcp-threshold": 15,
"fec-egress": "disable",
"fec-health-check": [],
"fec-ingress": "disable",
"fec-mapping-profile": [],
"fgsp-sync": "disable",
"fortinet-esp": "disable",
"fragmentation": "enable",
"fragmentation-mtu": 1200,
"group-authentication": "disable",
"group-authentication-secret": [
"ENC",
"vWtqtv0dyV9YmI2AVPGvHksmmGvaIQ0BPKapHEWAaZTomwBa3+cDcSVGHyGAVY73P5v58A1coRE7YJ6Nr9QKTgXTtPpJnTizVaju7iduNiLI6Ip82yHg6eBd6GiwX79JEmm67CA1GCJxisS/Ab7tJH7O8sn4JQby9FeGK9rxMD3zaC2h/g56sbmC74TRrrUj61HE0Q=="
],
"ha-sync-esp-seqno": "enable",
"idle-timeout": "disable",
"ike-version": "1",
"inbound-dscp-copy": "disable",
"include-local-lan": "disable",
"interface": [
"port4"
],
"ip-fragmentation": "post-encapsulation",
"ip-version": "4",
"ipsec-tunnel-slot": "auto",
"ipv4-dns-server1": "0.0.0.0",
"ipv4-dns-server2": "0.0.0.0",
"ipv4-dns-server3": "0.0.0.0",
"ipv4-split-exclude": [],
"ipv4-split-include": [],
"ipv6-dns-server1": "::",
"ipv6-dns-server2": "::",
"ipv6-dns-server3": "::",
"ipv6-split-exclude": [],
"ipv6-split-include": [],
"keepalive": 10,
"keylife": 86400,
"kms": [],
"link-cost": 0,
"local-gw": "0.0.0.0",
"localid": "$(local_id)",
"localid-type": "auto",
"mesh-selector-type": "disable",
"mode": "main",
"mode-cfg": "enable",
"monitor": [],
"monitor-hold-down-delay": 0,
"monitor-hold-down-time": "00:00",
"monitor-hold-down-type": "immediate",
"monitor-min": 0,
"name": "ol_isp4",
"nattraversal": "enable",
"negotiate-timeout": 30,
"net-device": "enable",
"npu-offload": "enable",
"packet-redistribution": "disable",
"passive-mode": "disable",
"peertype": "any",
"ppk": "disable",
"ppk-identity": null,
"ppk-secret": [
"ENC",
"NQ700fmIoUlU5b4CTWn/STfnb0a5+oFLyiWrlV3pVKjtPvDcnHl7hANCiors48fMGnpd8ftwf5iKRisHrySywxQ7+Xulrn3vBrfzotfqVZ0uG2kUQ4e6DYSqI25IH9DqvCWy6R1uc6Wv9BqWCPMYM1ZAomfoMId86EsnphUeu1cvNEcPIiKQajAEkr53/2xWKYxhlg=="
],
"priority": 1,
"proposal": [
"3des-sha256",
"aes128-sha256",
"aes256-sha256"
],
"psksecret": [
"ENC",
"TydeKqgUi6no2Uw0823BDtUEKGJ8bveeYnF89AL1UBxKwEtMRPWDZdCqcUZWvT4fb9WxjxE46IVfensAVliIh+4ClKn3ZG0RWgwIFykUzVEj8WJ8wNUNG7XCcWmwAYrRbUK93VmF4EkAUSAPgRtYGCPLPoa/zDTBK3abOg9iB+rZ0Obi"
],
"qkd": "disable",
"qkd-profile": [],
"reauth": "disable",
"rekey": "enable",
"remote-gw": "10.6.0.1",
"rsa-signature-format": "pkcs1",
"rsa-signature-hash-override": "disable",
"save-password": "disable",
"split-include-service": [],
"suite-b": "disable",
"transit-gateway": "disable",
"transport": "udp",
"type": "static",
"vni": 0,
"wizard-type": "custom",
"xauthtype": "disable"
},
"vpn ipsec phase2-interface": [
{
"add-route": "phase1",
"auto-discovery-forwarder": "phase1",
"auto-discovery-sender": "phase1",
"auto-negotiate": "disable",
"comments": null,
"dhcp-ipsec": "disable",
"diffserv": "disable",
"diffservcode": "000000",
"dst-addr-type": "subnet",
"dst-port": 0,
"dst-subnet": [
"0.0.0.0",
"0.0.0.0"
],
"encapsulation": "tunnel-mode",
"inbound-dscp-copy": "phase1",
"ipv4-df": "disable",
"keepalive": "enable",
"keylife-type": "seconds",
"keylifeseconds": 40000,
"name": "ol_isp4",
"pfs": "enable",
"phase1name": [
"ol_isp4"
],
"proposal": [
"aes128-sha256",
"aes256-sha256",
"aes128-sha1",
"aes256-sha1",
"aes128gcm",
"aes256gcm",
"chacha20poly1305"
],
"protocol": 0,
"replay": "enable",
"route-overlap": "use-new",
"single-source": "disable",
"src-addr-type": "subnet",
"src-port": 0,
"src-subnet": [
"0.0.0.0",
"0.0.0.0"
]
}
]
},
"var-list": null
},
"url": "/pm/config/adom/demo/template/_ipsec/ipsec_tunnel_template_001/action-list/4"
}
],
"session": "{{session}}"
}
{
"id": 4,
"result": [
{
"data": {
"seq": 4
},
"status": {
"code": 0,
"message": "OK"
},
"url": "/pm/config/adom/demo/template/_ipsec/ipsec_tunnel_template_001/action-list/4"
}
]
}
Click to expand
"""
Update an existing tunnel in an IPsec Tunnel Template
"""
from pyFMG.fortimgr import FortiManager
IP = "10.210.34.120"
USERNAME = "devops"
PASSWORD = "fortinet"
with FortiManager(
IP,
USERNAME,
PASSWORD,
verbose=True,
disable_request_warnings=True,
) as fmg:
ADOM = "demo"
MKEY = "ipsec_tunnel_template_001"
SEQ = 4
url = f"/pm/config/adom/{ADOM}/template/_ipsec/{MKEY}/action-list/{SEQ}"
# Get the tunnel you wan to modify
response = fmg.get(url)
tunnel = response[1].copy()
# Get rid of seq, and OIDs (you have multiple OIDs)
del tunnel["oid"]
del tunnel["seq"]
del tunnel["value"]["vpn ipsec phase1-interface"]["oid"]
for p2 in tunnel["value"]["vpn ipsec phase2-interface"]:
del p2["oid"]
# Modify your tunnel
tunnel["value"]["vpn ipsec phase1-interface"]["remote-gw"] = "10.6.0.1"
# Update your tunnel
fmg.debug = True
fmg.update(
url,
data=tunnel,
)
fmg.debug = False
4.11.9. How to assign devices to an IPsec Tunnel Template?#
The following example shows how to assign the dev_001 managed device and
its root VDOM to the ipsec_tunnel_template_001 IPsec Tunnel Template
in the demo ADOM:
{
"id": 3,
"method": "add",
"params": [
{
"data": {
"name": "dev_001",
"vdom": "root"
},
"url": "/pm/template/_ipsec/adom/demo/ipsec_tunnel_template_001/scope member"
}
],
"session": "{{session}}"
}
{
"id": 3,
"result": [
{
"status": {
"code": 0,
"message": "OK"
},
"url": "/pm/template/_ipsec/adom/demo/ipsec_tunnel_template_001/scope member"
}
]
}
The following example shows how to assign the dev_002 and dev_003
managed devices and their respective root VDOMs to the
ipsec_tunnel_template_001 IPsec Tunnel Template in the demo ADOM:
{
"id": 3,
"method": "add",
"params": [
{
"data": [
{
"name": "dev_002",
"vdom": "root"
},
{
"name": "dev_003",
"vdom": "root"
}
],
"url": "/pm/template/_ipsec/adom/demo/ipsec_tunnel_template_001/scope member"
}
],
"session": "{{session}}"
}
{
"id": 3,
"result": [
{
"status": {
"code": 0,
"message": "OK"
},
"url": "/pm/template/_ipsec/adom/demo/ipsec_tunnel_template_001/scope member"
}
]
}
4.11.10. How to assign device groups to an IPsec Tunnel Template?#
The following example shows how to assign the dev_grp_001 device group
to the ipsec_tunnel_template_001 IPsec Tunnel Template in the demo
ADOM:
{
"id": 3,
"method": "add",
"params": [
{
"data": {
"is group": 1,
"name": "dev_grp_001"
},
"url": "/pm/template/_ipsec/adom/demo/ipsec_tunnel_template_001/scope member"
}
],
"session": "{{session}}"
}
{
"id": 3,
"result": [
{
"status": {
"code": 0,
"message": "OK"
},
"url": "/pm/template/_ipsec/adom/demo/ipsec_tunnel_template_001/scope member"
}
]
}
The following example shows how to assign the dev_grp_002 and
dev_grp_003 device groups to the ipsec_tunnel_template_001 IPsec
Tunnel Template in the demo ADOM:
{
"id": 3,
"method": "add",
"params": [
{
"data": [
{
"is group": 1,
"name": "dev_grp_002"
},
{
"is group": 1,
"name": "dev_grp_003"
}
],
"url": "/pm/template/_ipsec/adom/demo/ipsec_tunnel_template_001/scope member"
}
],
"session": "{{session}}"
}
{
"id": 3,
"result": [
{
"status": {
"code": 0,
"message": "OK"
},
"url": "/pm/template/_ipsec/adom/demo/ipsec_tunnel_template_001/scope member"
}
]
}
4.11.11. How to unassign devices from an IPsec Tunnel Template?#
The following example shows how to unassign the dev_001 managed device and
its root VDOM from the ipsec_tunnel_template_001 IPsec Tunnel Template
in the demo ADOM:
{
"id": 3,
"method": "delete",
"params": [
{
"data": {
"name": "dev_001",
"vdom": "root"
},
"url": "/pm/template/_ipsec/adom/demo/ipsec_tunnel_template_001/scope member"
}
],
"session": "{{session}}"
}
{
"id": 3,
"result": [
{
"status": {
"code": 0,
"message": "OK"
},
"url": "/pm/template/_ipsec/adom/demo/ipsec_tunnel_template_001/scope member"
}
]
}
The following example shows how to unassign the dev_002 and dev_003
managed devices and their respective root VDOMs from the
ipsec_tunnel_template_001 IPsec Tunnel Template in the demo ADOM:
{
"id": 3,
"method": "delete",
"params": [
{
"data": [
{
"name": "dev_002",
"vdom": "root"
},
{
"name": "dev_003",
"vdom": "root"
}
],
"url": "/pm/template/_ipsec/adom/demo/ipsec_tunnel_template_001/scope member"
}
],
"session": "{{session}}"
}
{
"id": 3,
"result": [
{
"status": {
"code": 0,
"message": "OK"
},
"url": "/pm/template/_ipsec/adom/demo/ipsec_tunnel_template_001/scope member"
}
]
}
4.11.12. How to unassign device groups from an IPsec Tunnel Template?#
The following example shows how to unassign the dev_grp_001 device group
from the ipsec_tunnel_template_001 IPsec Tunnel Template in the demo
ADOM:
{
"id": 3,
"method": "delete",
"params": [
{
"data": {
"is group": 1,
"name": "dev_grp_001"
},
"url": "/pm/template/_ipsec/adom/demo/ipsec_tunnel_template_001/scope member"
}
],
"session": "{{session}}"
}
{
"id": 3,
"result": [
{
"status": {
"code": 0,
"message": "OK"
},
"url": "/pm/template/_ipsec/adom/demo/ipsec_tunnel_template_001/scope member"
}
]
}
The following example shows how to unassign the dev_grp_002 and
dev_grp_003 device groups from the ipsec_tunnel_template_001 IPsec
Tunnel Template in the demo ADOM:
{
"id": 3,
"method": "delete",
"params": [
{
"data": [
{
"is group": 1,
"name": "dev_grp_002"
},
{
"is group": 1,
"name": "dev_grp_003"
}
],
"url": "/pm/template/_ipsec/adom/demo/ipsec_tunnel_template_001/scope member"
}
],
"session": "{{session}}"
}
{
"id": 3,
"result": [
{
"status": {
"code": 0,
"message": "OK"
},
"url": "/pm/template/_ipsec/adom/demo/ipsec_tunnel_template_001/scope member"
}
]
}
4.11.13. How to delete an IPsec Tunnel Template?#
The following example shows how to delete the ipsec_tunnel_template_001 in ADOM demo:
{
"id": 3,
"method": "delete",
"params": [
{
"url": "/pm/template/_ipsec/adom/demo/ipsec_tunnel_template_001"
}
],
"session": "{{session}}"
}
{
"id": 3,
"result": [
{
"status": {
"code": 0,
"message": "OK"
},
"url": "/pm/template/_ipsec/adom/demo/ipsec_tunnel_template_001"
}
]
}
4.12. Static Route Template#
4.12.1. How to CRUD Static Route Template entries?#
4.12.1.1. Starting with FortiManager 7.6.4#
Caught in #1201897.
To create a new static route
The following example shows how to add a IPv4 static route within the
static_route_template_001Static Route Template for thedemoADOM:{ "id": 3, "method": "add", "params": [ { "data": { "device": [ "port1" ], "distance": 10, "dst": [ "0.0.0.0", "0.0.0.0" ], "gateway": "10.210.35.254" }, "url": "/pm/config/adom/demo/template/_router_static/static_route_template_001/router/static" } ], "session": "{{session}}" }
{ "id": 3, "result": [ { "data": { "seq-num": 1 }, "status": { "code": 0, "message": "OK" }, "url": "/pm/config/adom/demo/template/_router_static/static_route_template_001/router/static" } ] }
To get list of static routes
The following example shows how to list all IPv4 static routes in the
static_route_template_001Static Route Template for thedemoADOM:{ "id": 3, "method": "get", "params": [ { "url": "/pm/config/adom/demo/template/_router_static/static_route_template_001/router/static" } ], "session": "{{session}}", "verbose": 1 }
{ "id": 3, "result": [ { "data": [ { "_seq-num": null, "bfd": "disable", "blackhole": "disable", "device": [ "port1" ], "distance": 10, "dst": [ "0.0.0.0", "0.0.0.0" ], "dstaddr": [], "dynamic-gateway": "disable", "gateway": "10.210.35.254", "internet-service": [], "internet-service-custom": [], "internet-service-fortiguard": [], "link-monitor-exempt": "disable", "oid": 6216, "preferred-source": "0.0.0.0", "priority": 1, "sdwan-zone": [], "seq-num": 1, "src": [ "0.0.0.0", "0.0.0.0" ], "status": "enable", "tag": 0, "weight": 0 } ], "status": { "code": 0, "message": "OK" }, "url": "/pm/config/adom/demo/template/_router_static/static_route_template_001/router/static" } ] }
To get a specific static route
The following example shows how to get the IPv4 static routes with
seq-num1in thestatic_route_template_001Static Route Template for thedemoADOM:{ "id": 3, "method": "get", "params": [ { "url": "/pm/config/adom/demo/template/_router_static/static_route_template_001/router/static/1" } ], "session": "{{session}}", "verbose": 1 }
{ "id": 3, "result": [ { "data": { "_seq-num": null, "bfd": "disable", "blackhole": "disable", "comment": null, "device": [ "port1" ], "distance": 10, "dst": [ "0.0.0.0", "0.0.0.0" ], "dstaddr": [], "dynamic-gateway": "disable", "gateway": "10.210.35.254", "internet-service": [], "internet-service-custom": [], "internet-service-fortiguard": [], "link-monitor-exempt": "disable", "oid": 6216, "preferred-source": "0.0.0.0", "priority": 1, "sdwan-zone": [], "seq-num": 1, "src": [ "0.0.0.0", "0.0.0.0" ], "status": "enable", "tag": 0, "weight": 0 }, "status": { "code": 0, "message": "OK" }, "url": "/pm/config/adom/demo/template/_router_static/static_route_template_001/router/static/1" } ] }
To update an existing static route
The following example shows how to update the IPv4 static routes with
seq-num1in thestatic_route_template_001Static Route Template for thedemoADOM:{ "id": 3, "method": "update", "params": [ { "data": { "device": [ "port2" ] }, "url": "/pm/config/adom/demo/template/_router_static/static_route_template_001/router/static/1" } ], "session": "{{session}}" }
{ "id": 3, "result": [ { "data": { "seq-num": 1 }, "status": { "code": 0, "message": "OK" }, "url": "/pm/config/adom/demo/template/_router_static/static_route_template_001/router/static/1" } ] }
To delete an existing static route
The following example shows how to delete the IPv4 static routes with
seq-num1in thestatic_route_template_001Static Route Template for thedemoADOM:{ "id": 3, "method": "delete", "params": [ { "url": "/pm/config/adom/demo/template/_router_static/static_route_template_001/router/static/1" } ], "session": "{{session}}" }
{ "id": 3, "result": [ { "status": { "code": 0, "message": "OK" }, "url": "/pm/config/adom/demo/template/_router_static/static_route_template_001/router/static/1" } ] }
4.12.1.2. Before FortiManager 7.6.4#
Caught in #0690603.
REQUEST:
{
"client":"gui forward:10270",
"id": "df8d1f1b-e13f-443d-9afc-c2d38d098dba",
"keep_session_idle": 1,
"method": "set",
"params": [
{
"data": [
{
"action": "conf-static-router",
"dynamic_mapping": null,
"model": "all",
"seq": 1,
"value": "{\"comment\":\"\",\"device\":\"port5\",\"distance\":10,\"dst\":[\"0.0.0.0\",\"0.0.0.0\"],\"gateway\":\"172.18.26.1\",\"priority\":0,\"seq-num\":0,\"status\":\"enable\",\"weight\":0}",
"var-list": [
{
"name": "router static\/bfd",
"override": 0
},
{
"name": "router static\/link-monitor-exempt",
"override": 0
},
{
"name": "router static\/internet-service-custom",
"override": 0
},
{
"name": "router static\/internet-service",
"override": 0
},
{
"name": "router static\/dstaddr",
"override": 0
},
{
"name": "router static\/virtual-wan-link",
"override": 0
},
{
"name": "router static\/dynamic-gateway",
"override": 0
},
{
"name": "router static\/blackhole",
"override": 0
},
{
"name": "router static\/comment",
"override": 0
},
{
"name": "router static\/priority",
"override": 0
},
{
"name": "router static\/weight",
"override": 0
},
{
"name": "router static\/distance",
"override": 0
},
{
"name": "router static\/gateway",
"override": 0
},
{
"name": "router static\/status",
"override": 0
},
{
"name": "router static\/dst",
"override": 0
},
{
"name": "router static\/device",
"override": 0
},
{
"name": "router static\/seq-num",
"override": 0
}
]
}
],
"target start": 2,
"url": "/pm/config/adom/root/template/test1/device/template/widget/router/action-list/"
}
],
"session": 6783
}
4.12.2. How to get Static Route Templates?#
The following example shows how to get the Static Route Templates from the
demo ADOM:
{
"id": 3,
"method": "get",
"params": [
{
"url": "/pm/template/_router_static/adom/demo"
}
],
"session": "{{session}}",
"verbose": 1
}
{
"id": 3,
"result": [
{
"data": [
{
"name": "sdwan_overlay_template_001_HUB_Router",
"oid": 6031,
"template setting": {
"description": "[Created by SDWAN Overlay Template: sdwan_overlay_template_001]",
"option": "sdwan-overlay",
"stype": "_router_static",
"widgets": []
},
"type": "template"
},
{
"name": "static_route_template_001",
"oid": 6212,
"template setting": {
"description": "",
"option": "sdwan-manager",
"stype": "_router_static",
"widgets": [
"_router_static"
]
},
"type": "template"
}
],
"status": {
"code": 0,
"message": "OK"
},
"url": "/pm/template/_router_static/adom/demo"
}
]
}
Note
The
sdwan-manageroption means the static route template was manually created by a FortiManager administrator and enabled for visibility in both: - Device Manager > Provisioning Templates > Static Route - SD-WAN Manager > Templates > Static RouteThe
sdwan-overlayoption indicates the static route template was automatically created by the SD-WAN Overlay Template. By design, it appears in the same GUI locations as thesdwan-manageroption.
4.12.3. How to get a specific Static Route Template?#
The following example shows how to get the static_route_template_001 Static
Route Template for the demo ADOM:
{
"id": 3,
"method": "get",
"params": [
{
"url": "/pm/template/_router_static/adom/demo/static_route_template_001"
}
],
"session": "{{session}}",
"verbose": 1
}
{
"id": 3,
"result": [
{
"data": {
"name": "static_route_template_001",
"oid": 6212,
"template setting": {
"description": "",
"option": "sdwan-manager",
"stype": "_router_static",
"widgets": [
"_router_static"
]
},
"type": "template"
},
"status": {
"code": 0,
"message": "OK"
},
"url": "/pm/template/_router_static/adom/demo/static_route_template_001"
}
]
}
4.12.4. How to assign a device to a Static Route Template?#
Starting with FMG 7.2.1, you can use the add way (vs the update way
which forces you to first get the list of existing members, to update the list,
and then to push it back).
We assign device site_003 and its VDOM root to Static Route Template
branches in ADOM root:
REQUEST:
{
"id": 3,
"method": "add",
"params": [
{
"data": [
{
"name": "site_003",
"vdom": "root"
}
],
"url": "/pm/template/_router_static/adom/root/branches/scope member"
}
],
"session": "h/Z14lbhlu+Nk6ZpqQnXrM8z2jh+HFXJTP4h8QqhxDD4IQ6oohLctpcoXh/YAKcxLb+7EGxjSVyYw/DzZCL9gyOcQARoDb+0"
}
RESPONSE:
{
"id": 3,
"result": [
{
"status": {
"code": 0,
"message": "OK"
},
"url": "/pm/template/_router_static/adom/root/branches/scope member"
}
]
}
4.12.5. How to assign a device group to a Static Route Template?#
We assign device group branches to Static Route Template branches in
ADOM root:
REQUEST:
{
"id": 3,
"method": "add",
"params": [
{
"data": [
{
"is group": 1,
"name": "branches"
}
],
"url": "/pm/template/_router_static/adom/root/branches/scope member"
}
],
"session": "qG4el6X+OTwoScWKwMuNKwjCieab6fKxHgKVyxOsZ4nsbW2Qb0dTPFfEsJWOr6Wu+2Uncj3mhLoVf9jhenrO4hFMCIjoRii6"
}
RESPONSE:
{
"id": 3,
"result": [
{
"status": {
"code": 0,
"message": "OK"
},
"url": "/pm/template/_router_static/adom/root/branches/scope member"
}
]
}
4.12.6. How to unassign a device from a Static Route Template?#
We unassign device site_003 and its VDOM root from Static Route
Template branches in ADOM root:
REQUEST:
{
"id": 3,
"method": "delete",
"params": [
{
"data": [
{
"name": "site_003",
"vdom": "root"
}
],
"url": "/pm/template/_router_static/adom/root/branches/scope member"
}
],
"session": "6FAQQNLnra/2eZem4NTzSu9IpB0clQ6GaCfhz7D8jag+djcaP8QtRWPP6mK+yKNM7YKARB55V25IR3+eqsF/5JAfIJfXFKmi"
}
RESPONSE:
{
"id": 3,
"result": [
{
"status": {
"code": 0,
"message": "OK"
},
"url": "/pm/template/_router_static/adom/root/branches/scope member"
}
]
}
4.12.7. How to unassign a device group from a Static Route Template?#
We unassign device group branches from Static Route Template branches
in ADOM root:
REQUEST:
{
"id": 3,
"method": "delete",
"params": [
{
"data": [
{
"is group": 1,
"name": "branches"
}
],
"url": "/pm/template/_router_static/adom/root/branches/scope member"
}
],
"session": "NQ8D2CMzoMgvuD3Sztyxrq7n6zW36tkigp7pLkz/ys4yDJOJ5rVLr8FKj2Pbm6e/tqfca0pUlGjqYuDGZ6lQHEDknPh32hLK"
}
RESPONSE:
{
"id": 3,
"result": [
{
"status": {
"code": 0,
"message": "OK"
},
"url": "/pm/template/_router_static/adom/root/branches/scope member"
}
]
}
4.12.8. How to create a Static Route Template from an Import from Device operation?#
Caught in #0976806.
The following example shows how to create the static_route_template_001 by
importing existing static routes (IPv4 and IPv6 ones) from the existing dev_001 managed device and its root VDOM.
The static_route_template_001 Static Route Template will be created in the
demo ADOM:
{
"id": 3,
"method": "clone",
"params": [
{
"data": {
"new url": "/pm/config/adom/demo/template/_router_static/static_route_template_001"
},
"url": "/pm/config/device/dev_001/vdom/root/router/static"
},
{
"data": {
"new url": "/pm/config/adom/demo/template/_router_static/static_route_template_001"
},
"url": "/pm/config/device/dev_001/vdom/root/router/static6"
}
],
"session": "{{session}}"
}
{
"id": 3,
"result": [
{
"status": {
"code": 0,
"message": "OK"
},
"url": "/pm/config/device/dev_001/vdom/root/router/static"
},
{
"status": {
"code": 0,
"message": "OK"
},
"url": "/pm/config/device/dev_001/vdom/root/router/static6"
}
]
}
4.13. Template Group#
4.13.1. How to create a Template Group?#
The following example shows how to create a new Template Group named template_group_001 in the dc_africa ADOM and referencing the following
other templates:
The
cli_template_group_001CLI Template GroupThe
ap_profile_001FortiAP ProfileThe
fsw_template_001FortiSwitch TemplateThe
fext_profile_001FortiExtender ProfileThe
system_template_001System TemplateThe
threat_weight_template_001Threat Weight TemplateThe
ipsec_tunel_template_001IPsec Tunnel TemplateThe
bgp_template_001BGP TemplateThe
static_route_template_001Static Route TemplateThe
sdwan_template_001SD-WAN Template
{
"id": 3,
"method": "add",
"params": [
{
"data": {
"name": "template_group_001",
"template group setting": {
"description": "",
"cliprofs": [
"cli_template_group_001"
],
"wtpprofs": [
"ap_profile_001"
],
"fspprofs": [
"fsw_template_001"
],
"fxtprofs": [
"fext_profile_001"
],
"templates": [
"1__system_template_001",
"3__threat_weight_template_001",
"4-1__ipsec_tunnel_template_001",
"4-1240__bgp_template_001",
"4-2__static_route_template_001",
"5__sdwan_template_001"
]
},
"type": "tmplgrp"
},
"url": "pm/tmplgrp/adom/dc_africa"
}
],
"session": "{{session}}"
}
{
"id": 3,
"result": [
{
"status": {
"code": 0,
"message": "OK"
},
"url": "pm/tmplgrp/adom/dc_africa"
}
]
}
As you can see, some of the used templates can be referenced by just using their
names.
For instance to specify a CLI Template Group (or a CLI Template), you just use
the name of the CLI Template Group like cli_template_group_001.
It is the same logic for when you want to reference an FortiAP Profile, a
FortiSwitch Template or a FortiExtender Profile.
However, in the above example, what’s unusual is the way you specify some of
the used templates in the templates attribute.
For instance to specify the system_template_001 System Template, you have
to use 1__system_template_001.
Here is what you should use to designate such a template:
<key>-[<sub_key>]__<template_name>
where:
keyis the identifier of the template typeFor instance
1for a System Template,3for a Threat Weigth Template,4for an IPsec Tunnel Template, a BGP Template and a Static Route Template, and5for a SD-WAN Templatesub_keyis mostly for when thekeyvalue is4; it helps to specify the exact template typeFor instance,
1for IPsec Tunnel Template,1240for BGP Template and2for Static Route Templatetemplate_nameis the template name
The following table give all the possible key, sub_key collected from
FortiManager 7.4.2:
|
|
Template Type |
|---|---|---|
|
N/A |
System Template |
|
N/A |
Threat Weight Template |
|
|
IPsec Tunnel Template |
|
|
Static Route Template |
|
|
BGP Template |
|
N/A |
SD-WAN Template |
4.13.2. How to assign a Template Group to a Device Group?#
Caught in #0751625.
REQUEST:
{
"id": "64ed853f-1c61-47cb-8581-cefa6742694b",
"method": "update",
"params": [
{
"url": "pm/tmplgrp/adom/vpn_mgmt70",
"data": [
{
"name": "qagr",
"type": "tmplgrp",
"scope member": [
{
"name": "BBY-gr",
"is group": 1
}
],
"template group setting": {
"description": "",
"cliprofs": [
"cli_001"
],
"templates": [
"4-2__staticroute001",
"4-1__55"
]
}
}
]
}
]
}
4.14. How to delete a Template Group?#
To delete the template_group_001 from the dc_africa ADOM:
{
"id": 3,
"method": "delete",
"params": [
{
"url": "pm/tmplgrp/adom/dc_africa/template_group_001"
}
],
"session": "{{session}}"
}
{
"id": 3,
"result": [
{
"status": {
"code": 0,
"message": "OK"
},
"url": "pm/tmplgrp/adom/dc_africa/template_group_001"
}
]
}
4.15. SD-WAN Overlay Template#
4.15.1. How to get the SD-WAN Overlay Templates?#
The following example shows how to get the list of SD-WAN Overlay Template in
the demo ADOM:
{
"id": 3,
"method": "get",
"params": [
{
"url": "/pm/template/_sdwan_overlay/adom/demo"
}
],
"session": "{{session}}",
"verbose": 1
}
{
"id": 3,
"result": [
{
"data": [
{
"name": "sot_001",
"oid": 9728,
"template setting": {
"description": "",
"stype": "_sdwan_overlay",
"widgets": [
"_sdwan_overlay"
]
},
"type": "template"
}
],
"status": {
"code": 0,
"message": "OK"
},
"url": "/pm/template/_sdwan_overlay/adom/demo"
}
]
}
4.15.2. How to delete a SD-WAN Overlay Template?#
The following example shows how to delete the sot_001 SD-WAN Overlay
Template in the demo ADOM:
{
"id": 3,
"method": "delete",
"params": [
{
"url": "/pm/template/_sdwan_overlay/adom/demo/sot_001"
}
],
"session": "Gnl3h+{{session}}"
}
{
"id": 3,
"result": [
{
"status": {
"code": 0,
"message": "OK"
},
"url": "/pm/template/_sdwan_overlay/adom/demo/sot_001"
}
]
}
4.15.3. How to trigger the generation of a SD-WAN Overlay Template?#
Caught in #1162254.
The following example shows how to generate the
sdwan_overlay_orchestration_template_001 SD-WAN Overlay Orchestration
Template in the demo ADOM:
{
"id": 3,
"method": "exec",
"params": [
{
"url": "/pm/config/adom/demo/_sdwan/overlay/orchestration",
"data": {
"template": "sdwan_overlay_orchestration_template_001"
}
}
],
"session": "{{session}}"
}
{
"data": null,
"id": 3,
"status": {
"code": 0,
"message": "OK"
},
"url": "/pm/config/adom/demo/_sdwan/overlay/orchestration"
}
4.16. Fabric Authorization Template#
4.16.1. How to apply a Fabric Authoriztion Template?#
Applying the Fabric Authorization Template to a managed device using the API is similar to using the Generate action from the FortiManager GUI, as shown in the image below:
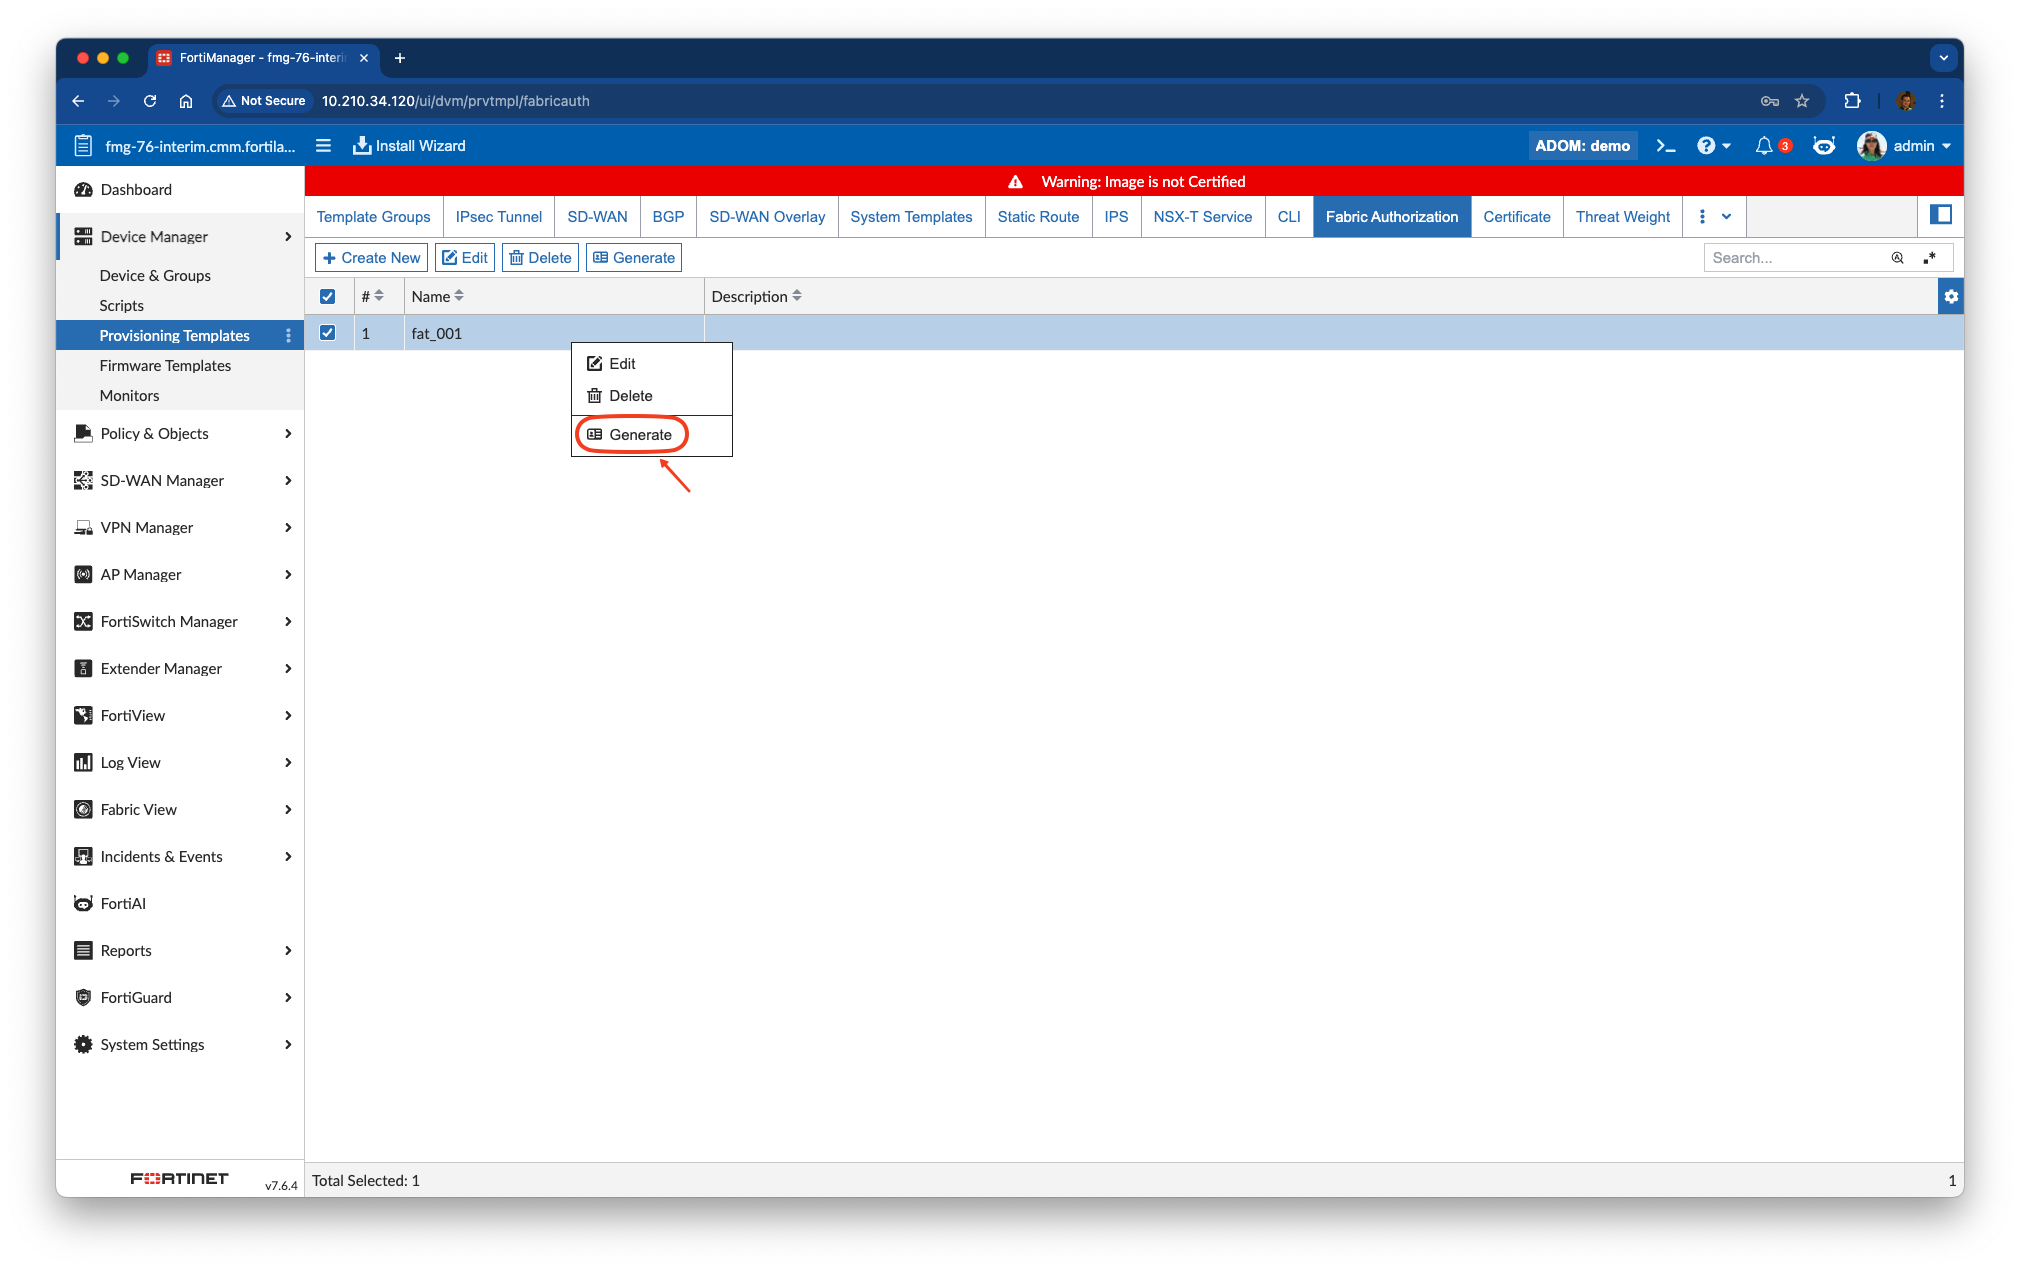
The following example shows how to apply the fat_001 Fabric Authorization
Template to the dev_001 managed device in the demo ADOM:
{
"id": 3,
"method": "exec",
"params": [
{
"data": {
"adom": "demo",
"scope": [
{
"name": "dev_001",
"vdom": "root"
}
],
"template": "fat_001"
},
"url": "/securityconsole/generate/device/controllers"
}
],
"session": "{{session}}"
}
{
"id": 3,
"result": [
{
"data": {
"task": 20
},
"status": {
"code": 0,
"message": "OK"
},
"url": "/securityconsole/generate/device/controllers"
}
]
}
Note
Like with every API calls returning a task ID, you have to monitor the
task status by getting /pm/task/{task} API endpoint.
The generated Lan Edge devices (FortiAP, FortiSwitch or FortiExtender) will be created both in ADOM DB and Device DB.
4.17. Export/import#
Caught in #0767892 - FortiManager 7.0.4/7.2.0.
It is possible to export and import Provisioning Templates, along with other similar objects such as FortiSwitch Templates, FortiAP Profiles, and more.
4.17.1. How to get the list of template which can be exported?#
The following example shows how to get the list of exportable templates:
{
"id": 3,
"method": "exec",
"params": [
{
"data": {
"list_category": "yes"
},
"url": "/deployment/export/template"
}
],
"session": "{{session}}"
}
{
"id": 3,
"result": [
{
"data": {
"category": {
"ap-prof": "AP Profiles",
"bgp-prof": "BGP Templates",
"ble-prof": "Bluetooth Profiles",
"bonjour-prof": "Bonjour Profiles",
"cert-prof": "Certificate Templates",
"cli-prof": "CLI Templates",
"cr-prof": "Threat Weight Templates",
"cst-prof": "NSX-T Service Templates",
"dev-blueprint": "Device Blueprint Templates",
"fext-prof": "FortiExtender Templates",
"ips-prof": "IPS Templates",
"ipsec-prof": "IPsec Tunnel Templates",
"qos-prof": "QoS Profiles",
"route-prof": "Static Route Templates",
"sdwan-overlay-prof": "SD-WAN Overlay Templates",
"sdwan-prof": "SD-WAN Templates",
"switch-prof": "FortiSwitch Templates",
"sys-prof": "System Templates",
"tmplgrp-prof": "Template Groups"
}
},
"status": {
"code": 0,
"message": "OK"
},
"url": "/deployment/export/template"
}
]
}
4.17.2. How to export a selected list of templates?#
The following example shows how to export a selected list of templates:
{
"id": 3,
"method": "exec",
"params": [
{
"data": {
"adom": 162,
"category": [
"ap-prof",
"bgp-prof",
"ble-prof",
"bonjour-prof",
"cert-prof",
"cli-prof",
"cr-prof",
"cst-prof",
"fext-prof",
"ipsec-prof",
"qos-prof",
"route-prof",
"sdwan-prof",
"switch-prof",
"sys-prof"
],
"create_task": "true"
},
"url": "/deployment/export/template"
}
],
"session": "{{session}}"
}
Note
You have to provide the ADOM OID (162 in the above request); it
won’t work if you provide the ADOM name.
{
"id": 3,
"result": [
{
"data": {
"file": "export_template_w1ClUv.json",
"taskid": 68
},
"status": {
"code": 0,
"message": "OK"
},
"url": "/deployment/export/template"
}
]
}
Note
FortiManager returns two things:
The name of file (i.e.,
export_template_w1ClUv.json) containing the exported templates.The task ID (i.e.,
68) that you have to monitor. When the task is complete, you can download the file. See section How to download exported templates file? for downloading the returned file.
Footnotes